This is the third article in the Practical Stimulus series, where we're learning various practical use-cases of Stimulus.js that you'd typically use either plain JavaScript or a single-page application framework like React or Vue.
In this post, we'll build a simple "counter" component to demonstrate the basics of state management, event listening, and DOM targeting, which are bread and butter tasks of front-end web development and the absolute core features of all JavaScript frameworks.
If instead of Stimulus, you'd like to learn how to progressively build a counter using Turbo Drive, Turbo Frames and Turbo Streams, check out the following post:
 Akshay Khot
Start with HTML
Instead of JavaScript, HTML takes the center stage in Stimulus, by representing the state, classes, targets, and event handlers.
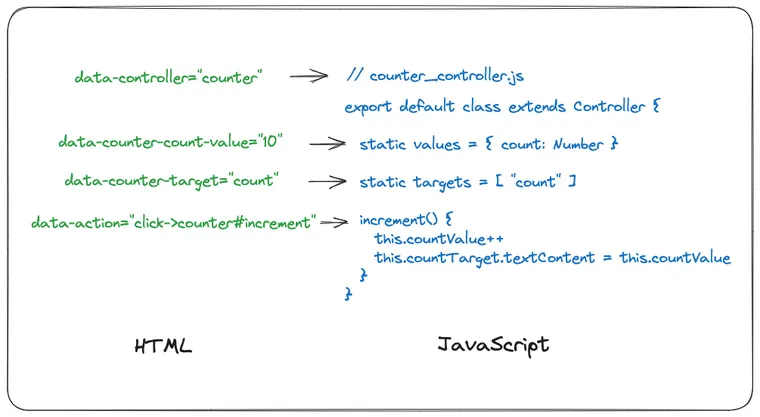
<div data-controller="counter" data-counter-count-value="10">
<div>
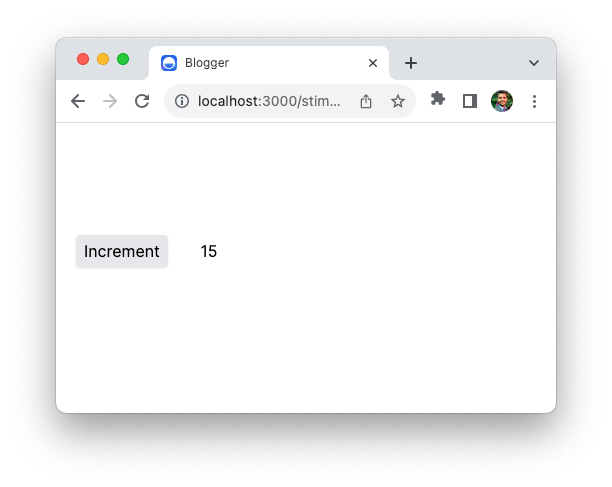
<button data-action="click->counter#increment">Increment</button>
<span data-counter-target="count">10</span>
</div>
</div>We'll learn what each attribute means later. To keep it clean, I've skipped the CSS classes on the HTML.
Make it Dynamic with a Controller
Create a Stimulus controller named counter_controller.js.
rails generate stimulus counter command which will create one for you.// counter_controller.js
import { Controller } from "@hotwired/stimulus"
export default class extends Controller {
static values = { count: Number }
static targets = [ "count" ]
increment() {
this.countValue++
this.countTarget.textContent = this.countValue
}
}That's it, we're done. The counter should be working as expected. Click on the button and watch the number getting incremented.
Let's walk through what's happening here.
Declaring Data
Use the data-{controller}-{name}-value attribute to add state.
<div data-controller="counter" data-counter-count-value="10">Here, we connect our <div> to the counter_controller.js controller. We also define the initial count value to 10. You can access this data in the Stimulus controller using Stimulus Values.
export default class extends Controller {
  static values = { count: Number }

  connect() {
    console.log(this.countValue) // 10
  }
}
So that's how you manage state, by declaring it in the HTML markup and connecting it to the values on the controllers.
Listening For Events
Use the data-action attribute to listen for any event on an element.
<button data-action="click->counter#increment">Increment</button>The attribute value follows the event->controller#action format. In this case, we want to listen for a click event on this button, and then call the increment method on the counter controller. So, we'll use click->counter#increment.
As you'd imagine, you can listen for other events. For example, listening for a mouseenter event would look like this: mouseenter->counter#update. To learn more, check out Stimulus Actions.
When a click event happens, Stimulus will call the associated controller method,. In this case, it's the increment method on counter controller. As you can see, we have direct access to the countValue property declared above.
increment() {
    this.countValue++
}
On the action attribute, you'll often see click is skipped as Stimulus infers it by default. For clarity, I prefer to leave it there.
Reacting to Changes
Use the data-{controller}-target attribute to mark the target of interest.
<span data-counter-target="count"></span>Here, we want to update the contents of this div, so we mark it with data target attribute.
You can access this div element in the controller using Stimulus Targets:
export default class extends Controller {
  static values = { count: Number }
  static targets = [ "count" ]

  connect() {
    console.log(this.countTarget)
  }
}
The only thing remaining is to update the contents of this target when the user clicks the button.
increment() {
  this.countValue++
  this.countTarget.textContent = this.countValue
}
And that's how you can build a simple counter component in Stimulus.
Although the resulting HTML might look intimidating, after working with Stimulus for almost two years I've come to realize that it results in a highly readable, and as a result, maintainable code. Reading the HTML practically tells you what's going on with a set of conventions and you rarely have to refer to the underlying JavaScript to understand the component.
That's a wrap. I hope you liked this article and you learned something new. If you're new to the blog, check out the start here page for a guided tour or browse the full archive to see all the posts I've written so far.
As always, if you have any questions or feedback, didn't understand something, or found a mistake, please leave a comment below or send me an email. I look forward to hearing from you.
If you'd like to receive future articles directly in your email, please subscribe to my blog. If you're already a subscriber, thank you.