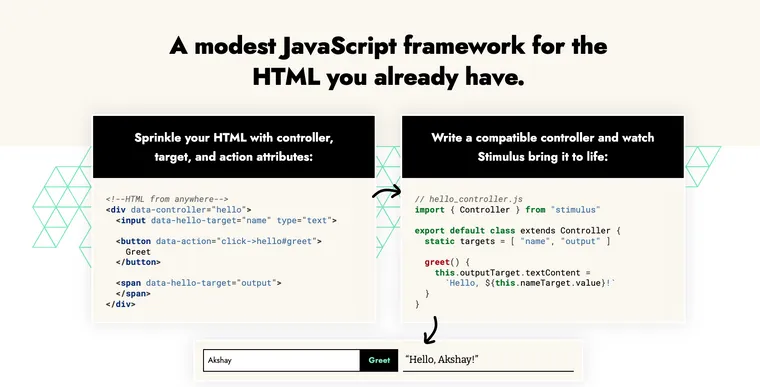
Stimulus is a modest JavaScript framework for the HTML you already have.
Stimulus is part of the Hotwire framework in Rails. After working with it for over a year and a half at my day job, I've really grown to love it. I've found Stimulus makes the HTML code really expressive and keeps it maintainable on large projects, just like Tailwind CSS.
That said, I haven't seen many tutorials and blog posts showing how to do some of the common front-end tasks (capture and store user inputs, toggle classes, show/hide stuff, submit forms, etc.) using Stimulus. If you know any good ones, please share them in the comments below.
Anyway, I've decided to write a series of articles that show how you can use Stimulus for various practical scenarios that you'd typically use either plain JavaScript or a SPA framework like React of Vue. If you want to try Stimulus in your projects but don't know whether it will be a good fit, you'll find this series useful.
In the first article in this series, we'll learn how you can capture user input with Stimulus and display it on the screen. In the process, we'll also learn some of the fundamental concepts in Stimulus such as controllers, targets, and actions.
Here's what the working feature looks like:
First, we'll build it using plain JavaScript, so we can compare the two approaches.
Plain JavaScript Implementation
Let's create a basic form as follows:
<div id="blog">
  <input id="title" type="text" />

  <p id="title-holder"></p>
</div>
We want to grab the text the user types into the text input box and put it into the title holder <p> element. To accomplish this using plain JavaScript, you might write the following code.
const titleInput = document.getElementById("title")

titleInput.addEventListener("keyup", () => {
  const titleHolder = document.getElementById("title-holder")
  titleHolder.textContent = titleInput.value
})
Plain and simple. Now let's see how you'd implement this feature in Stimulus.
Step 1: Wrap HTML in a Controller Data Attribute
Controllers bring HTML to life.
The first step is to wrap the parent <div> element within a Stimulus controller.
Stimulus continuously monitors the page waiting for HTML data-controller attributes to appear. For each controller attribute, Stimulus looks at the attribute’s value (e.g. blog) to find a corresponding controller class (e.g. blog_controller.js), creates a new instance of that class, and connects it to the element.
<div id="blog" data-controller="blog">
  ...
</div>
Paired with Hotwire, where you render HTML from the server, Stimulus works like magic. Once your server-generated response is added to the DOM, using the Mutation Observer API, Stimulus kicks in and finds the controller/target elements and attaches event handlers, etc..
Step 2: Create a Stimulus Controller
The controller class is where you put the JavaScript logic. Let's generate a Stimulus controller using the Rails generator command:
➜ bin/rails generate stimulus blog
    create  app/javascript/controllers/blog_controller.js
This will generate the following controller in the javascript/controllers directory. Within a Stimulus Controller class, you can access the HTML element with the this.element property, among others.
import { Controller } from "@hotwired/stimulus"

// Connects to data-controller="blog"
export default class extends Controller {
  connect() {
    console.log(this.element) // div#blog element
  }
}
Controllers are the basic organizational unit in Stimulus. They restrict the scope of the component and provide a nice object-oriented structure for your front-end logic.
Step 3: Identify Elements with Targets
Targets map important elements to controller properties.
The next step is to identify the elements of interest using targets in Stimulus. Targets let you reference important elements by name, instead of an ID or a class name. In our example, we want to identify the input element and the paragraph tag.
<div id="blog" data-controller="blog">
  <input type="text" data-blog-target="formInput" />

  <p data-blog-target="titleHolder"></p>
</div>
Now you can access these elements in the controller as this.formInputTarget and this.titleHolderTarget. You do have to declare them in a static targets array first.
import { Controller } from "@hotwired/stimulus"

// Connects to data-controller="blog"
export default class extends Controller {
  static targets = [ "formInput", "titleHolder" ]

  connect() {
    console.log(this.titleHolderTarget)
    console.log(this.formInputTarget.value)
  }
}
Now you might be wondering what's wrong with identifying elements using class names, something we've been doing for years. Well, there're a few issues with them.
First, it makes your code brittle, tightly coupling the class name to the HTML element. This is especially problematic when you're using a CSS framework like Tailwind CSS or BEM, where your class names dictate the design. Second, using class names as identifiers restricts your designers from freely modifying the class names as they want.
Using data attributes, on the other hand, frees you to identify the elements with their logical name, e.g. titleHolder, and the designers are free to modify the classes to their heart's content, without breaking the JavaScript code.
Step 4: Use Actions to Attach Events
Actions use conventions to attach and listen to DOM events.
Next, we'll hook the keyup event on the input element using Stimulus Actions. This is how you handle DOM events in the controllers, instead of manually writing code to add event handlers.
So our final HTML looks like this:
<div id="blog" data-controller="blog">
  <input type="text"
          data-action="keyup->blog#update"
          data-blog-target="formInput" />

  <p data-blog-target="titleHolder"></p>
</div>
The data-action value keyup->blog#update uses the following conventions:
keyupis the name of the DOM event to listen forblogis the controller identifierupdateis the name of the method to invoke
A huge benefit of writing events using actions is that the HTML code tells you what's going on. Just by reading HTML, you know that when you click this button or type something in the input, it's going to call this method on that controller. No more searching for event handlers that are defined in some unrelated JavaScript code.
Another benefit of actions is that just like targets, actions can be generic and can be moved around. So if you have an action on a button and you move it to a link, or an input element, the controller need not change, because it doesn't care about what type of element called its functions. This makes your controllers extremely reusable.
P.S. If you're a fan of Rails tag helpers, you can also write:
<div id="blog" data-controller="blog">
  <%= tag.input type: "text",
                data: {
                  action: "keyup->blog#update",
                  blog_target: "formInput"
                } %>

  <%= tag.p data: { blog_target: "titleHolder" },
            class: "mt-5 py-3 font-bold text-xl" %>
</div>
Rails will automatically convert the underscore in blog_target to a hyphen in the generated HTML, i.e. data-blog-target. Pretty cool.
Finally, in the Stimulus controller, we'll create the event handler method which updates the title holder with the user input.
import { Controller } from "@hotwired/stimulus"

// Connects to data-controller="blog"
export default class extends Controller {
  static targets = [ "formInput", "titleHolder" ]

  update() {
    this.titleHolderTarget.textContent = this.formInputTarget.value
  }
}
At first glance, the Stimulus version might feel clunky and verbose with all the data attributes. I agree and admit I had the same reaction when 37signals released Stimulus a few years ago. If you just compare the plain simple JavaScript code at the start of this post to its Stimulus version, this example looks silly.
However, on larger projects, Stimulus works like magic and significantly reduces the conceptual overhead when you're reading the code, which I find myself doing the majority of the time. You'll have to trust me on that. Similar to Tailwind CSS, it makes your HTML expressive and readable, even if it might not feel like it at first.
Once you understand the few conventions and get muscle memory, it feels effortless to add controllers, targets, and actions. Finally, by just reading the HTML, you'll have a pretty good understanding of what the code is doing without having to hunt around for JavaScript.
Here's a CodePen that shows a working example:
See the Pen Untitled by Akshay Khot (@akshay03) on CodePen.
Conclusion
As mentioned at the beginning of the post, I am really enjoying working with Stimulus. There isn’t a lot to learn, and new developers joining the team have gotten comfortable with it pretty quickly, compared to the steep learning curve with so many contemporary SPA frameworks.
I highly recommend you try Stimulus, even if you don't plan to use it in a real-world project, just out of pure curiosity. I bet you won't be disappointed.
Further Reading:
I hope you liked this article and you learned something new.
As always, if you have any questions or feedback, didn't understand something, or found a mistake, please leave a comment below or send me an email. I look forward to hearing from you.
If you'd like to receive future articles directly in your email, please subscribe to my blog. If you're already a subscriber, thank you.