First things first: it's Zeitwerk, not Zeitwork. For some reason, I always thought it was Zeitwork. It was only when I tried to install the gem I noticed the typo. Luckily, there's no such gem called Zeitwork.
This is the next post in the series on building a web application in Ruby without Rails, where we'll use the Zeitwerk gem to load our dependencies without explicitly requiring them.
In Rails, you don't have to require classes and modules in advance. Somehow, they're just available to use right when you need them. This is all thanks to Zeitwerk, which is written by Xavier Noria, member of the Rails core team.
Now, you can enjoy the benefits of Zeitwerk without really understanding what it is or how it works, but it's good to know how to use it outside Rails to get the benefits it provides in your Ruby projects. For example, the new mrsk gem uses Zeitwerk internally to load its dependencies.
Note: In a future article that's fully dedicated to Zeitwerk, we'll try to figure out how it really works by reading the source code. This article only shows how to use it outside Rails.
Here's the list of topics we'll cover in this article:
- Introducing models to our no-rails app
- Using Zeitwerk to load classes and modules
- Bonus: How Rails Configures Zeitwerk
Before digging into Zeitwerk, let's first try to understand the problem it's solving. We'll do this by introducing the concept of models in our Ruby web application and then loading them with Zeitwerk.
If you haven't been following the rails-companion series where we build a web application in Ruby without using Rails, the following code won't make much sense, but bear with me. It's very simple Ruby code, and we'll get to Zeitwerk very soon. Or you can directly jump to the Zeitwerk section.
Let's revisit the controller class we added in the previous article on controllers.
# controllers/articles_controller.rb

require_relative 'application_controller'

class ArticlesController < ApplicationController
  def index
    @title = 'All Articles'
  end
end
The @title instance variable is accessed in the ERB view as follows:
<%# views/articles/index.html.erb %>

<h1>
  <%= @title %>
</h1>
This works fine, but as the data we want to display gets complicated in size and shape, it doesn't make sense to store it in separate variables. For example, suppose we want to display a post, with its title and body. With separate variables, you might write this:
# controllers/articles_controller.rb

require_relative 'application_controller'

class ArticlesController < ApplicationController
  def index
    @title = 'All Articles'

    @post_title = 'post title'
    @post_body  = 'post body'
  end
end
A better way to organize this data is to group the related variables together and encapsulate them inside proper Ruby objects, also called models in the Rails. For example, the above properties could be moved to a Post class.
The benefit of models is that you can move the common operations on the data to the objects methods, and it keeps your controllers nice and clean. Models also provide a place to keep all your business logic together, separate from the view or controller's logic.
Introducing Models to Our No-Rails App
Let's create a new model called Article, which is just a plain Ruby class. For this, we'll first create a new directory weby/models and add a article.rb file in it.
# models/article.rb

class Article
  attr_reader :title, :body

  def initialize(title, body)
    @title = title
    @body = body
  end
end
Next, I'll update the controller so it creates an instance of Article model, passing the title and body properties. Although they're hard-coded for now, we'll fetch them from the database in a future post.
# controllers/articles_controller.rb
require_relative 'application_controller'
require_relative '../models/article'
class ArticlesController < ApplicationController
def index
@title = 'All Articles'
@article = Article.new 'Ruby no Rails', 'Let\'s build a web application in Ruby, without Rails!'
end
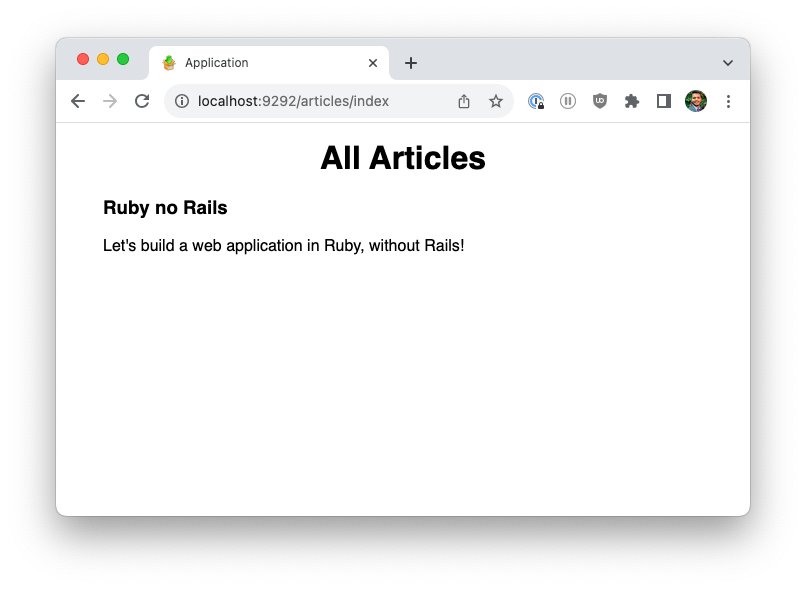
endFinally, update the index.html.erb template to display the article's title and body. Since the @article object is included in the current binding, the template can access it without any problem.
<%# views/articles/index.html.erb %>

<main>
  <h1 style="text-align: center;">
    <%= @title %>
  </h1>
  <div>
    <h3>
      <%= @article.title %>
    </h3>
    <p>
      <%= @article.body %>
    </p>
  </div>
</main>
Launch the app, and you should see this page.
Now we could stop here, but all those require_relative statements are bugging me. Wouldn't it be nice if we could just use a class or module name, and our app would load it automatically?
This is where Zeitwerk enters the picture. Let's use Zeitwerk to autoload the constants and get rid of all the require statements.
Using Zeitwerk to Load Constants (Classes and Modules)
To load all the dependencies like classes and modules without explicitly requiring them, we'll use Zeitwerk. In the weby directory, run the following command:
bundle add zeitwerkNext, require the gem in the app.rb file.
# app.rb
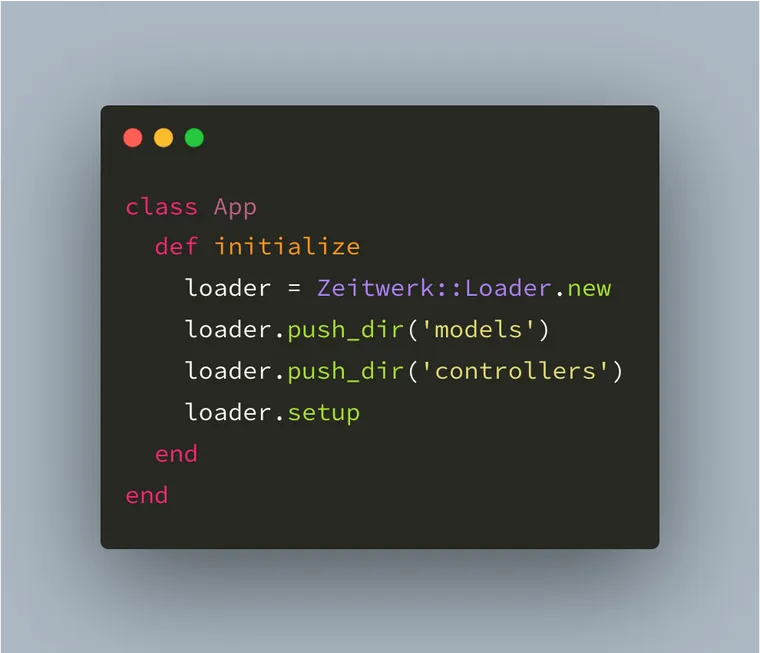
require 'zeitwerk'Finally, in the application constructor, add the directories where you want to look for constants. I'll add the models and controllers directories, so that Zeitwerk loads the model and controller classes automatically.
# app.rb

class App
  def initialize
    loader = Zeitwerk::Loader.new
    loader.push_dir('models')
    loader.push_dir('controllers')
    loader.setup
  end
end
P.S. The push_dir method pushes the directory to the list of root directories.
Now, remove the require_relative statements from the articles_controller.rb and router.rb file that load controllers and models.
Restart the application, and everything works just fine.
Out of the box, Zeitwerk uses String#camelize naming conventions for file names. For example, it expects that a class named UsersController is defined in a file named users_controller.rb, because:
"users_controller".camelize # => UsersControllermodels branch.How Rails Configures Zeitwerk
If you're curious how Rails uses and configures Zeitwerk, here's a highly simplified version of the Rails codebase that does what we just did.
The Autoloaders class sets up a Zeitwerk loader. The autoload paths are managed by the Rails.autoloaders.main autoloader.
# railties/lib/rails/autoloaders.rb

module Rails
  class Autoloaders
    def initialize
      require "zeitwerk"

      @main = Zeitwerk::Loader.new
    end
  end
end
The Finisher module adds an initializer that adds the configured directories to the Zeitwerk loader.
# railties/lib/rails/application/finisher.rb

module Rails
  class Application
    module Finisher
      initializer :setup_main_autoloader do
        autoloader = Rails.autoloaders.main

        autoload_paths.uniq.each do |path|
          autoloader.push_dir(path)
        end

        autoloader.setup
      end
    end
  end
end
Don't worry if it doesn't make sense. It was just a taste of what's to come. In a future post, we'll do a deep-dive into the Zeitwerk codebase to learn how it works, and also explore the Rails codebase to understand how it integrates Zeitwerk.
That's a wrap. I hope you liked this article and you learned something new. If you're new to the blog, check out the full archive to see all the posts I've written so far or the favorites page for the most popular articles on this blog.
As always, if you have any questions or feedback, didn't understand something, or found a mistake, please leave a comment below or send me an email. I look forward to hearing from you.
If you'd like to receive future articles directly in your email, please subscribe to my blog. If you're already a subscriber, thank you.