
Do you ever get the feeling that you know a topic is important and that you should know well, but you only understand it superficially? Ever since I got into Rails, I've had that feeling with the Rails router.
Transitioning from ASP.NET, I knew the concept of routing and got comfortable with the router after reading the docs. However, at the back of my mind, I've always had that nagging feeling that I don't REALLY understand the complete picture. I could make the basic routes and resources to get by for the simple CRUD tasks, but whenever I wanted to do something complicated, I found myself fumbling in dark.
Well, after over a year of fumbling and trying to skim the docs and StackOverflow to just learn enough to get by, I decided to dig deeper and REALLY understand how Routing works in Rails.
I've tried to summarize everything I learned in this one giant article. It's over 5,000 words, so don't expect to finish it in one sitting. However, if you can stick through it and read it till the end, I can pretty much guarantee that you'll have a much better understanding of how routing works in Rails. You'll also learn a few nice tips and tricks to clean up and simplify your existing routes right away.
Sounds interesting? Let's get started. Here's what we'll learn:
What You'll Learn:
- What is Routing?
- Routing in Rails
- Digging Deeper: Router Internals
- A Short Detour: the
instance_execMethod - The
matchMethod and its Options - HTTP Method Shorthands
- Understanding the Segment Keys
- The Magic of Named Routes
- Resourceful Routes
- Non-Resourceful Custom Routes
We'll start with the basics, by understanding the purpose of routing in web applications and the role of the Rails router. Then we'll open the hood (i.e. the Rails codebase) and take a peek behind the scenes to understand how Rails implements the routing mechanism.
Then, we'll learn about the match method, which forms the core of most of the routing shorthand methods in Rails, such as get, post, etc. It leads us into covering a few fundamental routing topics such as segment keys and named routes.
Once we've learned the fundamentals, we'll be ready to tackle the practical routing topics, which you'll use day-to-day in your Rails apps. They include the concept of resources and RESTful routes, which drastically reduce the amount of code you write by following convention-over-configuration. We'll wrap up by learning the syntactic sugar provided by router to make it easy to create more expressive routes.
As it goes with all the posts on this blog, I'm writing to clarify my understanding and act as a reference for the future me, but I really hope that you, the reader, find my writing useful in gaining a deeper understanding of the router.
There's a little metaprogramming involved along the way, but don't worry, it's actually very simple to understand. If you need a quick primer on metaprogramming, check out my notes on the Metaprogramming Ruby book.
 Akshay Khot
Alright, enough talk. Let's get started. We've got a lot of ground to cover.
What is Routing?
Before answering that, let me ask another question: What happens when someone visits your application? To keep things simple, let's ignore the load balancers, web servers, proxy servers, etc. and just assume the request hits your Rails application server.
What happens when that request reaches your application?
The very first thing that needs to happen is Rails needs to figure out which part of your codebase it should send (or route) that request to, so you can return a meaningful response to the browser. And here lies the answer to the question: What is Routing?
In simple terms,
Routing is the process that determines what code in your application needs to run based on the URL of the incoming request.
Router is one of the first components to run when an HTTP request hits your application. It inspects the incoming URL and directs it to the appropriate Ruby code. Typically, this code will be an action method inside a Rails controller.
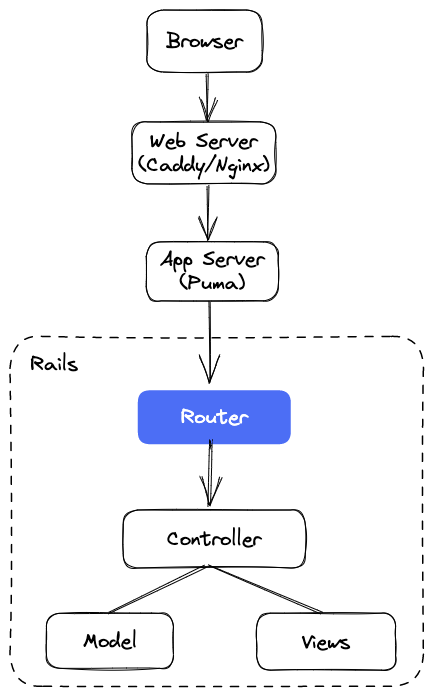
As you can see, the router is the first point of contact for a request inside your Rails application.
After inspecting the URL, the router decides to either:
- forward the request to a controller action
- redirect the request to another URL inside your application, or even to an external website or application
- filter and reject the request based on pre-defined constraints or conditions, e.g. if the user is not logged in, then do not show the
/adminpage.
If the router can't find a route that matches the incoming request, it throws an error.
You can think of the router as a black box with a clear input and an output. Upon receiving the incoming HTTP request URL as an input, the router outputs the controller action where that request must be dispatched.

However, the router serves a dual purpose in Rails. In addition to routing the incoming request to a controller action, it can also dynamically generate the URLs for you, so you don't need to hard-code string URLs throughout your app. Not only this approach is more maintainable, it also reads well and makes your codebase more expressive. We'll explore the named routes in a later section of this post.
Now that you know what routing is, let's try to understand how routing works in the Rails framework.
Routing in Rails
When you create a new Rails application, the application generator creates a config/routes.rb file which contains all the routes for your application. This gives a central place to look for all the paths and pages supported by your application.
To configure the router, you add specific rules (called routes) in the routes.rb file. These routes tell the router how to map incoming URLs to specific controller actions.
When a request on a specific URL endpoint arrives (e.g. app.com/pages), the router first finds the route which matches the URL pattern (pages). It does this by going through the routes in the order they're defined in the routes.rb file. As soon as it finds a matching route, the search ends. Each route has a corresponding controller#action method associated with it which gets called to generate the response HTML for that request.
The most basic way to define routes in Rails is to use the match method. For example, the following route instructs Rails to direct any POST request with the URL posts/publish to the publish action method on the PostsController class.
match "posts/publish/:id", controller: "posts", action: "publish", as: "publish", via: :postNote: If you were expecting to see a shorthand route likeget posts/publish => posts#publish, I'm intentionally taking the difficult and longer route (no pun intended!) with thematchmethod, as it will give you a deeper and better understanding of routing.
This single route contains multiple components that we'll examine in this post.
- the incoming URL
pathto match:posts/publish - which controller and action this request should be routed to, i.e. the
publishaction onPostsControllerclass - the name for this route:
publish, it generates URL helpers namedpublish_urlandpublish_paththat you can use in your code. - HTTP verb this route corresponds to
:post - segment key
:idwhich acts as a variable placeholder for the ID of the post.
As you can see, the router offers a rich domain-specific language (DSL) to express a lot of information with a concise syntax. And this is still a long-form version that you'll rarely use!!
As you'll soon learn, Rails uses convention-over-configuration to even shorten the above route without affecting its expressiveness.
For example, the above route could be simplified to:
post "posts/publish/:id" => "posts#publish", as: "publish"And it keeps getting better.
So that was a brief introduction to the routing process and the Rails router. Now let's inspect the internals of the router to understand what's going on behind the scenes. Trust me, this will be really useful as you learn more advanced features of the router later in the article.
Digging Deeper: Router Internals
In this section, we'll explore how Rails implements the beautiful routing DSL behind the scenes. This is going to be a bit technical, but nothing too complex.
Let's revisit the config/routes.rb file we saw earlier.
When you create a new Rails app, it automatically creates a /routes.rb file in the config directory. All it contains is a single call to the draw method on the object returned by the Rails.application.routes method. Additionally, it takes a block containing the routes for your application.
Rails.application.routes.draw do
  # application routes go here...
end
To understand how the above method works, we need to take a short detour and understand Ruby's instance_exec method defined on the BasicObject class.
Understanding How instance_exec Works
The instance_exec method takes a block and runs that block in the context of the object on which it's called. Inside the block, it sets self to that object, so you can access its instance variables and methods.
class Company
  def initialize(name, product)
    @name = name
    @product = product
  end

  def info
    "#{@name}: #{@product}"
  end
end

microsoft = Company.new 'Microsoft', 'Excel'

microsoft.instance_exec do
  puts info    # access instance method
  puts @name   # access instance variable
end

# Output:

# Microsoft: Excel
# Microsoft
You might wonder what's the purpose of using instance_exec when you can just call the method directly on microsoft. You are, of course, right in this example, but, as we'll soon see, the most important benefit of instance_exec method is that it allows you to pass a block and run it later in the context of an object. This is really useful technique for creating special-purpose DSLs.
Not sure what I mean? let's revisit the routes.rb file.
Rails.application.routes.draw do
end
The Rails.application is an instance of the Application class which inherits from the Engine class. The Engine class has a routes method which returns an instance of the RouteSet class.
# railties/lib/rails/engine.rb

def routes(&block)
  @routes ||= ActionDispatch::Routing::RouteSet.new_with_config(config)

  # ...

  @routes
end
It means that the block passed to the draw method in the routes.rb file is ultimately received by the draw method on the RouteSet class. This method passes that block to the eval_block method, as seen below.
# actionpack/lib/action_dispatch/routing/route_set.rb

def draw(&block)
  # ...
  eval_block(block)
  # ...
end

def eval_block(block)
  mapper = Mapper.new(self)

  mapper.instance_exec(&block)
end
As you can see, the eval_block method first creates an instance of the ActionDispatch::Routing::Mapper class and executes the block within the context of that instance.
What it means, is that any code we write inside the block passed to the Rails.application.routes.draw method will be evaluated as if it was written inside the Mapper class.
For example, the two pieces of code below are similar. However, the first version just reads better. It feels like a programming language specifically designed for the routing domain.
Rails.application.routes.draw do
  root 'application#index'
  get 'posts/publish', to: 'posts#publish'
end

# is similar to

routes = ActionDispatch::Routing::RouteSet.new
mapper = Mapper.new(routes)
mapper.root 'application#index'
mapper.get 'posts/publish', to: 'posts#publish'
This also means that whenever you see a method in your routes file, you know where to look for its definition. It's the ActionDispatch::Routing::Mapper class and its included modules. For example, the commonly used get method is defined in the Mapper::HttpHelpers module.
def get(*args, &block)
  map_method(:get, args, &block)
end
This gives us a solid base to explore the Rails Routing API. We'll start our investigation with the match method.
The match Method
In this section, we will explore how thematchmethod works behind the scenes. Once you really understand thematchmethod and its options, the rest of the routing methods and shorthands become very easy to understand.
To understand the Rails Router API, it's essential to learn the match method, which forms the core of the Router DSL. All helper methods like get and post use match under the hood. Additionally, most of the shorthand syntax such as scopes and constraints use the options provided by match behind the scenes.
Here's the basic API of the match method, which is defined inside the Mapper class.
match(path, options)The first parameter path tells the router what URL pattern you wish to match. It can be either a String or a Hash.
- The string version specifies the URL pattern, e.g.
/posts/publish/:id - The hash matches the URL pattern to a
controller#actionpair, like'/posts/1' => 'posts#show'.
The second parameter options is a hash containing additional data required by the router to decide where it should redirect this request. You can also pass any custom data, which gets passed to the params hash accessible in the controllers.
In its simplest and most explicit form, you supply a string URL pattern along with the name of the controller and the action via options.
match 'photos/:id', controller: 'photos', action: 'show', via: :getIf you don't want to pass them separately, a string in the form of controller#action is also allowed with the :to option.
match 'photos/:id', to: 'photos#show', via: :getFinally, the hash version even simplifies this:
match 'photos/:id' => 'photos#show', via: :getAs we'll learn later, you'll often use shortcuts like get and post instead of directly using the match method. However, match comes in handy when you want to match a route for multiple HTTP verbs.
match 'photos/:id', to: 'photos#handle', via: [:get, :post]Note: the :via option is mandatory for security-related reasons. If you don't pass it, the router raises an ArgumentError.
Options Available to Match
The options hash helps the router identify the action to which it should pass the incoming request. Here are some of the important options that you can provide to the match method.
params hash, which you can access in the controllers, using the params hash.:controller and :action
The controller and action keys are used together. They specify the name of the controller and the action you want to route this request to.
match 'home', controller: 'application', action: 'home', via: :get:to
If you don't want to pass the controller and action separately, the :to option lets you pass the controller#action as a string.
match 'home', to: 'application#home', via: :getNote: You're not restricted to using only controller actions for incoming requests. The :to option also allows you to point to a Rack endpoint, i.e. any object that responds to a call method. This is really useful for quickly testing routes without creating new controllers, actions, and views.
match 'path', to: -> (env) { [200, {}, ["Success!"]] }, via: :get
match 'path', to: RackApp, via: :get
If you're curious to learn more about Rack, check out this article:
Akshay Khot
via
Lists the HTTP verb for this route. You have to pass at least one HTTP verb, for security-related reasons.
match 'path', to: 'controller#action', via: :get
match 'path', to: 'controller#action', via: [:get, :post]
match 'path', to: 'controller#action', via: :all
module
Use this if you want namespaced controllers. The following route directs the request with /posts URL to Blog::PostsController#index action.
match '/posts', module: 'blog', controller: 'posts', action: 'index', via: :getas
This option provides the name for the generated URL helpers. The following route creates the helpers named blog_path and blog_url.
match 'posts', to: 'posts#index', as: 'blog', via: :getconstraints
If you want to put more restrictions on what URL patterns a route should match, provide this option with a hash of regular expressions. It can also take an object responding to matches?.
match 'path/:id', constraints: { id: /[A-Z]\d{5}/ }, via: :getdefaults
Sets the default value for a parameter. The following route will set the value of params[:author] to 'Akshay'.
match '/courses/publish(/:author)', to: 'courses#publish', defaults: { author: 'Akshay' }, via: :getFor a complete list of options, check out the API docs for the match method. Most of the routing methods you'll use are just shorthands using various combinations of the match method's options.
Next, we'll learn about the shortcuts Rails provides, so you don't need to use the common options such as :via, :module, etc. all the time.
HTTP Method Shorthands
So far, we've been using the match method, passing the HTTP verbs like :get and :post with the :via option. Can we do better? 🧐
YES! As you may already know, Rails provides simplified shorthand methods like get and post which implicitly assume the HTTP verb, inferred from the method name. For example, the following three routes mean the same thing.
match 'posts', to: 'posts#index', via: :get

# ==

get 'posts', to: 'posts#index'

# OR

get 'posts' => 'posts#index'
There is a method for each HTTP verb.
getpostpatchandputdeleteoptions
All of them accept the exact same options that we saw for the match method. For the remaining post, I'll use the above shorthands instead of the more explicit match method, unless needed.
Next, we'll learn another fundamental topic in routing, segment keys.
Segment Keys
So far, we've seen route paths such as posts/:id. If you're new to routing, you might be wondering why there are symbols inside the URL. These symbol-like terms are called segment keys, which make your URLs dynamic.
Making a URL dynamic? What does that even mean? 🤔
It means that they allow the router to match both posts/1, posts/2 and posts/n, where n can be anything.
Instead of hard-coding a URL which matches exactly one URL, segment keys allow you to match more than one URL. You can access the values of those keys in the params hash, e.g. params[:id].
Here's a segment key named :slug which lets you refer posts by their logical, dasherized name, i.e. ruby-on-rails.
get '/posts/:slug', to: 'posts#show'
When you make a GET request to the URL matching the above route, e.g. /posts/understanding-router, Rails sets params[:slug] to understanding-router. You can access the slug value inside the controller.
class PostsController < ApplicationController
  def show
    @post = Post.find_by(slug: params[:slug])
  end
end
Note: If you use segment keys in a route, you have to provide their values when generating the URLs with the Rails helpers.
<%= link_to 'Understanding Rails', controller: 'posts', action: 'show', slug: 'understanding-rails' %>But what if some of my URLs don't need a segment key?
You can mark a segment key as optional by wrapping it in parentheses. The following route matches both /posts/understanding-rails and posts.
get '/posts(/:slug)', to: 'posts#show'That's nice, but how can I restrict the slugs to only be text and not numbers?
This is where the constraints option that we saw earlier, comes into the picture. You can add restrictions on the segment keys by providing a constraint.
The following route matches only those URLs where slug is a word consisting of letters between a to z.
get '/posts/:slug', to: 'posts#show', constraints: { slug: /[a-z]+/ }

# or you can also use a shorthand
get '/posts/:slug', to: 'posts#show', slug: /[a-z]+/
But I also want to access the request object...
For more powerful constraints, you can pass a lambda to :constraints which receives the request object.
get '/posts/:slug', to: 'posts#show', constraints: ->(req) { req.params[:slug].length < 10 }But, my constraint logic is too complicated, and I hate putting it right there inside the route...
Rails allows you to extract the complex logic to a class that has a matches(request) method on it. Put that class inside the app/constraints directory, and Rails will pick it up without a hitch.
get '/posts/:slug', to: 'posts#show', constraints: SlugLength.new

# app/constraints/slug_length.rb
class SlugLength
  def matches?(request)
    request.params[:slug].length < 5
  end
end
Don't forget to return a boolean result from the method, depending on whether the URL matches the pattern.
Alright, that's enough about the segment keys. Next, we'll tackle the named routes, which give you sweet helper methods to generate the URLs on the fly.
Named Routes
So far, we have seen only one responsibility of the router: take an incoming HTTP request and route it to the piece of code (controller#action) that handles it.
- Input: HTTP Request URL
- Output: Controller and Action
However, the Rails router works in the reverse way, as well. Given the route name (along with the corresponding data or model), the router can generate the resulting URL.
Consider the following route.
get 'post/:id', to: 'posts#show'When you make a request to post/10, the router invokes the show action on the PostsController class.
What if you want to link to a post? How would you go about creating the URL?
Well, the simplest solution is to interpolate it, passing the post id.
link_to post.title, "/post/#{post.id}"But hard-coding URLs into your application is not always a good idea. When your URL changes, you'll have to search the whole codebase to find and replace the old URLs. If you miss one, your code won't complain until the users click the link, only to be shown an error page.
To fix this, you could provide the controller and action name along with the post id, so Rails could infer the URL.
link_to post.title, controller: 'posts', action: 'show', id: post.idHowever, there's an even better way with the named routes, where you can name a route by providing the :as option.
When you name a route, Rails will automatically generate helper methods to generate URLs for that route. These methods are called name_url or name_path, where name is the value you gave to the :as option.
Let's rewrite the above route and give it a name.
match '/post/:id', to: 'posts#show', as: 'article'The router creates two methods named: article_path and article_url. The difference between the two methods is that article_path returns only the path portion of the URL, whereas article_url returns the complete URL, which includes the protocol and domain.
article_path(4) -> `/posts/4`
article_url(4)  -> `https://blog.com/posts/4` or `https://localhost:3000/posts/4`
Once you have named a route, you can use it as follows:
link_to post.title, article_path(id: post.id)It's less code to write, and it also avoids the problem of hard-coding the URL.
In fact, we can skip the id key, and just pass its value.
link_to post.title, article_path(post.id)We can go even further. Rails allows you to pass any object to the named helper methods as long as those objects have a to_param method on it.
class Question
  def to_param
    '100'
  end
end

article_path(Question.new) # '/post/100'
What's more, all the active record objects have a to_param method out of box, which returns the object's id (you can customize this).
link_to post.title, article_path(post)This version is more readable, concise, and also avoids the problem of hard-coded URLs.
Pretty cool, right?
Now we're going to tackle one of the most practical concepts in routing that you'll use every day on your Rails apps: resources.
Resourceful Routes
resources declares seven routes for index, show, new, create, edit, update, and destroy actions. In addition to having multiple resources, there's also a singular form of resourceful routes. It represents a resource that only has one, single form. For example, a logged-in user's profile.
The concept of resources is very powerful in Rails. With a single call to a method named resources, Rails will generate seven different routes for you, saving you a lot of typing. But saving a few keystrokes is just the cherry on top. The biggest benefit of using resourceful routing is that it provides a nice organizational structure for your application. Let's learn how.
What's a Resource?
A resource, like an object, is one of those concepts that's difficult to put into words. You intuitively understand them, but you can't express them.
I'll stick to how Roy Fielding, the inventor of REST, defined them in his dissertation.
A resource R is a temporally varying membership function MR(t), which for time t maps to a set of entities, or values, which are equivalent.
Is your head spinning? 🤯 Mine too. Let's try the other definition he gives in the same section.
A resource is the key abstraction of information. Any information that can be named can be a resource.
Much better, right? 💡 I think that definition captures the essence of resources really well.
Any concept in your application domain can be a resource: an article, a course, or an image. It doesn't have to be a physical entity, but can be an abstract concept such as a weather forecast or an SSH connection to connect to a remote server.
The main point is: you have total freedom in choosing whatever idea you are using in your application as a resource.
But Why do I need a Resource?
Good question. You might be wondering what this discussion of resources has to do with routing. Well, resources are fundamental to routing. They allow you to reduce seven different routes into a single method call.
If you've used any software application, you must have noticed that most apps have a few common patterns. Most of the time, you're:
- Creating some data (publishing a post, uploading an image)
- Reading that data (viewing the tweets, listening to podcasts)
- Updating the data (changing source code on GitHub, editing the post)
- Deleting the data (removing a folder from Dropbox, deleting your profile picture)
No matter how fancy your application is, I guarantee it will have some form of these four actions that your users can take. Collectively, they're called CRUD which stands for Create, Read, Update, and Delete.
For each of these actions, your application should have a route. Assuming you're building a course platform, your routes file might have the following routes.
post   'courses'      => 'courses#create'
get    'course'       => 'course#show'
patch  'courses/:id'  => 'courses#update'
delete 'courses/:id'  => 'courses#destroy'
In addition to these four routes, you'll typically have three more:
- one to see all the courses
- two to fetch the pages that let the users create and modify the courses.
get 'courses'          => 'courses#index'

get 'courses/new'      => 'courses#new'
get 'courses/:id/edit' => 'courses#edit'
So we have a total of seven routes that are common to most resources in most web applications. If you are building a blog, you'll have these seven routes for posts. If you're building Instagram, you'll have the same routes for images.
No matter the topic, you'll most likely have some subset of these seven routes for each resource.
Since this pattern is so common, Rails introduced the concept of resourceful routing, whereby calling one method named resources and passing the name of the resource, i.e. :post, :course, :image, etc. you get these seven routes for free. Rails will automatically generate them for you.
Rails.application.routes.draw do
  resources :courses
end
In addition, resourceful routing also generates sensible names for these routes. For example, you'll have names like course_path, edit_course_path at your disposal without providing the :as option.
The following table summarizes what you get with a single call to resources. The values under the Prefix column represent the prefix of the route's name, e.g. new_course gives you new_course_path and new_course_url helpers, and so on.
➜ bin/rails routes -g course

     Prefix Verb   URI Pattern                 Controller#Action
    courses GET    /courses(.:format)          courses#index
            POST   /courses(.:format)          courses#create
 new_course GET    /courses/new(.:format)      courses#new
edit_course GET    /courses/:id/edit(.:format) courses#edit
     course GET    /courses/:id(.:format)      courses#show
            PATCH  /courses/:id(.:format)      courses#update
            PUT    /courses/:id(.:format)      courses#update
            DELETE /courses/:id(.:format)      courses#destroy
Resourceful routing allows you to quickly declare all of the common routes for a given resource. A single call toresourcesdeclares seven routes forindex,show,new,create,edit,update, anddestroyactions.
In addition to having multiple resources, there's also a singular form of resourceful routes. It represents a resource that only has one, single form. For example, a logged-in user's profile. You can use the resource method for this.
resource :profileIt creates the following routes:
 new_profile GET    /profile/new(.:format)  profiles#new
edit_profile GET    /profile/edit(.:format) profiles#edit
     profile GET    /profile(.:format)      profiles#show
             PATCH  /profile(.:format)      profiles#update
             PUT    /profile(.:format)      profiles#update
             DELETE /profile(.:format)      profiles#destroy
             POST   /profile(.:format)      profiles#create
Note two important differences from the plural version:
- The route to show all profiles is missing. Since we only have a single profile, there's no point in displaying all.
- None of the routes contain an
idsegment key. We don't need it to identify a profile as there's only one profile.
What if I don't have all seven routes?
Sometimes, you don't want all seven routes that resources method creates for you. In such cases, you can pass the only or except options to filter the ones you need or don't need.
resources :courses, only: [:index, :show]

resources :courses, except: [:delete]
You can even nest multiple resources, but I'll leave that topic for a different post, since this one is already getting bigger than I anticipated.
Non-Resourceful Custom Routes
A single call to resources in the routes.rb file declares the seven standard routes for your resource. What if you need additional routes?
Don't worry, Rails will let you create custom routes that don't fit one of the above seven routes with the member and collection routes. The member route only applies to a single resource, whereas collection will apply to a group of resources.
Member Routes
Let's assume that your users need to see a preview of the course before purchasing it, and you need to expose that route on the courses/:id/preview URL. How should you go about it?
Here's how you define the preview route on the CoursesController using the member block.
resources :courses do
  member do
    get 'preview'
  end
end
The router adds a new route that directs the request to the preview action on the CoursesController class. The remaining routes remain unchanged.
It also passes the course id in params[:id] and creates the preview_course_path and preview_course_url helpers.
preview_course GET /courses/:id/preview(.:format) courses#preview
If you have a single member route, use the short-hand version by passing the :on option to the route, eliminating the block.
resources :courses do
  get 'preview', on: :member
end
Although this approach works fine, a better way is to create a new controller dedicated to previewing images. Typically, you should strive to restrict your controllers with the seven default actions.
What I’ve come to embrace is that being almost fundamentalistic about when I create a new controller to stay adherent to REST has served me better every single time. Every single time I’ve regretted the state of my controllers, it’s been because I’ve had too few of them. I’ve been trying to overload things too heavily.
DHH, on Full Stack Radio
Collection Routes
Let's say you want to search all courses and you want to expose it on the courses/search endpoint. You can add a new route for the collection of courses with the collection block.
resources :courses do
  collection do
    get 'search'
  end
end
This adds the following new route. It will also add a search_courses_path and search_courses_url helpers.
search_courses GET /courses/search(.:format) courses#searchIf you don't need multiple collection routes, just pass :on option to the route.
resources :courses do
  get 'search', on: :collection
end
This will add the same route as above.
To learn more about custom routes, check out this article:
Akshay Khot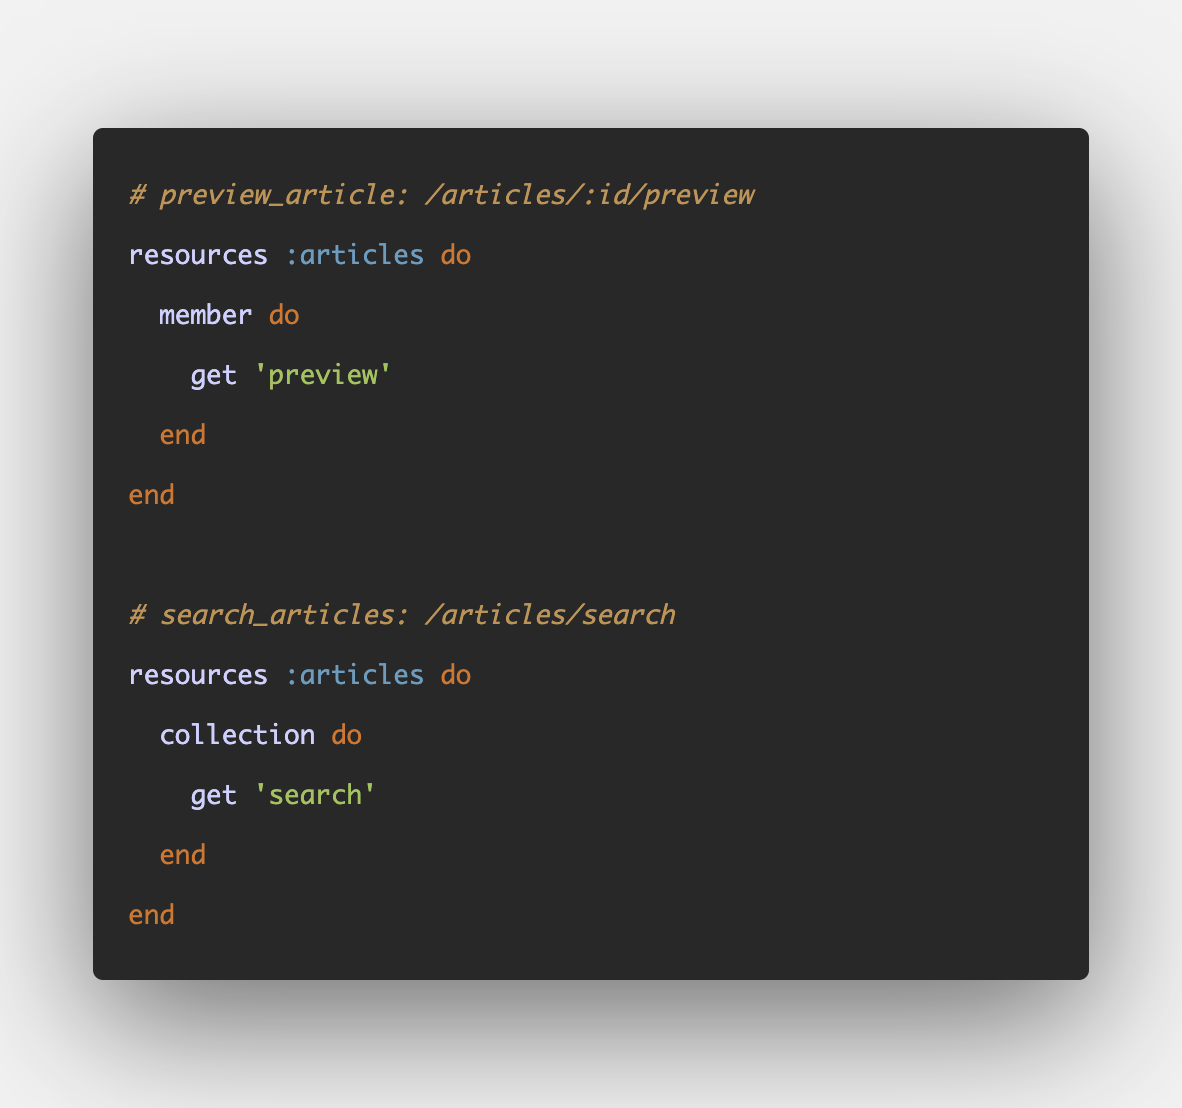
As we saw, the Rails router is very powerful and highly flexible. Routing is also a two-way street: match URLs to controller actions, and generate URLs dynamically. Additionally, the router uses powerful conventions such as resourceful routing to automatically generate sensible routes for you.
Alright, I will stop here. There are a few other shortcuts and helper methods that we didn't cover in this article, but I've already written more than 5000 words non-stop, and this article is way, wayy, wayyy bigger than what I first thought it would be. If you're still reading, I sincerely hope that you learned at least one new thing about the Rails router that you didn't know before.
Expect a few posts in the upcoming weeks that will explain the remaining topics. But what we've covered so far should be more than enough for you to get started and be productive with using various routing features, both basic and advanced, in your applications.
Here're some additional resources, if you want to learn more about routing.
Further Resources
- Rails Routing from the Outside In
- Rails API: The Mapper Class
- Routing in Laravel (to learn routing from a different framework's perspective)
- Roy Fielding's Dissertation
That's a wrap. I hope you found this article helpful and you learned something new.
As always, if you have any questions or feedback, didn't understand something, or found a mistake, please leave a comment below or send me an email. I reply to all emails I get from developers, and I look forward to hearing from you.
If you'd like to receive future articles directly in your email, please subscribe to my blog. If you're already a subscriber, thank you.