
If you haven't heard, Turbo 8 is dropping TypeScript.
I used to love TypeScript, but now I prefer plain JavaScript, both for reading and writing. So personally, I am happy with this bold move, even though everyone on the Internet seems to be pissed off.
Anyway, ever since switching to Hotwire two years ago, I've always wondered how Turbo really worked behind the scenes. For example, what really happens when you click the link, how frame-swapping works, etc. Reading the source is one of the best ways I've found to learn how a feature/framework/program works, so when I read David's comment on the PR,
The code not only reads much better, it's also freed of the type wrangling and gymnastics needed to please the TS compiler.
I decided to do a deep dive into the Turbo, and spent the last few hours reading the source code. It's been an absolute joy ride, full of mysteries, anticipations, and A-Ha moments, and I learned a ton of interesting things not only about Turbo, but also in JavaScript, and browser APIs, and took a ton of notes.
In this post, we'll learn exactly what happens when you click a link and the page updates without a full reload. We'll also see how to set up the sandbox repository for experimenting and debugging with breakpoints.
Update: After I started writing, within an hour the post ballooned past 3000 words. So to keep it readable, I've decided to split it into two parts. In this first part, we'll explore (almost) everything that happens from the moment you click the link until Turbo fetches the response. In the next part, we'll see how it swaps the current body from the response and merges the head.
Sounds interesting? Let's get started. We've got a lot of ground to cover.
Setup the Turbo Sandbox
This section explains how to download and set up the codebase so you can easily debug and step through it in the browser.
Step 1: Get the Source Code
Before diving into the codebase, you first need to get the working source code on your development machine. For this, clone the Github repository and install dependencies as usual.
$ git clone https://github.com/hotwired/turbo.git

$ cd turbo

$ yarn install
Step 2: Compile the Source
The source code is split across many JavaScript files. To compile them all into a single JavaScript file that we can include in our HTML, you have to build the source.
$ yarn buildAfter the build finishes, you'll have two files in the dist directory, named turbo.es2017-esm.js and turbo.es2017-umd.js.
If you open thepackage.jsonfile, you'll notice that the build script runsrollup -cbehind the scenes. If you're curious, you can check out the rollup configuration in therollup.config.jsfile.
Step 3: Add HTML Pages
It's nice to step-through the code as you're reading it to inspect the variables and follow the execution. To allow debugging in Chrome Devtools, let's create a new public directory and add a couple of HTML pages in it.
$ mkdir public

$ touch public/index.html
$ touch public/pages.about.html
Here's the Home (index) page:
<!-- public/index.html -->

<!DOCTYPE html>
<html>
  <head>
    <meta charset="utf-8" />
    <title>Home</title>
    <script src="/dist/turbo.es2017-umd.js"></script>
  </head>
  <body>
    <h1>Hotwire + Stimulus</h1>

    <a href="pages/about.html">About</a>
  </body>
</html>
And here's the About page:
<!DOCTYPE html>

<html>
  <head>
    <meta charset="utf-8" />
    <title>About</title>
    <script src="/dist/turbo.es2017-umd.js"></script>
  </head>
  <body>
    <h1>About</h1>
  </body>
</html>
Note that I've used the umd version of the compiled JavaScript in the script tag.
Step 4: Start the Server
Turbo provides a local web server to make debugging and testing easy. Start the server as follows:
$ yarn start

yarn run v1.22.17
$ node src/tests/server.mjs
Test server listening on port 9000
Visit the localhost:9000 URL in the browser and open the devtools window. Under the sources tab, open the turbo-es2017-umd.js file.
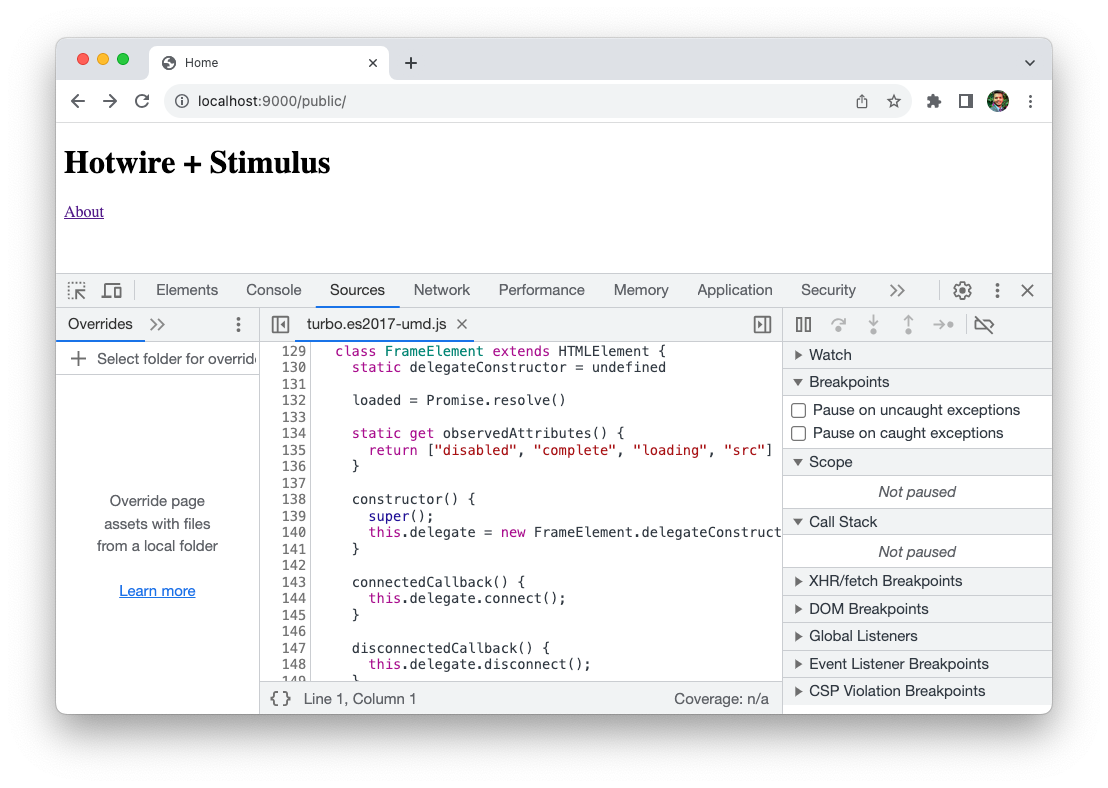
It's not a huge file, the entire source is less than 5000 lines.
Now we're all set up to explore the codebase. Let's dive in.
What Happens When You Click a Link?
In this section, we'll try to understand the sequence of events that take place when you click a link on a Turbo-enabled web page.
If you haven't played with Hotwire, I suggest check out the following article that introduces it.
 Akshay Khot
Quick summary: When you are using Hotwire, Turbo Drive intercepts all links and form submissions to the same domain. When you click a link or submit a form, Turbo Drive does the following:
- Prevent the browser from following the link,
- Change the browser URL using the History API,
- Request the new page using a
fetchrequest - Render the response HTML by replacing the current
<body>element with the response and merging the<head>element’s content.
The JavaScript window and document objects as well as the <html> element persist from one rendering to the next.
The same goes for an HTML form. Turbo Drive converts Form submissions into fetch requests. Then it follows the redirect and renders the HTML response. As a result, your browser doesn’t have to reload, and the app feels much faster.
We will start our code exploration by following three distinct phases in the Turbo lifecycle. Initialization process, intercepting the link click, and following the visit to the location.
Initialization Process
When your app loads in the browser, the control flow starts with the src/index.js file. You can verify this by putting the breakpoint on line where we set the Turbo object on the window.
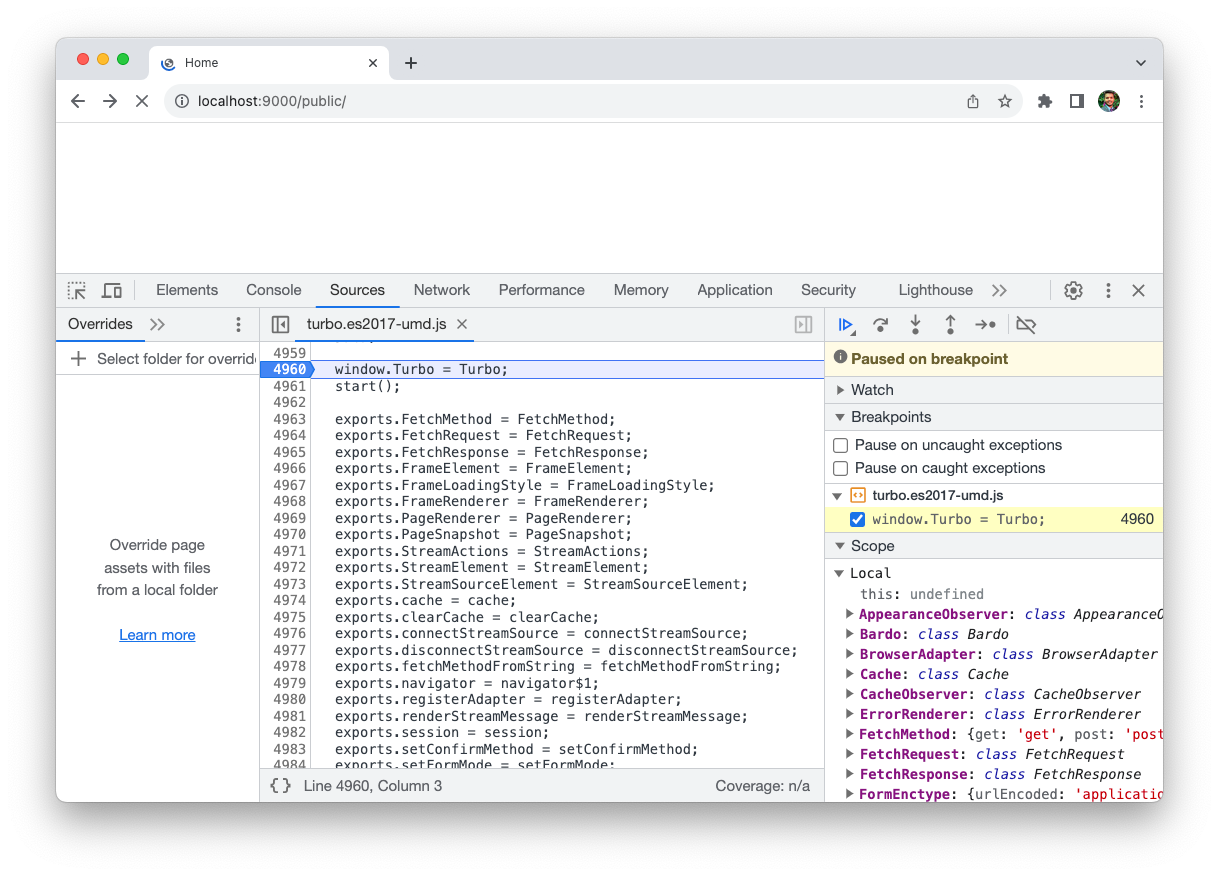
The control hits the above breakpoint as soon as you reload the page. We're ready to step into the initialization process.
As you read the rest of the article, step through the code in the devtools window at the same time. This will allow you to inspect local variables and objects for a deeper understanding.
If you open index.js in the editor, you'll notice that it imports everything from the ./core directory in the Turbo global variable and starts the main session by calling Turbo.start() method.
// src/index.js

window.Turbo = Turbo
Turbo.start()
The start method in turn starts the session by calling session.start() method. This method starts all the relevant actors, including LinkClickObserver, and FormSubmitObserver which listen for link click and form submission events and act accordingly.
// src/core/session.js

export class Session {

  linkClickObserver = new LinkClickObserver(this, window)
  formSubmitObserver = new FormSubmitObserver(this, document)

  start() {
    if (!this.started) {
      // ...
      this.linkClickObserver.start()
      this.formSubmitObserver.start()
      // ...
      this.history.start()
      this.started = true
      this.enabled = true
    }
  }
}
For this article, we're only interested in what happens when you click the link. So let's dive into the LinkClickObserver class.
export class LinkClickObserver {
  started = false

  constructor(delegate, eventTarget) {
    this.delegate = delegate        // set to 'session'
    this.eventTarget = eventTarget  // set to 'window'
  }

  start() {
    if (!this.started) {
      this.eventTarget.addEventListener("click", this.clickCaptured, true)
      this.started = true
    }
  }
}
When LinkClickObserver starts, it adds an event listener for the click event on the window . However, instead of attaching a handler on event bubbling phase, it uses event capturing by setting the third optional, boolean parameter useCapture to true.
Capturing phase is the inverse of the bubbling phase. Capturing happens before bubbling, and in reverse order. Instead of starting on the target element and propagating outwards (which is what bubbling does), the outermost element is notified of the event first. Then the event propagates down the hierarchy until reaching the target.
The mechanics of the capturing phase make it ideal for preparing or preventing behavior that will later be applied by event delegation during the bubbling phase.
Source: Using event capturing to improve Basecamp page load times
The clickBubbled function ultimately handles the link clicks. To understand what's going on, I'll put a breakpoint on the first statement, and click the About link on the page.
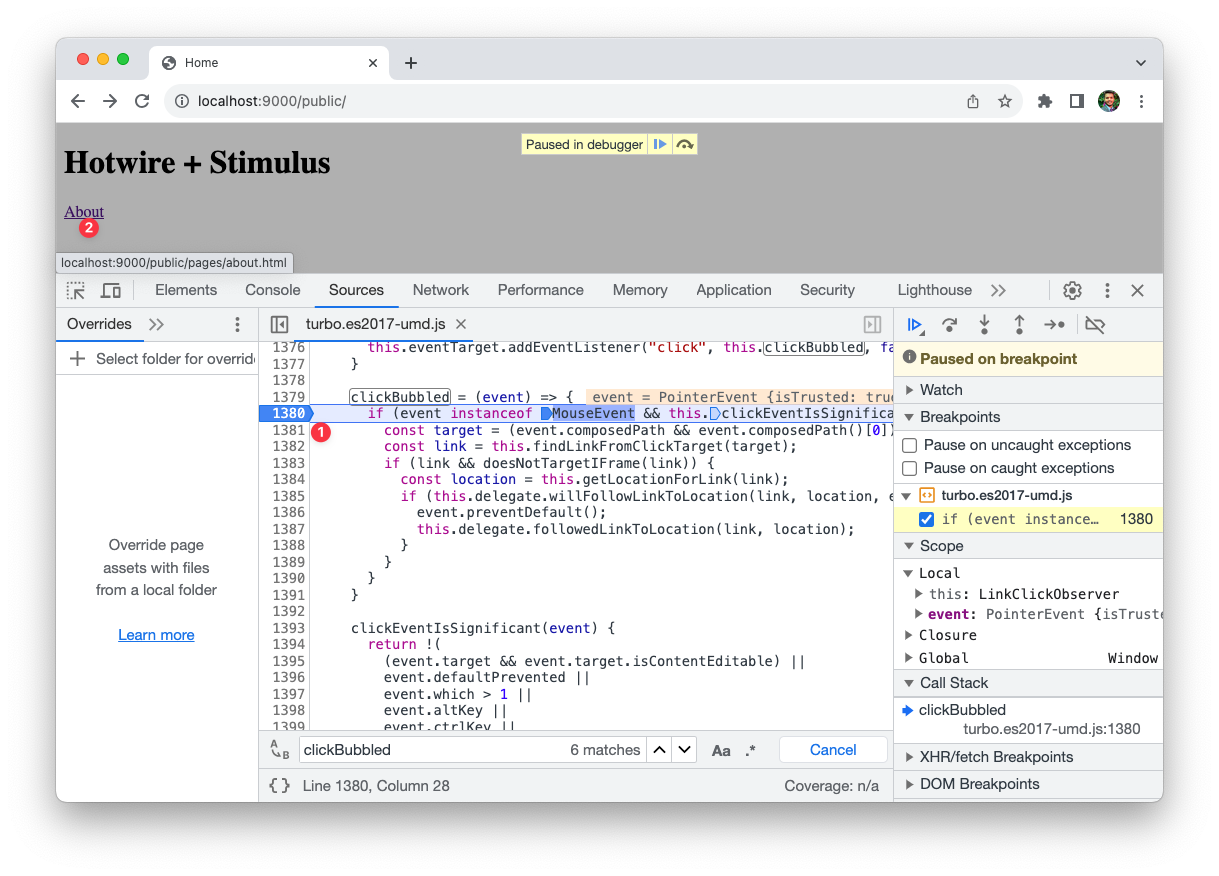
The clickBubbled handler first checks if the click event came from a mouse click and if it's significant, i.e. it was not triggered on an editable element, or performed by one of the special keys such as Alt, Ctrl or Shift etc.
If it's not a significant event, it simply returns.
If it's a significant mouse click event, it finds the link (the <a> element) and location (the URL) from the click target.
Something I learned: To get the target element, Turbo calls the composedPath method on the event. This method returns the event's path which is an array of the objects on which listeners will be invoked.
In our case, it returns the following array.
> event.composedPath()
(5) [a, body, html, document, Window]
Then it delegates to the Session to check if the following conditions are satisfied:
- Turbo Drive is enabled for the element
- The location is visitable, i.e. it belongs to the same domain (location is prefixed by the root location) as your application and if it's an HTML request
- The application allows following the link to the location by triggering the
turbo:clickevent and checking if the application didn't stop the event propogation.
/* session.ts */

willFollowLinkToLocation(link, location, event) {
  return (
    this.elementIsNavigatable(link) &&
    locationIsVisitable(location, this.snapshot.rootLocation) &&
    this.applicationAllowsFollowingLinkToLocation(link, location, event)
  )
}If your application didn't prevent the event by intercepting it, then Turbo prevents the regular browser link navigation, gets the action for the link (advance, replace, or restore) and delegates the task of proposing the location visit to the Navigator.
/* session.ts */

// actually follow the link
followedLinkToLocation(link, location) {
  const action = this.getActionForLink(link)
  const acceptsStreamResponse = link.hasAttribute("data-turbo-stream")
  this.visit(location.href, { action, acceptsStreamResponse })
}

// propose visit to the location (simplified...)
visit(location, options) {
  this.navigator.proposeVisit(location, options)
}
Visiting the Location
The Navigator.proposeVisit() method first checks if the application allows visiting the location with given action (default: advance) by triggering the turbo:before-visit custom event and checking if it was prevented by the application.
export class Navigator {
  constructor(delegate) {
    this.delegate = delegate  // set to 'session'
  }

  proposeVisit(location, options = {}) {
    if (this.delegate.allowsVisitingLocationWithAction(location, options.action)) {
      if (locationIsVisitable(location, this.view.snapshot.rootLocation)) {
        this.delegate.visitProposedToLocation(location, options)
      } else {
        window.location.href = location.toString()
      }
    }
  }
}
If the location can be visited, then the Navigator checks if the location is visitable by verifying if it belongs to the same domain (location is prefixed by the root location) as your application and if it's an HTML request.
// src/core/url.js

export function locationIsVisitable(location, rootLocation) {
  return isPrefixedBy(location, rootLocation) && isHTML(location)
}
If the location is not visitable, i.e., it refers to the different origin or different content-type than HTML, Turbo simply redirects the browser to the requested location by setting the `window.location.href` property. This happens for non-origin or non-HTML URLs.
If the location is visitable, Turbo uses the BrowserAdapter class to co-ordinate the action of visiting the location
// src/core/session.js

export class Session {
  adapter = new BrowserAdapter(this)

  visitProposedToLocation(location, options) {
    this.adapter.visitProposedToLocation(location, options)
  }
}
The BrowserAdapter Class
The BrowserAdapter class has two responsibilities:
- show the progress bar
- visit the location
It does the second by instructing the Navigator to start the visit, passing a uuid as an identifier for restoration. Lots of delegation happening, everywhere.
export class BrowserAdapter {
  progressBar = new ProgressBar()

  constructor(session) {
    this.session = session
  }

  visitProposedToLocation(location, options) {
    this.navigator.startVisit(location, options?.restorationIdentifier || uuid(), options)
  }
}
The startVisit method instantiates the Visit class, which handles the actual visit by recording the timing metrics, updating the state, and delegating to BrowserAdapter and Navigator classes, passing itself to both.
// src/core/drive/visit.js

export class Visit {
  start() {
    if (this.state == VisitState.initialized) {
      this.recordTimingMetric(TimingMetric.visitStart)
      this.state = VisitState.started
      this.adapter.visitStarted(this)
      this.delegate.visitStarted(this)
    }
  }
}
The BrowserAdapter#visitStarted method does the following:
- Loads the cached snapshot if it exists. For the first click, there won't be any.
- Issues the Fetch request after dispatching a
turbo:before-fetch-requestevent so the application can intercept it. - Changes the browser history
- Navigates to the anchor
Steps 2-4 are handled by the Visit class.
// src/core/native/browser_adapter.js

export class BrowserAdapter {
  visitStarted(visit) {
    this.location = visit.location
    visit.loadCachedSnapshot()
    visit.issueRequest()
    visit.goToSamePageAnchor()
  }
}
The Visit#issueRequest method performs the actual visit by instantiating FetchRequest, which encapsulates the fetch call.
// src/core/drive/visit.js

export class Visit {
  issueRequest() {
    this.request = new FetchRequest(this, FetchMethod.get, this.location)
    this.request.perform()
  }
}
Finally, here's the perform method that makes the actual fetch request.
export class FetchRequest {
  async perform() {
    const response = await fetch(this.url.href, fetchOptions)
    return await this.receive(response)
  }
}
At this point, we've received the response from the server. However, we're not finished yet. If you remember the steps that take place when you click a link:
- Prevent the browser from following the link - Done
- Change the browser URL using the History API - Done
- Request the new page using a
fetchrequest - Done - Render the response HTML by replacing the current
<body>element with the response and merging the<head>element’s content.
We still need to complete the fourth step, i.e. update the body and merge the head, which is a topic that deserves a blog post of its own.
If you're still here, I don't think both me and you have the energy or the patience to explore any further right away. So I'll stop here, and continue the exploration in the next post.
Stay tuned!
That's a wrap. I hope you liked this article and you learned something new. If you're new to the blog, check out the start here page for a guided tour or browse the full archive to see all the posts I've written so far.
As always, if you have any questions or feedback, didn't understand something, or found a mistake, please leave a comment below or send me an email. I reply to all emails I get from developers, and I look forward to hearing from you.
If you'd like to receive future articles directly in your email, please subscribe to my blog. If you're already a subscriber, thank you.