
While the exception mechanism of raise and rescue is great for abandoning execution when things go wrong, it's sometimes nice to be able to jump out of some deeply nested construct during normal processing. This is where catch and throw come in handy.
- Pragmatic Programmers, 2001
If like me, you're coming to Ruby from traditional programming languages, the throw and catch methods might surprise you.
No, they're not used for throwing and handling errors (although you can use them for that). Instead, they manage the control flow of your Ruby code, by allowing you to terminate execution early and escape deeply nested control flows, without having to use break, return, or raise-rescue.
In this post, we'll cover the basics of using throw and catch in Ruby, including how these methods work and when should you use them. We'll also see a few real-world use cases, including how the Warden gem uses throw-catch for authentication and how Sinatra uses them to immediately halt a request.
What We'll Learn:
- Introduction to
throwandcatch - Why and when should you use them?
- In the wild: How warden uses
throwandcatch - Performance comparison with
raiseandrescue - How to test it?
- Conclusion
Sounds fun? Let's begin.
Introduction to Throw and Catch
In this section, we'll inspect the API of both of these methods in detail.
Kernel#throw(tag, obj)
The throw method is defined in the Kernel module, hence you can call it anywhere in your Ruby code. You can pass it a symbol (tag), and optional data.
throw transfers control to the end of the active catch block waiting for the tag. If there is no catch block for the tag, Ruby will raise an UncaughtThrowError.
The optional second parameter provides a return value for the catch block, which otherwise defaults to nil.
msg = catch(:tag) do
  # do something

  throw :tag, 'no match found'

  puts 'this is not executed'
end

puts msg  # no match found
It's important to note thatthrow works just like return. Any code you write after it will not be executed. In the above example, the first puts call won't run.
Kernel#catch
The catch method is also defined in the Kernel module, and it accepts a symbol (tag) and a block. First, it executes the block, which can either call the throw method or not.
- If the
throwmethod is not called anywhere in the block, the block executes normally. Thecatchreturns the value of the last expression evaluated in the block.
msg = catch(:err) do
  # do something
  'success'
end

puts msg # success- If the block calls the
throwmethod with the matchingtag(the symbol passed tocatch), the block stops executing and returns whatever arguments you passed tothrowmethod (seeobjin thethrowmethod above). It returnsnilif no second argument was given tothrowmethod.
msg = catch(:err) do
  throw :err, 'something went wrong'
  puts 'this is not executed'
end

puts msg  # something went wrong
When you call the throw method, the Ruby interpreter walks up the stack until it finds a corresponding catch.
Throwing something always requires that someone should be there to catch it. If you try to throw something without having a matching catch, Ruby will raise an UncaughtThrowError.
# uncaught throw :err (UncaughtThrowError)
throw :err, 'something went wrong'

# uncaught throw :error (UncaughtThrowError)
catch(:err) do
  throw :error, 'something went wrong'
end
Now you might be wondering why and when we might need to use catch and throw. So let's take a look at a few use cases.
Why and When Should You Throw and Catch?
Typically, you'll use throw and catch to escape from multiple levels of loops and conditionals, just like a good old GOTO statement.
I know you can use the break statement to exit loops, but break will only halt the computation on the innermost loop in which it's called. If you have multiple nested loops, the outer loop still continues, as the following example shows.
3.times do |i|
  3.times do |j|
    puts i
    break
    print j
  end

  puts 'still here'
end

# Output:

# 0
# still here
# 1
# still here
# 2
# still here
In contrast, throw provides an elegant way to jump out of multiple loops.
catch(:err) do
  3.times do |i|
    3.times do |j|
      puts i
      throw :err
      print j
    end

    puts 'still here'
  end
end

# Output:

# 0
Another excellent use case for throw-catch is when you have some computation taking place in the deep bowels of your codebase and need to eject immediately, as soon as some condition (not an error!) is met.
In fact, this is exactly how Warden uses it. The next section shows how.
In the Wild: How Warden Uses Throw-Catch
Warden is a Rack-based middleware, designed to provide a mechanism for authentication in Ruby web applications. It is a common mechanism that fits into the Rack middleware system to offer powerful options for authentication.
You may not have heard about Warden, but you must have used or heard of Devise, which provides a complete authentication solution for Rails applications. Devise uses Warden under the hood.
To learn more about Rack and the concept of middleware, check out the following articles, from yours truly:
 Akshay Khot
 Akshay Khot
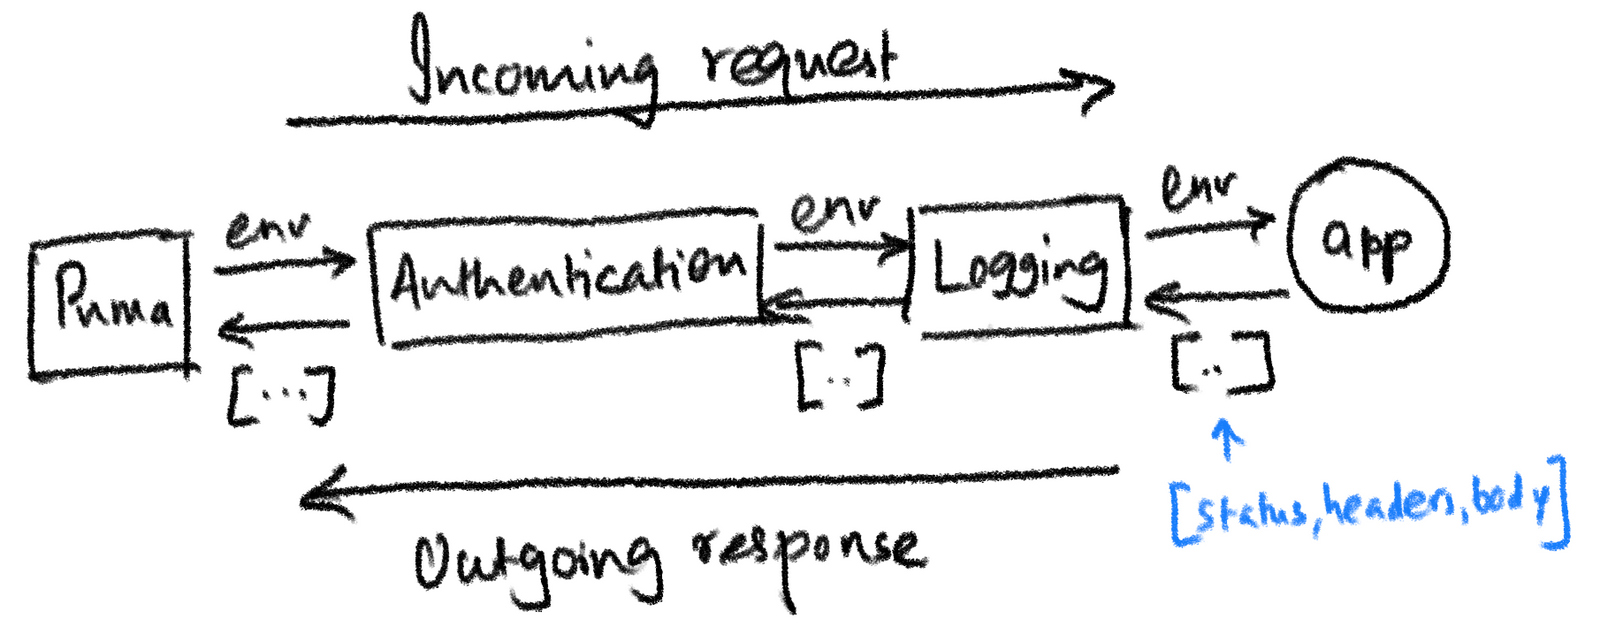
Okay, back to Warden. To reiterate, Warden provides a mechanism for authentication in Rack-based web applications.
Warden enables all the middleware components that are next in the pipeline to share a common authentication solution. Each middleware that comes after the warden middleware can layer whatever API they want on top of it, and everything still works.
In fact, that's how Devise uses Warden.
Let's inspect the Warden middleware's call method. I'll skip the code that comes before and after the catch method, as it's not relevant to this discussion.
# lib/warden/manager.rb

def call(env)
  # set up warden

  result = catch(:warden) do
    @app.call(env)
  end

  # process the result
end
As you can see, Warden calls the catch method, passing the symbol :warden and a block that simply forwards the request to the next middleware @app.call(env).
When a user tries to log in, Warden calls the authenticate! method which performs the authentication.
# lib/warden/proxy.rb

def authenticate!(*args)
  user, opts = _perform_authentication(*args)
  throw(:warden, opts) unless user
  user
end
If the user is missing, that means the authentication failed, and Warden throws the :warden symbol, which is caught by the catch method we saw earlier. Then it processes the result and the additional arguments passed in the throw method.
Here's another example: Sinatra uses throw and catch to implement the halt method, which lets you immediately terminate a request at any time.
# Run the block with 'throw :halt' support and apply result to the response.
def invoke(&block)
  res = catch(:halt, &block)

  # remaining code
end

# Exit the current block, halts any further processing
# of the request, and returns the specified response.
def halt(*response)
  response = response.first if response.length == 1
  throw :halt, response
end
Pretty interesting, don't you think?
Performance Comparison with Raise and Rescue
throw-catch is significantly faster than raise-rescue, as shown by Josh on StackOverflow.
require 'benchmark'

Benchmark.bmbm do |x|
  x.report('Break') do
    1_000_000.times do
      break
    end
  end

  x.report('Catch/Throw') do
    1_000_000.times do
      catch(:benchmarking) do
        throw(:benchmarking)
      end
    end
  end

  x.report('Raise/Rescue') do
    1_000_000.times do
      begin
        raise StandardError
      rescue
        # do nothing
      end
    end
  end
end
Output
                   user     system      total        real
Break          0.000008   0.000001   0.000009 (  0.000005)
Catch/Throw    0.307164   0.001274   0.308438 (  0.310073)
Raise/Rescue   1.013735   0.008861   1.022596 (  1.027078)
One of the reasons for this dramatic difference is that raise-rescue creates backtrace, which is not needed for catch-throw. (source)
How to Test?
To test if a block throws a symbol, use the assert_throws method in Minitest.
def check
  throw :expired, 'status is expired'
end

test 'throws the status if user is expired' do
  assert_throws(:expired) { User.new.check }
end
If you're using RSpec, use the throw_symbol expectation.
expect { ... }.to throw_symbol
expect { ... }.to throw_symbol(:symbol)
expect { ... }.to throw_symbol(:symbol, 'value')
Although testing this is well and good, don't forget to test the actual side-effect you want to have after the symbol is caught.
Conclusion
throw-catchoffers a way to escape from deeply nested, multiple layers of control flow without having to resort toraise-rescue.
To summarize, throw-catch is used for jumping out of control statements, when no further work is required. In contrast, raise-rescue is used for error handling. It's not that one is better than the other. You have to use them according to the needs of your program.
When should you use throw-catch? To be honest, not very often, unless you really know you need it, just like the Warden gem.

That's a wrap. I hope you liked this article and you learned something new.
As always, if you have any questions or feedback, didn't understand something, or found a mistake, please leave a comment below or send me an email. I look forward to hearing from you.
If you'd like to receive future articles directly in your email, please subscribe to my blog. If you're already a subscriber, thank you.