Middleware Pipeline

Rails Middleware: (Almost) Everything You Need to Know

In this post, we'll learn almost everything about Rails middleware: what it is, why we need it, how it works, and why it's so important. We'll also learn how to create and test custom middleware in a Rails app. Finally, we'll extract logging functionality in its own middleware in a simple web app.

11 min read
💡
This is the eighth article in the series on building a web application in Ruby without using Rails. In the previous article, we added support for logging, and this one shows how to extract the logging functionality to a middleware, to keep our application free from peripheral concerns.

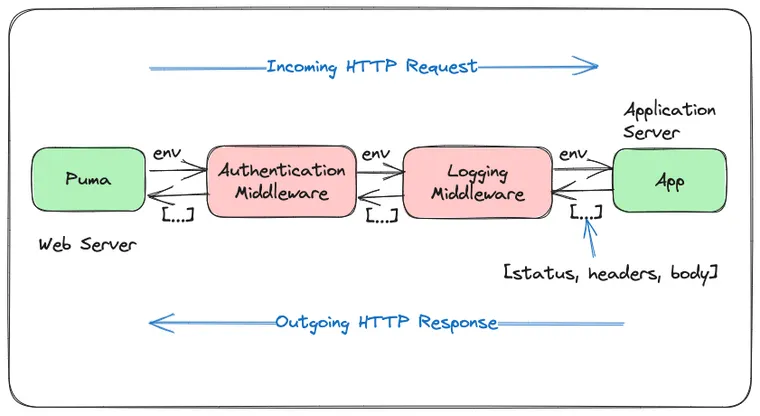
Most web applications have some functionality that's common for many (or even all) HTTP requests. For example, an application will authenticate the user and log the incoming HTTP request, add new headers, or check if the request is for a static file and serve it from a CDN without hitting the app server.

Middleware is an elegant way to organize this common functionality, instead of spreading it everywhere in your application code, which should focus on the logic of your application. In its essence, middleware is a self-contained application that operates on a request independently before or after your main application.

As we learned in the The Definitive Guide to Rack for Rails Developers, the Rack protocol provides a simple interface for web applications and web servers to talk to each other. This communication happens through the middleware pipeline.

The Definitive Guide to Rack for Rails Developers
The word Rack actually refers to two things: a protocol and a gem. This article explains pretty much everything you need to know about Rack as a Rails developer. We will start by understanding the problem Rack solves and move to more advanced concepts like middleware and the Rack DSL.

In this post, we're going to do a deep dive into middleware; especially how and where they fit into your Rails applications. We'll learn what middleware is, why we need them, how they work, and why they're so important. I'll also show you how to create custom middleware for your Rails application and how to test it.

Finally, we'll pick up where we left off in the ruby-no-rails series and extract the logging functionality to a separate middleware.

What You'll Learn:

Sounds interesting? Let's get started.

What is Middleware?

A middleware is nothing but a class with a call method that receives the incoming HTTP request (env) from the web server, processes it before passing it to the Rails application, processes the response received from the application, and returns the response back to the web server.

When we say an application is Rack-compliant, it means the following:

  1. It has a call method that accepts a single argument env, containing all the data about the request, and
  2. It returns an array containing the status, headers, and response.

Because the Rack interface is so simple, you can use any code that implements this interface in a Rack application, allowing you to build small, focused, and reusable applications that work together to provide different functionalities. These mini-components are known as Middleware.

It's best to envision middleware as a series of "layers" HTTP requests must pass through before they hit your application. Each layer can examine the request, modify it, and even reject it entirely.

Here's a simple middleware that prints some text before and after passing the request to the application (or the next middleware in the pipeline).

class CustomMiddleware
  def initialize(app)
    @app = app
  end
  
  def call(env)
    puts 'before'
    result = @app.call(env)
    puts 'after'
    result
  end
end

Two important things to note here:

  1. The middleware receives the application (or the next middleware) in the constructor.
  2. After receiving the response from the application, it has to return the response to the web server, or the next middleware in the pipeline.
Middleware
Middleware

Why Use Middleware?

Middleware is very useful for writing logic that is not specific to your web application, such as authenticating the request, logging, or error handling. It focuses on doing one thing and doing it well.

Middleware sits between the user and the application code. When an HTTP request comes in, the middleware can intercept, examine, and modify it. Similarly, it can examine and modify the HTTP response before forwarding it to the user.

Middleware provides a convenient mechanism for inspecting and filtering HTTP requests entering your application. For example, Rails includes the Rack::MethodOverride middleware that inspects and overrides the HTTP verb of the incoming request.

💡
Using middleware simplifies your application code, and it can only focus on the logic related to the application.

Authentication is another good use case for middleware. If the user is not authenticated, the middleware will redirect the user to your application's login screen. However, if the user is authenticated, the middleware will allow the request to proceed further into the application.

You can write middleware to perform a variety of tasks besides authentication. For example, as we'll see later, a logging middleware logs all incoming requests to your application.

There are several middleware (is 'middlewares' a word?) included in the Rails framework. You can see a list of all middleware by running the bin/rails middleware command. The Rails guides also provide a brief description of what each middleware does.

Middleware can perform tasks before or after passing the request deeper into the application. For example, the following middleware performs some task both before and after the request is handled by the application:

module Middleware
  class DoSomething
    def initialize(app)
      @app = app
    end
  
    def call(env)
      # perform something before passing the request to the application
      process_request(env)
      
      response = @app.call(env)
      
      # perform something after receiving the response from the application. 
      # It should also return the response.
      process_response(response)
    end
  end
end

No matter where a middleware performs its action, it still has to return a valid Rack-compatible response to the next middleware in the pipeline, or the web server.

In the next section, we'll learn how you can create your own middleware.

Let's Add Custom Middleware in Rails

Imagine you want to add a new middleware for your application that does a simple thing: verify a token sent in the header by the client code. If this token matches our secret token, allow the request to proceed. Otherwise, immediately return an error without passing the request to the application.

To accomplish this, let's introduce a custom middleware, which is just a Ruby class with the interface we saw in the introduction. As mentioned above, it will have a call method that takes the incoming request and returns an array containing the HTTP status, headers, and the response body.

# lib/middleware/verify_token.rb

module Middleware
  class VerifyToken
    def initialize(app)
      @app = app
    end
  
    def call(env)
      request = ActionDispatch::Request.new(env)
      if request.headers['token'] != 'my-secret-token'
        return [200, {}, ['invalid or missing token']]
      end
  
      @app.call(env)
    end
  end
end

As you can see, in the call method, we'll first verify the token and return an error if it doesn't match our secret token. If it matches, we send the normal response.

Where do you put middleware in your Rails app?

Middleware can't be in app because they can't be reloaded. They should be in lib. - Rafael Franca

Let's create a new folder called middleware in the lib folder and add VerifyToken middleware in it.

We're not done yet, we need to tell Rails to insert this middleware in the middleware stack. Let's do this using the config.middleware object.

Rails Middleware API

Rails provides a simple configuration interface config.middleware for adding, removing, and modifying the middleware stack.

The object returned by config.middleware method is an instance of Rails::Configuration::MiddlewareStackProxy class. As the name suggests, it's a proxy for the Rails middleware stack that lets you configure the middleware for your application.

You can either config.middleware in the application.rb file or one of the environment-specific configuration files under the environments/<env>.rb file.

To add a new middleware, use the config.middleware.use method, passing the name of the Ruby class that acts as middleware. Rails will insert this middleware at the end of the existing middleware stack, meaning it will get executed in the end, just before your application is called.

# config/application.rb

require_relative "../lib/middleware/verify_token"'

module Blog
  class Application < Rails::Application
    config.middleware.use Middleware::VerifyToken
  end
end

That's it! We've successfully added a middleware to verify an incoming request.

Instead of putting your middleware in the end, if you wish to insert it before or after another middleware, you can do so using the insert_before or insert_after method.

config.middleware.insert_before ActionDispatch::Callbacks, VerifyToken

This will insert the VerifyToken callback before the ActionDispatch::Callbacks middleware runs.

How to Modify Existing Middleware

In addition to inserting your own middleware, Rails also lets you modify its existing middleware stack, by allowing you to replace or even delete a middleware.

Replace Middleware

You can replace existing middleware in the middleware stack using config.middleware.swap method. For example,

config.middleware.swap ActionDispatch::RequestId, Custom::RequestId

will replace the ActionDispatch::RequestId module with the Custom::RequestId module.

Delete Middleware

You can delete existing middleware using the config.middleware.delete method.

config.middleware.delete ActionDispatch::Flash

Now the flash middleware won't run when Rails executes the middleware pipeline. You can also verify that it's removed by running the bin/rails middleware command.

Passing Parameters to Middleware

So far, we've run our middleware code without providing any additional parameters. Rails also makes it easy to pass extra parameters. For example, we can pass a default token for the VerifyToken middleware as follows:

# config/application.rb

# Set custom middleware
config.middleware.use Middleware::VerifyToken, default_token: 'another-token'

This parameter will be available in the constructor of the middleware. You can set it to an instance variable and access it anywhere else in the class.

module Middleware
  class VerifyToken
    def initialize(app, default_token: nil)
      @app = app
      @default_token = default_token
    end
  
    def call(env)
      # remaining code
    end
  end
end

You can pass more than one parameters, if needed.

How to Test Middleware Classes

If you're adding a custom middleware with significant code or logic, it's a good idea to add tests for it. That said, you can simply test the side-effect of the middleware without directly testing the middleware class, as we've seen earlier, and that should be totally fine for most cases.

However, what if you want to actually test the VerifyToken class? How to initialize its dependency app , which is the whole Rails application itself?

Don't worry, you can pass the world's simplest Rack app instead ;)

require "test_helper"
require "middleware/verify_token.rb"

class VerifyTokenTest < ActiveSupport::TestCase
  setup do
    @app = ->(env) { [200, { 'Content-Type' => 'text/plain' }, [ 'success' ]] }
    @middleware = Middleware::VerifyToken.new(@app)
    @env = Rack::MockRequest.env_for("/middleware")
  end

  test 'deleting the associated quotes' do
    response = @middleware.call(@env)
    assert_equal [200, {}, ["invalid or missing token"]], response
  end
end

Note that we're using Rack::MockRequest to build the env hash.

Now that you have all the necessary dependencies, you can test your custom middleware to your heart's content.

Extract Logging Middleware in Our No-Rails App

If you haven't been following the Ruby-no-Rails series, this section might not make much sense. I recommend that you start from the first article: Let's Build a Web Application in Ruby without Rails

In the previous article, we implemented the logging functionality for our simple web application written in vanilla Ruby.

Logging in Ruby: (Almost) Everything You Need to Know
Like backups, logging is one of those topics that seems unnecessary until something goes wrong! It’s very frustrating to fix a bug that’s only reproducible in production without having any logs to help you debug it. This post covers the basics of logging in Ruby and adds logging to our no-rails app.

However, one thing that's been bothering me is how the logging-related code is scattered throughout our application, i.e. app.rb file.

# app.rb

require 'debug'
require 'logger'
require 'zeitwerk'

require_relative 'config/routes'

class App
  attr_reader :logger

  def initialize
    # ...

    @logger = Logger.new('log/development.log')
  end

  def call(env)
    logger.info "#{env['REQUEST_METHOD']}: #{env['REQUEST_PATH']}"

    headers = { 'Content-Type' => 'text/html' }

    response_html = router.build_response(env)

    [200, headers, [response_html]]
  rescue => e
    logger.error("Oops, something went wrong. Error: #{e.message}")
    [200, headers, ["Error: #{e.message}"]]
  end

  private
    # ...
end

If you remember, whenever the Puma web server receives a new HTTP request, it calls the call method on the App class. Since we want to log each and every incoming request, logging is an excellent candidate for extraction as a middleware. That way, it can live in its own module without affecting the rest of the app.

In fact, we're actually already using some middleware in our simple application. The reloader middleware checks if the application code is changed or not and reloads the code if it did. The config.ru file holds the middleware chain.

# config.ru

require 'rack'
require_relative 'app'

# Reload source after change
use Rack::Reloader, 0

# Serve all requests beginning with /public 
# from the "public" folder and favicon.ico
# from the current directory
use Rack::Static, urls: ['/public', "/favicon.ico"]

run App.new

The basic idea is to insert the logging middleware into this chain. The logging middleware will log a request, then call the call method of the next handler in the chain, and return the response.

Let's create a new middleware directory in our project and add a logging.rb file in it, which will contain the logging-related code.

# middleware/logging.rb

require 'logger'

class Logging
  attr_reader :logger

  def initialize(app)
    @app = app
    @logger = Logger.new('log/development.log')
  end

  def call(env)
    logger.info "#{env['REQUEST_METHOD']}: #{env['REQUEST_PATH']}"
    @app.call(env)  # call the next middleware or our application
  rescue => e
    logger.error("Oops, something went wrong. Error: #{e.message}")
    [200, { 'Content-Type' => 'text/html' }, ["Error: #{e.message}"]]
  end
end

Next, we need to tell Rack to insert this logging middleware just before our main application.

# config.ru

require 'rack'

require_relative 'app'
require_relative 'middleware/logging'

# other middleware

use Logging

run App.new

Finally, we can get rid of all the logging code from app.rb. Here's the diff:

Nice and clean.

Start the web server by running puma in the terminal, and hit the URL localhost:9292. If you open the development.log file, you'll notice that the application is still logging the incoming requests as expected.

💡
Check out the changes in this PR and the complete source code on the middleware branch on Github.

I should probably stop here. If you're still reading this (and I know you are), you should have a much better understanding of the concept of middleware. If you're curious to learn more, here're some great resources for you about middleware.  

Additional Resources


That's a wrap. I hope you liked this article and you learned something new. If you're new to the blog, check out the start here page for a guided tour or browse the full archive to see all the posts I've written so far.

As always, if you have any questions or feedback, didn't understand something, or found a mistake, please leave a comment below or send me an email. I reply to all emails I get from developers, and I look forward to hearing from you.

If you'd like to receive future articles directly in your email, please subscribe to my blog. If you're already a subscriber, thank you.