If you want to skip reading the ~2800 word article knowing you'll forget most of it anyway, download the PDF cheatsheet.
Rails provides a ton of different ways to modify the database schema via Active Record migrations. It's a very powerful and flexible way to handle schema changes while keeping all updates under version control. However, all the migration methods, options, conventions, and their variations can be overwhelming, and hence, confusing.
I found myself reaching out for the Rails migration guide and the Rails API almost every time I wanted to create a new Rails migration to make database changes. So last night I decided to spend a few hours to note down all the common database operations I use most of the time.
Now, this is not an exhaustive reference of ALL the methods and options. You'll still need to refer to the Rails API for the obscure ones. I've just listed the stuff I use most of the time, but I'm sure many of you will find it useful, too.
Table of Contents
- Generating Migrations
- Migration Structure
- Applying Migrations
- Revert (Rollback) a Migration
- Common Rails Database Commands
- Working with Tables
- Create Table
- Update Table
- Rename Table
- Drop Table
- Referencing Other Tables
- Working with Columns
- Create Column
- Update Column
- Rename Column
- Drop Column
- Working with Indexes (Indices)
- Create Index
- Rename Index
- Drop Index
Sounds fun? Let's begin...
Generating Migrations
To generate a database migration, use the rails generate migration command.
$ rails generate migration CreateCustomers name:string email:string
      invoke  active_record
      create    db/migrate/20230829033126_create_customers.rb
After running this command, Rails will add the new migration in your project's db/migrate directory. Each migration filename contains a timestamp that Rails uses to determine the order of the migrations.
# db/migrate/20230829033126_create_customers.rb

class CreateCustomers < ActiveRecord::Migration[7.1]
  def change
    create_table :customers do |t|
      t.string :name
      t.string :email

      t.timestamps
    end
  end
end
When you create a new table, Rails will add t.timestamps at the end of the definition. It adds two columns to the table: created_at and updated_at.
In the above command, we provided CreateCustomers as the name of the migration. Typically, Rails will try to guess the name of the table using the name of the migration, i.e. customers in this case. If Rails can figure out the table name from the migration name, it will pre-fill the generated migration file with the specified table. Otherwise, you can simply edit the migration to specify the table name.
Migration Structure
The migration file contains a change method, which is used to add new tables, columns, or indexes to your database. In this method, you can use the TableDefinition object to create and modify tables.
In this example, we're creating the customers table with two string columns named name and email. By default, Rails also adds the created_at and updated_at columns with the timestamps methods.
# db/migrate/20230829033126_create_customers.rb

class CreateCustomers < ActiveRecord::Migration[7.1]
  def change
    create_table :customers do |t|
      t.string :name
      t.string :email

      t.timestamps
    end
  end
end
Applying Migrations
Once you're satisfied with the migration code, you've to run that migration. To run the newly created migration (or all outstanding migrations), run the rails migrate command:
$ rails migrateTo verify which migrations have been already applied, use the rails db:migrate:status command:
$ rails db:migrate:status

database: storage/development.sqlite3

 Status   Migration ID    Migration Name
--------------------------------------------------
   up     20230829171000  Create customers
Revert (Rollback) a Migration
If you made a mistake, or noticed a typo in the migration that you just ran, use the db:rollback command to roll back the previous migration. This command reverts the schema back to the previous version.
bin/rails db:rollbackYou can roll back a specific number of migrations by providing the STEP option to the rollback command. For example, the following command will roll back the last five migrations:
rails db:rollback STEP=5After fixing the related migrations, you've to migrate the database again by running the db:migrate command.
Roll Back and Migrate Using A Single Command
The db:migrate:redo command will roll back the database one migration and re-migrate the database.
bin/rails db:migrate:redoAs with the rollback command, you can roll back and migrate a specific number of migrations by passing the STEP option to the redo command. The following command will roll back and re-migrate the last five migrations:
bin/rails db:migrate:redo STEP=5The db:migrate:reset command drops and recreates all databases from their schema for the current environment and loads the seeds. This command effectively re-creates your entire database.
bin/rails db:resetCommon Rails Database Commands
You can see all the available commands in Rails by running the bin/rails --help command. To narrow down the database-related commands, grep it on the database prefix, i.e. bin/rails --help | grep db. Here're the common ones.
# Create the database from DATABASE_URL or config
bin/rails db:create

# Load the seed data from db/seeds.rb
bin/rails db:seed

# Create databases, load schema and seed data
bin/rails db:setup

# Same as setup, but drop databases first
bin/rails db:reset

# Run setup if database doesn't exist, otherwise migrate
bin/rails db:prepare

# Generate a migration
bin/rails generate migration CreateCustomers name:string:index email:string

# Migrate the database
bin/rails db:migrate

# Show status of migrations
bin/rails db:migrate:status

# Revert (rollback) the previous (n) migration(s)
bin/rails db:rollback STEP=n

# First rollback, then migrate previous (n) migration(s)
bin/rails db:migrate:redo STEP=n
For a detailed overview of these tasks, please refer to this blog post:
 Akshay Khot
Naming Conventions for Active Record Migrations
You can flesh out the structure of the migration during generation by following a few simple conventions. Here're the most common ones I've found. If you know more, let me know in the comments.
# Creates a table named 'Table' with provided columns
bin/rails g migration CreateTable col:type col:type

# Adds column 'Column' to table 'Table'
bin/rails g migration AddColumnToTable col:type

# Removes column 'Column' from table 'Table'
bin/rails g migration RemoveColumnFromTable col:type

# Adds the `amount` column on the `carts` table with precision 10 and scale 2, and
# adds the `user_id` column on the `carts` table (cart references user)
bin/rails g migration AddAmountToCarts 'amount:decimal{10,2}' user:references

# Creates a join table between `customers` and `products` tables.
bin/rails g migration CreateJoinTableCustomerProduct customer product
Working with Tables
ActiveRecord provides a bunch of methods to create, update, and drop tables in the database. Let's explore the most common ones.
Create Table
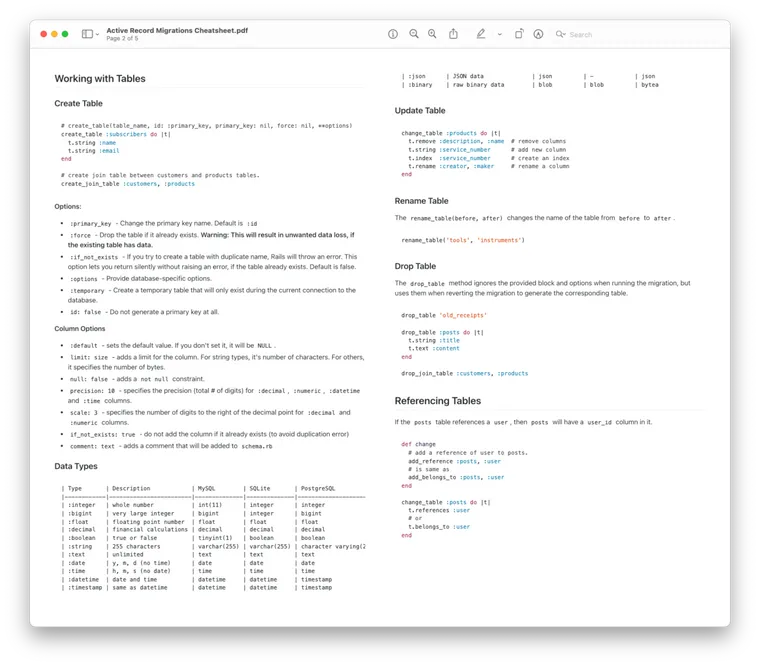
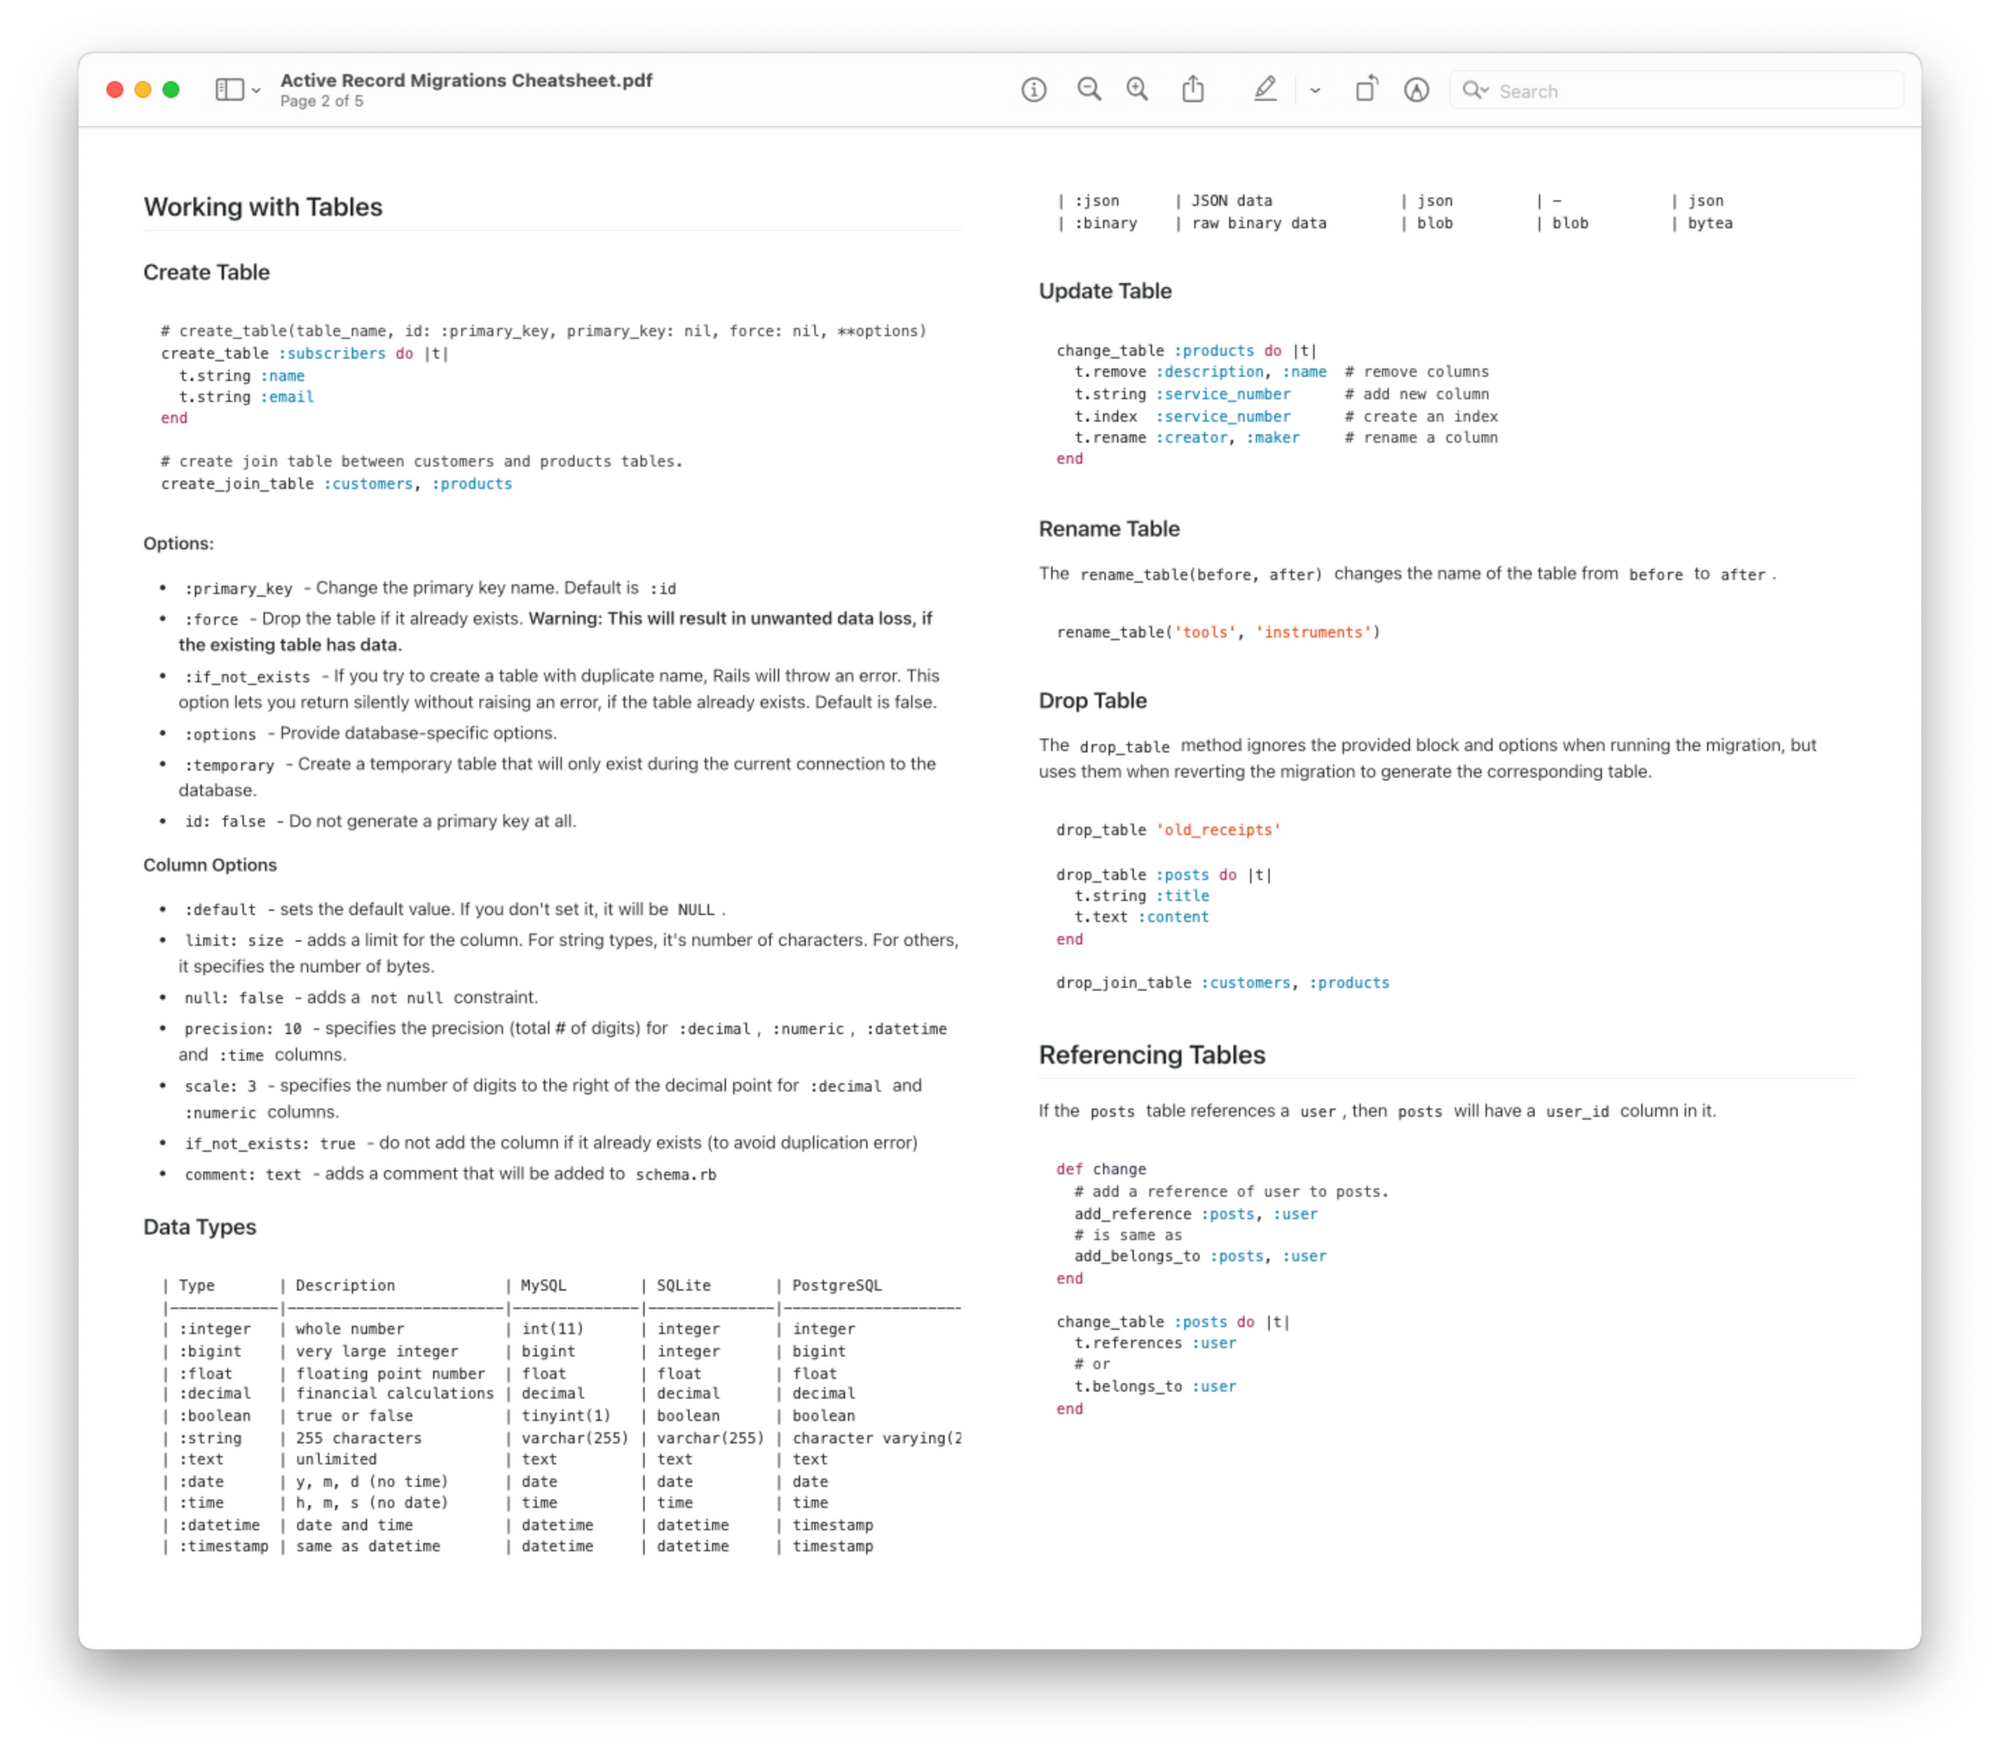
To create a new database table, use the create_table method. This method accepts the name of the table and a block that's used to define the new table, e.g. to add columns, indexes, etc.
# create_table(table_name, id: :primary_key, primary_key: nil, force: nil, **options)
create_table :subscribers do |t|
  t.string :name
  t.string :email
end
It creates a table named subscribers. Assumes an auto-incrementing, integer primary key named id.
tis an instance ofActiveRecord::ConnectionAdapters::TableDefinition. It represents the database table schema and lets you manipulate the schema representation.
To create a join table, use the create_join_table method.
# create join table between customers and products tables.
create_join_table :customers, :products
When creating the table, you may use any of the ActiveRecord's column methods to define the table's columns.
Options:
:primary_key- Change the primary key name. Default is:id:force- Drop the table if it already exists. Warning: This will result in unwanted data loss, if the existing table has data.:if_not_exists- If you try to create a table with duplicate name, Rails will throw an error. This option lets you return silently without raising an error, if the table already exists. Default is false.:options- Provide database-specific options.:temporary- Create a temporary table that will only exist during the current connection to the database.id: false- Do not generate a primary key at all.
Column Options: See the Create Column section for available column options.
Here's a table that shows all available column types along with their corresponding values in different databases.
| Type | Description | MySQL | SQLite | PostgreSQL |
|---|---|---|---|---|
| :integer | whole number | int(11) | integer | integer |
| :bigint | very large integer | bigint | integer | bigint |
| :float | floating point number | float | float | float |
| :decimal | financial calculations | decimal | decimal | decimal |
| :boolean | true or false | tinyint(1) | boolean | boolean |
| :string | 255 characters | varchar(255) | varchar(255) | character varying(255) |
| :text | unlimited | text | text | text |
| :date | y, m, d (no time) | date | date | date |
| :time | h, m, s (no date) | time | time | time |
| :datetime | date and time | datetime | datetime | timestamp |
| :timestamp | same as datetime | datetime | datetime | timestamp |
| :json | JSON data | json | - | json |
| :binary | raw binary data | blob | blob | bytea |
Update Table
Use the change_table method to update existing tables. Like create_table, the change_table method accepts the name of the table and a block to add columns or indexes to the table:
change_table :products do |t|
  t.remove :description, :name
  t.string :service_number
  t.index :service_number
  t.rename :creator, :maker
end
Rename Table
To rename an existing table, use the rename_table method. The following method renames the from_table to to_table.
rename_table('from_table', 'to_table')Drop Table
To drop an existing table, you can use the drop_table method.
drop_table('users')Note: drop_table ignores the provided block and options when running the migration, but uses them when reverting the migration to generate the corresponding table.
def change
  drop_table :accounts

  drop_table :posts do |t|
    t.string :title
    t.text :content
  end
end
Referencing Other Tables
The naming convention for foreign keys is the singularized table name followed by _id.
For example, if table projects depends on table clients, i.e., a project belongs_to a client and a client has_many projects, then projects table will have a client_id column in it.
To add this foreign key, use the add_reference :table_name, :reference method. For example, if the posts table references a user, then posts will have a user_id column in it.
def change
  # add a reference of user to posts.
  add_reference :posts, :user
  # is same as
  add_belongs_to :posts, :user
end
Alternatively, you can use the references method on the TableDefinition instance yielded to create_table or change_table methods.
change_table :posts do |t|
  t.references :user
  # or
  t.belongs_to :user
end
Note: Referencing another table will also create an index.
Working with Columns
Similar to table, ActiveRecord provides various ways to work with columns. You can add new columns, modify existing ones, or delete them altogether. Let's explore the related methods.
Create Column
As seen in the section on creating tables, you can specify new columns while creating a new table. But if you want to add new columns to an existing table, use the add_column method.
The add_column(table_name, column_name, type) method adds a new type column named column_name to table_name.
# add_column(table_name, column_name, type, **options)

add_column(:users, :picture, :binary)
Available Column Types
The type parameter is normally one of the migrations native types, which is one of the following: :primary_key, :string, :text, :integer, :bigint, :float, :decimal, :numeric, :datetime, :time, :date, :binary, :blob, :boolean.
Column Options
:default- sets the default value. If you don't set it, it will beNULL.limit: size- adds a limit for the column. For string types, it's number of characters. For others, it specifies the number of bytes.null: false- adds a `not null` constraint.precision: 10- specifies the precision (total # of digits) for:decimal,:numeric,:datetimeand:timecolumns.scale: 3- specifies the number of digits to the right of the decimal point for:decimaland:numericcolumns.if_not_exists: true- do not add the column if it already exists (to avoid duplication error)comment: text- adds a comment that will be added toschema.rb.
Note: The same options apply while crating a new table with new columns.
Update Column
The change_column method allows you to modify the type and attributes of existing columns. For example, to increase the size of a name column, use the change_column method as follows:
# change_column(table_name, column_name, type, **options)

change_column :users, :name, :string, limit: 80
Rename Column
To rename a column, use the rename_column method.
# rename_column(table_name, column_name, new_column_name)

rename_column(:suppliers, :description, :name)
Renames the column from description to name on the suppliers table
Drop Column
Finally, to drop a column, you may use the remove_column method.
remove_column :users, :passwordAlternatively, you can also call the rename_column and the remove_column method on the table definition, while changing a table.
change_table :users do |t|
  t.remove_column :password
end
If you want to drop multiple columns from a table, pass the list of column names to the remove_columns method.
remove_columns :users, :password, :address, :phoneWorking with Indexes (Indices)
Database indexes provide a way to quickly lookup the requested data. An index is a powerful data structure that makes your database queries faster.
The database uses these indices to search for data without looping through every row in the table. The indices are updated automatically whenever new data is added or removed.
Create Index
ActiveRecord supports several types of indexes. Use the add_index or t.index method to add new index. Additionally, you can mark the index as unique or give it a different name.
The following example creates a new email column and specifies that its values should be unique.
create_table :users do |t|
  t.string :name, index: true
  t.string :email, index: { unique: true }
  t.index [:title, :address], unique: true
end
Alternatively, you may use the add_index method.
def change
  # adds a new index on the `posts` table for the `title` column.
  add_index :posts, :title

  # adds a new index for the `company_id` and `manager_id` columns;
  add_index :suppliers, [:company_id, :manager_id]
end
You may even pass an array of columns to the add_index method to create a compound (or composite) index:
add_index(:accounts, [:branch_id, :party_id], unique: true)When creating an index, ActiveRecord will automatically generate an index name based on the table, column names, and the index type, but you may pass a second argument to the method to specify the index name yourself.
create_table :users do |t|
  t.string :name, index: true
  t.string :email, index: { unique: true, name: 'unique_emails' }
end

 # OR

add_index(:accounts, [:branch_id, :party_id], unique: true, name: 'by_branch_party')
Rename Index
To rename an index, use the rename_index method. This method accepts the table name as its first argument and the current index name and the desired name as its second and third arguments, respectively.
rename_index :people, 'index_people_on_last_name', 'index_users_on_last_name'
Alternatively, use the rename_index method while changing a table. This is useful when you want to change multiple index names in a single migration.
change_table :users do |t|
  t.rename_index(:user_id, :account_id)
end
Drop Index
To drop an index, you may use the remove_index method, passing the name of the table and either the column name or the name of the index.
remove_index :accounts, :branch_id

remove_index :accounts, column: [:branch_id, :party_id]

remove_index :accounts, name: :by_branch_party
Alternatively, use the remove_index method while changing the table.
t.remove_index(:branch_id)
t.remove_index(column: [:branch_id, :party_id])
t.remove_index(name: :by_branch_party)
t.remove_index(:branch_id, name: :by_branch_party)
I'll stop here. If you think this cheatsheet should include any other operations, methods, or options, please let me know in the comments below.
Here's the preview:
That's a wrap. I hope you liked this article and you learned something new. If you're new to the blog, check out the start here page for a guided tour or browse the full archive to see all the posts I've written so far.
As always, if you have any questions or feedback, didn't understand something, or found a mistake, please leave a comment below or send me an email. I reply to all emails I get from developers, and I look forward to hearing from you.
If you'd like to receive future articles directly in your email, please subscribe to my blog. If you're already a subscriber, thank you.