TL;DR: If you want to process (append, replace, etc.) a Turbo Stream response received from a fetch request in JavaScript, simply render the stream HTML with Turbo.renderStreamMessage(html) and let Turbo take care of it, instead of manipulating the DOM yourself.
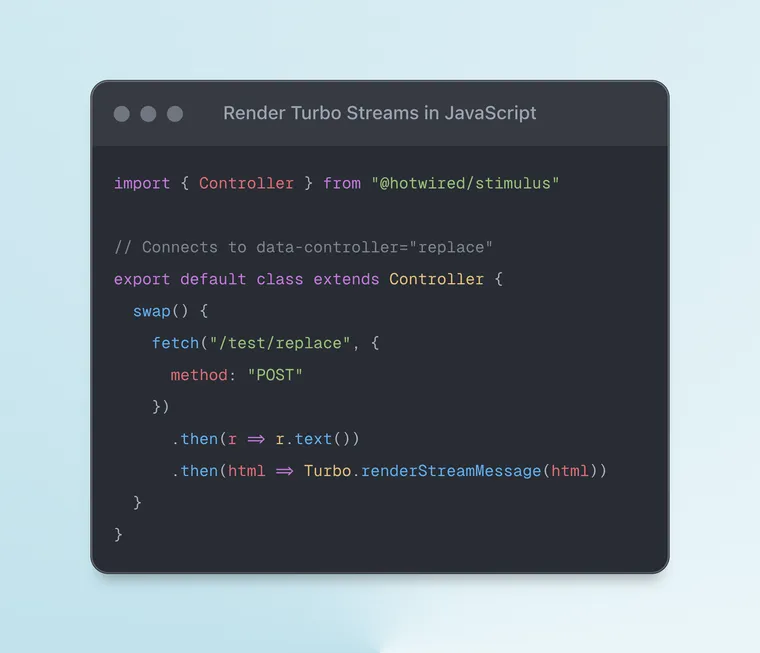
Here's a simple Stimulus controller showing how it works:
import { Controller } from "@hotwired/stimulus"

// Connects to data-controller="replace"
export default class extends Controller {
  // click->replace#swap
  swap() {
    fetch("/test/replace", {
      method: "POST",
      headers: {
        Accept: "text/vnd.turbo-stream.html"
      }
    })
      .then(r => r.text())
      .then(html => Turbo.renderStreamMessage(html))

    // html: <turbo-stream action="replace"> ...</turbo-stream>
  }
}
That's it. Turbo will process the stream response as usual, just like it does for a stream message in response to a form submission or from a WebSocket. This lets you render your view templates on the server with ERB, without duplicating them on the client.
A Little Backstory
While working on a recent client project, I came across an interesting challenge. I am not sure if the way I've solved it is the optimal way (let me know if you have a better solution), but sharing it nonetheless, since the general technique to process Turbo Streams in JavaScript can be useful to others.
Here's what I was trying to do: Allow users to upload images by dragging and dropping into a simple textarea that contains Markdown text and let them copy the public URL of the uploaded image in the markdown format.
Here's what the end result looks like:
- Once the image is dropped onto the editor, it's sent to the server for uploading to the cloud.
- After the server stores the image on the cloud, it sends the public URL of the image back to the client.
- The client JavaScript code displays that URL in a modal dialog with a copy button so that the user can copy + paste it into the (markdown) editor (this responsibility belongs to client since it's the one who initiated the
fetchrequest and got the response).
For uploading the image, I created a Stimulus controller whose action was triggered after the image was dropped. In this action, I made a fetch call to the server, and submitted the image. In the response, I got back the image URL via a JSON response.
Here's the complete controller at this point:
import { Controller } from "@hotwired/stimulus"

// Connects to data-controller="image-uploader"
export default class extends Controller {
  // dragover->image-uploader#handleDrag
  handleDrag(e) {
    // Prevent default behavior (Prevent file from being opened)
    e.preventDefault();
  }

  // drop->image-uploader#upload
  upload(e) {
    e.preventDefault()

    if (e.dataTransfer.items) {
      // Use DataTransferItemList interface to access the file(s)
      [...e.dataTransfer.items].forEach((item, i) => {
        // If dropped items aren't files, reject them
        if (item.kind === "file") {
          const file = item.getAsFile();
          console.log(`uploading the image ${file.name}`);
          this.uploadFileToServer(file)
        }
      });
    }
  }

  async uploadFileToServer(file) {
    const formData = new FormData();
    formData.append('file', file);

    const response = await fetch("/test/upload", {
      method: "POST",
      headers: {
        "X-CSRF-Token": this.getCsrfToken()
      },
      body: formData
    })

    const image_url_response = await response.json()

    // What to do with this JSON??
  }

  getCsrfToken() {
    return document.querySelector('meta[name="csrf-token"]').content;
  }
}
I want to point your attention to the uploadFileToServer method. After making the fetch call posting the image file, the server stored the image and returned the image URL via a JSON response.
The question is: what to do with this URL?
To remain consistent with the rest of the app UI, I wanted to display a modal containing the URL along with a copy button that the user could click to copy it.
The best way to display modals in a Rails + Hotwire app is to either use Turbo Frames or Turbo Streams, keeping the view templates on the server. However, since the Stimulus controller initiated the fetch request, I couldn't just receive and process the Turbo response automatically.
One obvious way to achieve this was to create and use a pure JavaScript based modal. However, that went against the Hotwire's philosophy of rendering templates on the server. Since I'd need the modal for other, regular Hotwire features anyway, it didn't make sense to duplicate the HTML for the modal, once in JavaScript and once in ERB.
The other solution that would let me keep the modal template on the server was to receive the HTML response containing the URL, and use JavaScript to swap the existing empty modal with this response. But this sounded like a messy solution that would create more problems in future.
Then I tried to think about the problem from the first principles. Since Turbo is a JavaScript library, it must be using JavaScript to process the received Turbo Stream HTML. I just needed to find where and how it was doing it.
So I spent some time digging into the source code, and came across the renderStreamMessage method, which Turbo uses internally to process the stream messages.
Turns out, it is exposed to the public, and also documented on the official site.
Only if I had scrolled down a little more (-‸ლ)
That's it. You don't have to muck around with the DOM, let Turbo take care of that!
So here's what I did. Instead of sending the image URL via a JSON response back to the client, I created a new Turbo Stream template called upload.turbo_stream.erb and wrapped the image URL in a Turbo Stream response as follows:
<%= turbo_stream.replace "modal" do %>
  <div id="modal" class="">
    <%= @image_url %>
  </div>
<% end %>
Note: To build the Turbo Stream, I'm using helper provided by turbo-rails.
After that, all I needed was to update my fetch call to receive HTML instead of JSON, and call the above method to delegate the DOM manipulation to Turbo.
Here's the resulting uploadFileToServer method.
async uploadFileToServer(file) {
  // ...
  const response = await fetch("/test/upload", {
    // ...
  })

  const html = await response.text()
  Turbo.renderStreamMessage(html)
}
It worked like magic. The view template for the modal remained on the server where I wanted it to be, and I didn't have to write any extra JavaScript code to update the HTML.
Again, this is the end result:
Pretty cool, right?
Btw, Turbo source code is extremely readable, even more so after dropping Typescript, I highly suggest you give it a read.
 Akshay Khot
One more thing: In my research, I also came across the request.js library in Rails which encapsulates the logic to send by default some headers that are required by rails applications like the X-CSRF-Token, and also automatically processes Turbo Stream responses.
Although it would have simplified my code above, I didn't want to add another dependency to my app, so I left it at that.
That's a wrap. I hope you found this article helpful and you learned something new.
As always, if you have any questions or feedback, didn't understand something, or found a mistake, please leave a comment below or send me an email. I reply to all emails I get from developers, and I look forward to hearing from you.
If you'd like to receive future articles directly in your email, please subscribe to my blog. If you're already a subscriber, thank you.