But...why reinvent the wheel?
For the past few months, over the weekends and evenings, I've been teaching Ruby and Rails to a few kids in my hometown in India. Part of the reason is to give back, but a big motivation is to show them just how much fun programming can be with Ruby and Rails, in contrast to the standard engineering curriculum that focuses on C++ and Java.
Anyway, although most of them picked up Ruby pretty quickly and even started building simple Rails and Sinatra apps, I found that many struggled with understanding how various components fit together to form a working web application.
For example, here're a few recurring themes of questions I've seen pop up:
- What really happens from the moment you type a URL in the browser until the application loads on the screen?
- How Rails Handles incoming requests from the browser?
- What are Puma and Rack, and how they fit in with a Rails app?
- What is Routing and how to dispatch an HTTP request to the Ruby code (a Rails controller)?
- How is data passed from the controller to the views, and how Rails generates the HTML from the ERB template?
- What's involved in sending the generated HTML response to the browser?
- and many more...
Which is not uncommon, since I struggled with the same questions when I was trying to learn about web application development. But if there's one thing that I've learned about learning itself is that to understand the benefits of any tool, you should try to accomplish the same task without using that tool.
Ruby on Rails is not different.
It's a tool that helps us quickly build web applications. And I think we'll have a much better understanding and appreciation of all the things Rails does for us by trying to build a simple yet complete web application without it, trying to implement many of its features ourselves.
This technique has really helped my students, and it also helped me improve my knowledge of Rails. I think it will help you, too.
So, in this series of articles, we will build a web application using only Ruby, without an ounce of Rails. I hope it will give you a peek under the hood and explain some of the core concepts like routing requests, passing data from controllers to views, working with a database, processing forms, and much more.
In this first post, we will set up our project and create a very simple Ruby application that says 'Hello World' in the browser.
Here's the list of topics we'll cover in this post.
- Setup a Project Directory with Bundler.
- Install Puma Application Server to listen for incoming HTTP requests.
- Use the Rack Gem to provide the glue between application servers and our application.
- Create a Web Application that follows the Rack specification.
- Make Puma Talk to Our Application with a Rackup File
- Run the Application
- Use the Rack Reloader Middleware to Reload Application whenever the code changes.
It goes without saying that this series of posts is only for learning purposes, to understand the fundamentals of web applications and frameworks. You should absolutely use Rails for your real-world applications.
Here's a video version of this post. Enjoy!
Let's get started by creating a project directory for our no-rails app!
Setup a Project Directory
Let's create a brand-new directory named weby (yes, it stands for web + ruby) and switch into it.
➜  mkdir weby
➜  cd weby
Next, we'll install bundler, a package (gem) manager for Ruby.
Bundler makes sure Ruby applications run the same code on every machine.
It does this by managing the gems that the application depends on. Given a list of gems, it can automatically download and install those gems, as well as any other gems needed by the gems that are listed.
Initialize Bundler for your project by running the following commands from the project root directory.
➜  gem install bundler
➜  bundle init
It creates a Gemfile in the project. Whenever we want to use a gem in our project, we will add it to this file, and run bundle install command to install it.
As a shortcut, bundler provides the bundle add command, which adds the gem to the Gemfile and runs the bundle install for us.
The first gem we will install using Bundler is Puma, which is an application server.
Install Puma Application Server
To run our web application, we need an application server. Rails uses Puma, and we will use the same.

Let's install Puma using bundler.
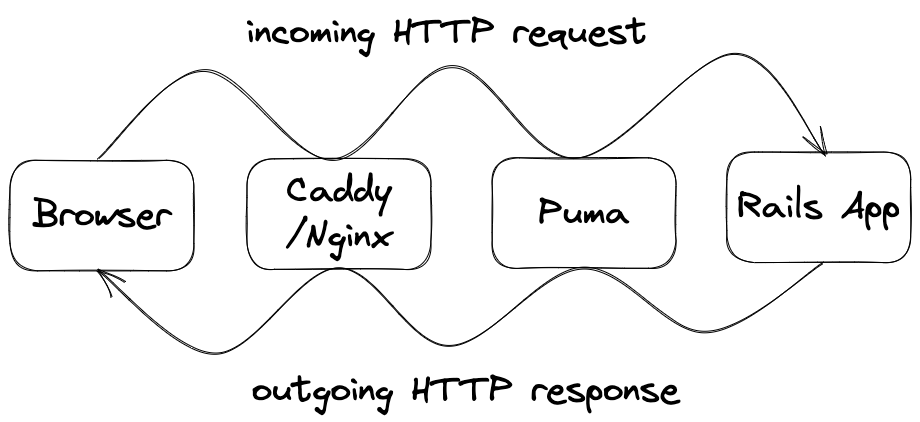
➜ bundle add pumaAn application server is different from a web server such as Apache, Nginx or Caddy which handles incoming requests from the Internet and passes them to the application server.
The purpose of an application server is to take an incoming HTTP request from the web server and pass it to our application. Our application processes the request, builds the response HTML, and hands it back to the application server.
After installing Puma on your machine, the next question is: how will Puma talk to our web application?
For that, we need Rack.
Install the Rack Gem
All Ruby application servers and web applications follow the Rack specification. Let's install the Rack gem using Bundler.
➜ bundle add rackWhat is Rack?
Rack is a very important topic if you want to understand how Ruby-based web frameworks and application servers communicate with each other. To learn more about Rack specification as well as the gem, I suggest you read this article.
 Akshay Khot
Here's the gist:
Rack provides a simple interface using which application servers communicate with the applications.
The Rack specification has two conditions:
- The application should have a
callmethod that takes anenvobject representing the incoming HTTP request. - The application should return an array containing the status, headers, and response.
So that is Rack, a specification. However, in addition to being an abstract protocol, Rack is also a gem. It provides a bunch of useful tools, such as middleware and a convenient DSL (domain-specific language) to run rack-compliant web applications.
Now, let's create an application Puma will talk to using the Rack specification.
Create a Web Application
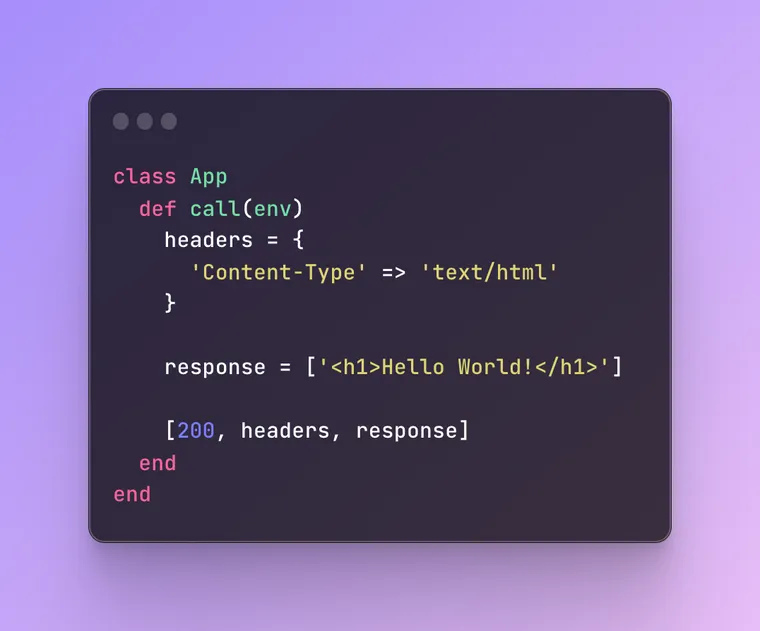
Create the following Ruby script called app.rb in the weby directory. This is our application.
Yes, IT IS our entire app.
# weby/app.rb

class App
  def call(env)
    headers = {
      'Content-Type' => 'text/html'
    }

    response = ['<h1>Hello World!</h1>']

    [200, headers, response]
  end
end
As you can see, it follows the Rack protocol.
- It has a
callmethod that takes anenvobject. - It returns an array containing the status, headers, and response.
Make Puma Talk to Our Application with a Rackup File
At this point, we have the Puma application server, and we also have our application app.rb.
The only thing missing is the glue that connects the two.
How does Puma pass the incoming request to our application?
The answer is a rackup file, which is just a Ruby file with .ru extension. All Rails apps use this file. When you create a new Rails app, it's generated for you.
When we launch Puma (next step) without any arguments, it looks for this rackup file called config.ru in the current directory. Check out the Puma documentation to learn more.
So let's add a config.ru file in the weby directory.
➜ touch config.ruAdd the following code to this file. It loads the rack gem and also loads our application.
require 'rack'
require_relative './app'

run App.new
The run method is provided by the Rack gem that we installed earlier. It takes a Ruby object as an argument and invokes the call method on it.
Since the App class has a call method, Rack can run it just fine.
At this stage, you should have the following structure in your project directory.
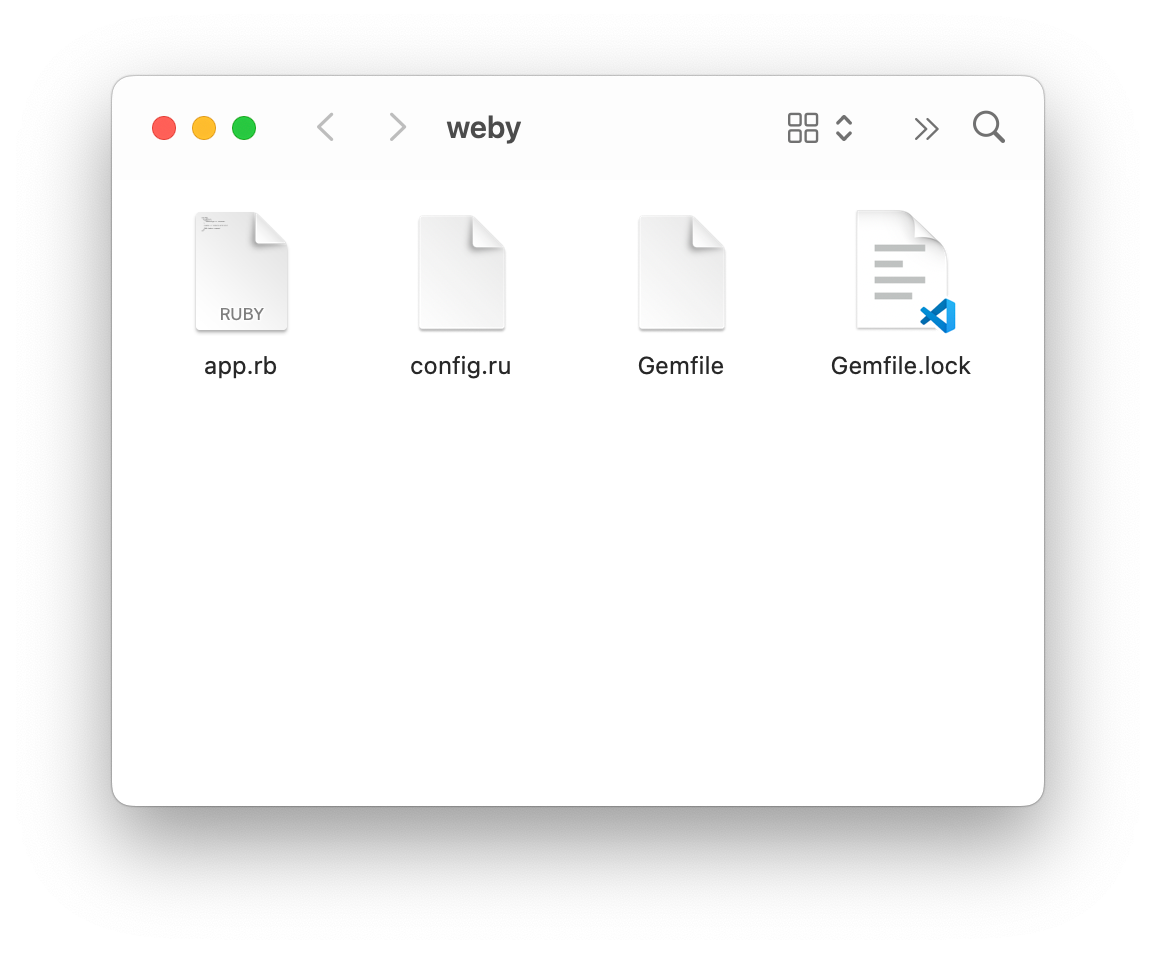
We have the final piece of the puzzle. The only thing remaining is running the application!
Run the Application
To launch the web server, run the puma command from the weby directory. Alternatively, you can also run rackup and it will work the same.
The benefit of the rackup command is that it's app-server agnostic. So it will work even if you're using a different app-server like Thin instead of Puma. ➜ puma
Puma starting in single mode...
* Puma version: 6.0.0 (ruby 3.1.0-p0) ("Sunflower")
* Min threads: 0
* Max threads: 5
* Environment: development
* PID: 6041
* Listening on http://0.0.0.0:9292
Use Ctrl-C to stopNow our web server is running and serving our application. Open your browser and go to http://0.0.0.0:9292 URL.
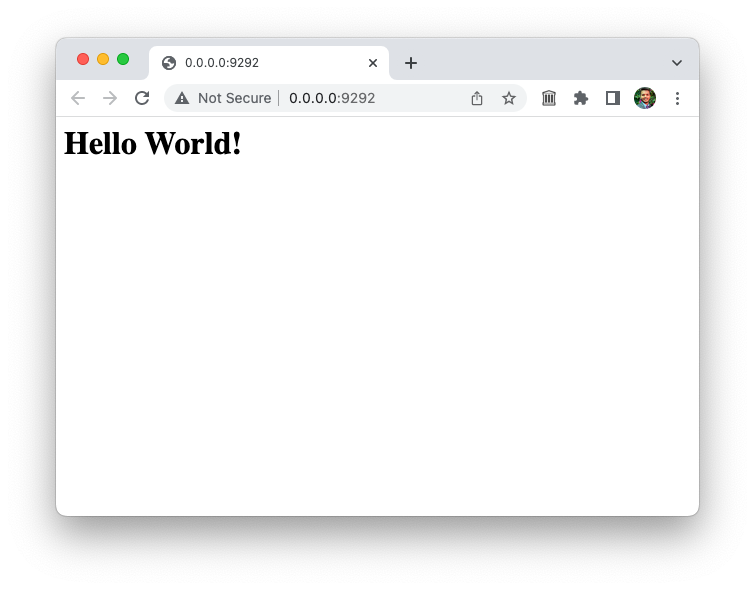
Congratulations! You have the simplest web application written in Ruby.
To summarize what we've done so far,
- We installed an application server that accepts HTTP request and forwards it to our application
- We created the glue (the
rackupfile) between the application server and our application, so Puma knows where to send the incoming request. - We wrote an entire web application in a single Ruby script
app.rbthat takes the incoming HTTP request in theenvparameter and returns the response containing the status, headers, and the response body.
The cool thing is, this is exactly what Rails does behind the scenes!
If you don't believe me, open any Rails app and notice the config.ru file. It runs the Rails.application as your application.
require_relative "config/environment"

run Rails.application
Rails.application.load_server
The Rails application class inherits from the Engine class. It contains the entry point of your application. Open the engine.rb file and see for yourself.
def call(env)
  req = build_request env
  app.call req.env
end
We'll trace the whole path of a Rails request in a separate blog post, but let's fix one minor annoyance we have in our application.
Use the Rack Reloader Middleware to Reload Application
At this point, we have a small problem.
If you make a change in your application, it won't be reflected in the browser. For this, you need to restart the server by pressing ctrl + c on the keyboard.
After making a change, restart the server by running rackup or puma command again. Your change will show up now.
It can get tedious to restart the server after every change.
Is there a better way?
Yes! The Rack gem ships with a Rack::Reloader middleware that reloads the application after changing the source code.
A middleware is a small, focused, and reusable application that provides useful functionality to your main app.
Middleware sits between the user and the application code. When an HTTP request comes in, the middleware can intercept, examine, and modify it. Similarly, it can examine and modify the HTTP response before forwarding it to the user.
Check out my article on Rack middleware to learn more.
Akshay Khot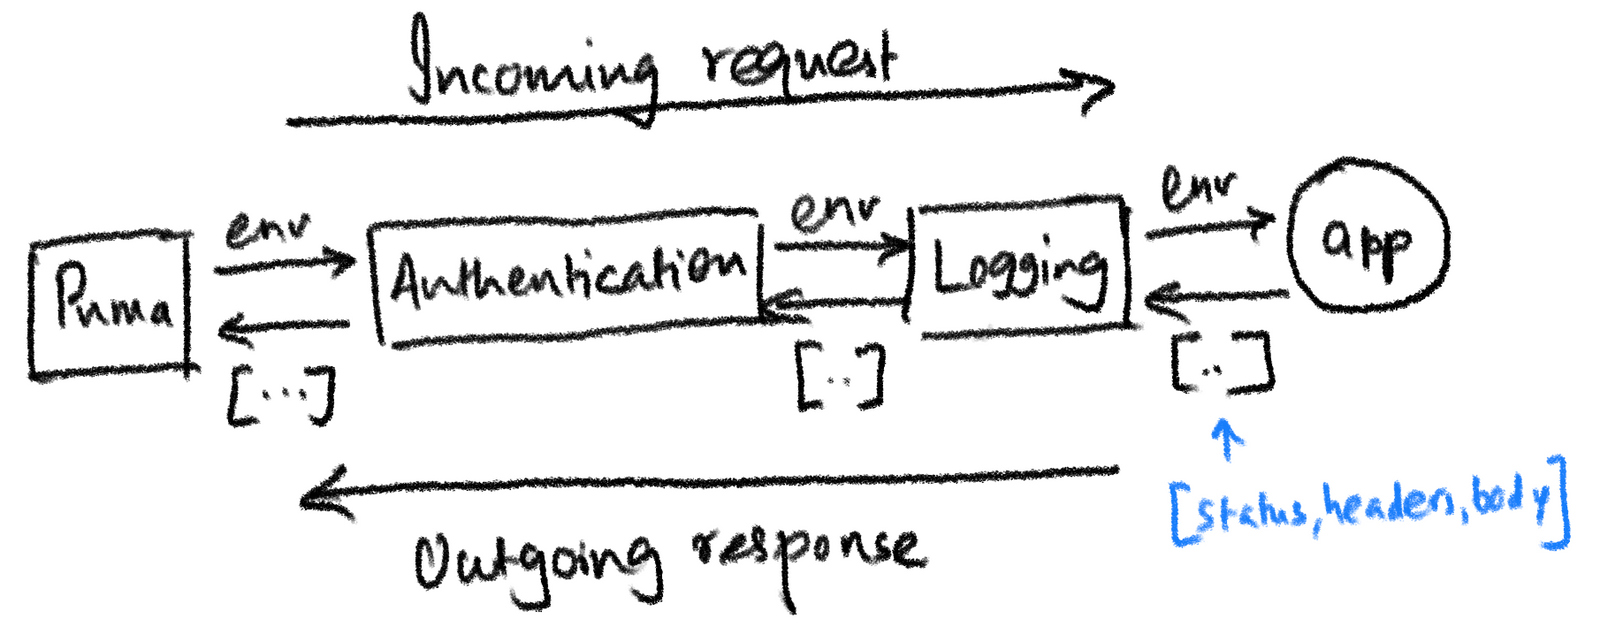
Use the Reloader Middleware
Add the Rack::Reloader middleware in the config.ru file.
require 'rack'
require_relative './app'

use Rack::Reloader, 0 # <- Add this line
run App.new
Now launch the web server using puma command. The Reloader middleware will automatically reload the application when the next request arrives, if the source code was changed. So we don't have to restart the server manually.
Problem solved.
What's Next?
Currently, our app is returning a hard-coded string response directly from the Ruby code, which is not ideal. We will learn how to separate the "view" from the application logic and move it to a different part of the codebase.
In future articles in this series, I will explore the following topics.
- Routing requests based on URL patterns
- Project structure and organization
- HTML templates with ERB
- How to serve static files
- Handle errors and logging
- Connect to the database to store and fetch data
- Generate dynamic response HTML
- Adding middleware to handle specific tasks like authentication
- Process form inputs
- and much more...
If those sound interesting to you, consider subscribing to the blog.
Trust me, it's going to be a lot of fun, so stay tuned!!
That's a wrap. I hope you liked this article and you learned something new.
As always, if you have any questions or feedback, didn't understand something, or found a mistake, please leave a comment below or send me an email. I look forward to hearing from you.
If you'd like to receive future articles directly in your email, please subscribe to my blog. If you're already a subscriber, thank you.