Note: This is a long article (> 5000 words), so don't expect to finish reading it in one sitting. Also, make sure you keep the Rails and Hotwire documentation open while programming.
Here's a list of topics this article covers:
- A brief introduction to Hotwire
- Create a New Rails Application
- Install Tailwind CSS
- Create, Read, Update, and Delete Tasks
- How Turbo Drive Works
- Using Stimulus for Completing Tasks
- Introducing Turbo Frames for In-Place Editing
- Conclusion: Why Hotwire?
A Brief Introduction to Hotwire
Hotwire is a suite of front-end frameworks shipped with Rails 7. It stands for HTML over the wire. It is a collection of techniques that tries to get the best of both worlds, keeping the original, simple web architecture of sending HTML over the wire, while not losing the performance benefits of Single Page Applications.

Hotwire is not a single framework; it’s a suite of different frameworks.
- Turbo uses different techniques to reduce the amount of JavaScript most web applications have to write. This is the most important part of Hotwire.
- Stimulus is a JavaScript framework when you absolutely need to use JavaScript. It sprinkles the client-side interactivity for your application when a server-side trip is not justified.
- Strada (not yet released) works with native applications, making it easy to progressively level-up web interactions with native replacements.
Turbo uses the following techniques to provide a SPA-like experience, while still keeping the simplicity of traditional web applications, i.e. sending HTML over the wire.
- Turbo Drive accelerates links and form submissions. It listens for link clicks or form submissions, performs them in the background, and updates the page without a full reload.
- Turbo Frames divide pages into independent contexts called frames (not iframe). Turbo captures link clicks and form submissions inside a frame, automatically updating the frame contents after receiving a response.
- Turbo Streams delivers page changes over WebSocket, SSE, or in response to form submissions using just HTML and a set of CRUD-like actions.
If all these different frameworks and techniques are already sounding confusing, don’t worry. You won’t be using all of them equally, all the time. Here’s a diagram that might help you understand how it all fits together.
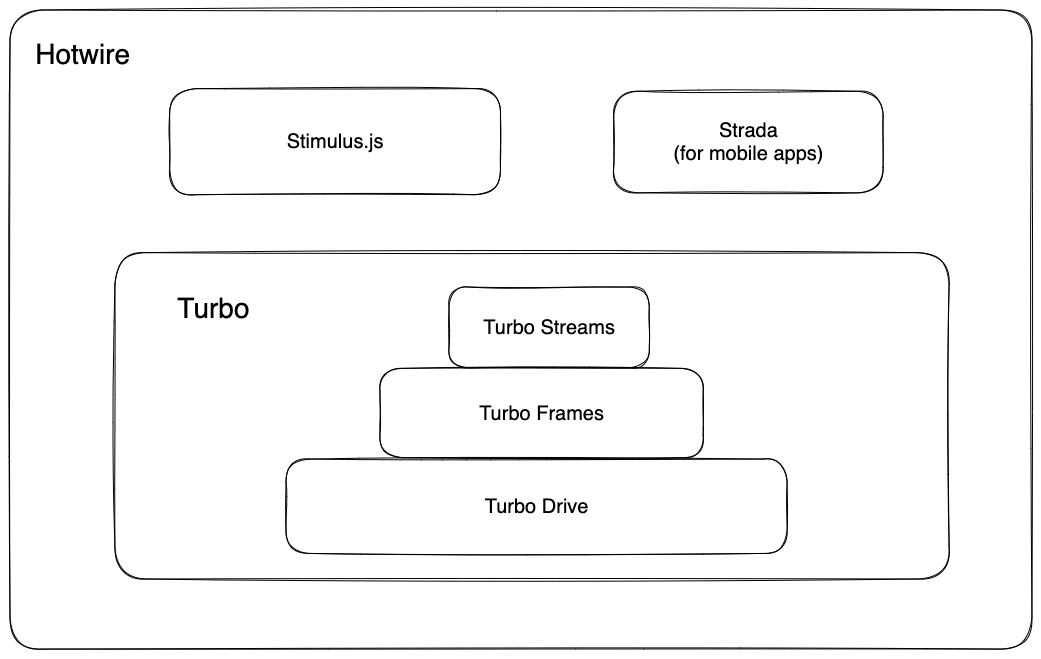
Turbo makes the foundation of Hotwire. When you need to work with some JavaScript to add client-side interactivity, you use Stimulus, and you only need Strada when your application needs to have mobile apps on Android and iOS.
Inside Turbo, Turbo Drive will satisfy most of your needs for fast performance, by only replacing the page body when you click a link. When you need additional responsiveness for updating parts of the page, you use Turbo Frames. Finally, in a few cases where you need to bring your application alive, such as sending live updates from the server, you will use Turbo Streams.
For more details, please check out the following article that compares and contrasts the traditional web application architecture with single-page applications, also explaining the drawbacks of single-page applications.
 Akshay Khot
With that quick summary out of the way, let's build our to-do list.
Why a To-Do List?
There’s nothing like building a simple, run-of-the-mill to-do list when learning a new framework. It teaches you the basics of creating, reading, updating, and deleting data from various levels of the technology stack, including the front-end, back-end, and database.
We will start with a new Rails app from scratch and learn about Hotwire as we build our application. I am also going to use Tailwind CSS to style our app, but it’s not a requirement, and the code examples should still work without it. But, if you haven’t worked with Tailwind, I highly recommend that you give it a try.
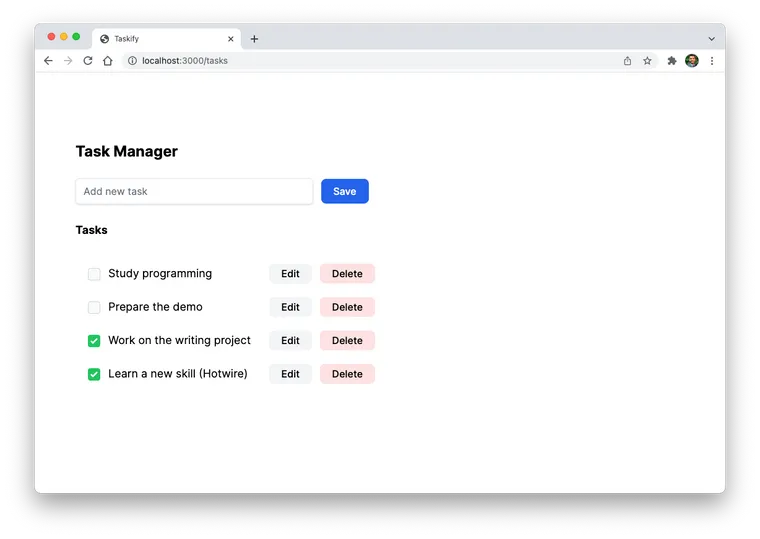
Before we start coding, this is a quick preview of what we are going to build. It’s a simple CRUD application. You can add new tasks, edit existing ones, delete a task, and also complete them.
I’ll assume that you have installed the required dependencies for building a Rails app. If not, just follow the Rails getting started guide, and you should be all set. For this application, I will use the following stack:
- Ruby on Rails
- Hotwire (Turbo Drive + Stimulus)
- Sqlite
- Tailwind CSS
With that out of the way, let’s start by creating a new Rails app.
Step 1: Create a New Rails Application
Run the following command to create a new Rails application in a new terminal window. I will call my app taskify.
➜ rails new taskify
➜ cd taskify
Open the app in your favorite editor. I will use VS Code.
➜ code .
Let’s run the app to make sure everything is set up correctly. Use the following command to start the server and visit the https://localhost:3000 URL to see your app.
➜ bin/rails server
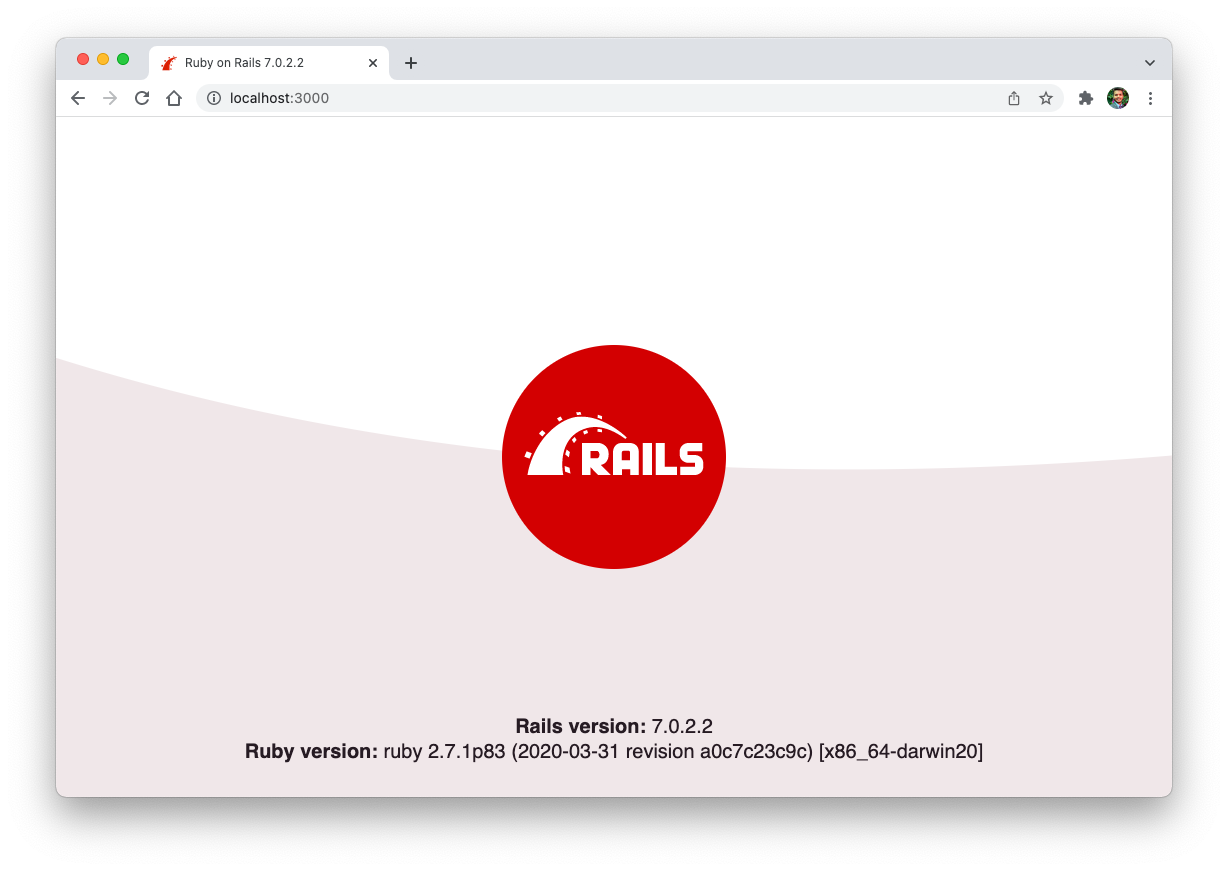
If everything works, Rails should greet you with the following screen.
Step 2: Install Tailwind CSS
You can build this app using plain CSS or SASS, but I highly suggest that you consider using Tailwind CSS. It will dramatically increase your productivity when designing UI (not constantly switching back and forth between HTML and CSS) and help you write more maintainable CSS.
Now I have to warn you first if you have never seen Tailwind. It takes a while to get used to, but once you've taken the pill, you will never want to go back. I surely don't. That said, if you don’t want to use it, the rest of the tutorial should still work for you.
First, install the tailwindcss-rails gem that makes the setup painless.
➜ bin/bundle add tailwindcss-rails
Then run the Tailwind installer, which will set up Tailwind for you, additionally setting up foreman, which makes running multiple processes very easy. For more details, check out my post on Foreman.
➜ bin/rails tailwindcss:install
The next step is to configure the template paths in the config/tailwind.config.js file. Tailwind watches these files to generate the final CSS. However, the tailwindcss-rails gem does it automatically for you, also setting the tailwind directives in the application.tailwind.css file.
module.exports = {
  content: [
    './app/helpers/**/*.rb',
    './app/javascript/**/*.js',
    './app/views/**/*',
  ],
  theme: {
    extend: {},
  },
  plugins: [],
}
Finally, launch the Foreman script that will launch the Rails server and the Tailwind CLI to watch for changes in your HTML or ERB files and generate the CSS.
➜ bin/dev
19:25:54 web.1  | started with pid 29201
19:25:54 css.1  | started with pid 29202
Note: Make sure you’ve already stopped the Rails app using ctrl + c that you launched earlier. Otherwise, the above command will throw an error saying, “a server is already running”.
If everything worked, you should still be greeted by the Rail logo if you reload your browser. We are now ready to start building our task manager.
Step 3: Create the Task Resource
Now, we could take the easy way out and generate a rails scaffold instead of a resource, which will set up everything for us, including the routes, controller actions, views, style, etc. However, we want to really learn how to build this task manager step-by-step, so we will take the long and hard route. I promise that it's worth the effort, and you will learn a lot in the process.
What's a resource? A resource is any object that you want users to be able to access via URI and perform CRUD (create, read, update, delete) operations on.
We need a Task resource for our to-do list, which has description and completed attributes. So let’s generate the Task model using the rails generate resource command. This command creates an empty model, controller, and migration to create the tasks table.
➜ bin/rails generate resource task description:string{200} completed:booleanRunning this command will create a 20220212031029_create_tasks.rb migration file under the db/migrate directory. The exact name will be different as Rails uses the timestamp to generate the name of the migration file.
This file should have the following content.
class CreateTasks < ActiveRecord::Migration[7.0]
  def change
    create_table :tasks do |t|
      t.string :description, limit: 200
      t.boolean :completed

      t.timestamps
    end
  end
end
Let’s run the migration to create the tasks table. This will run the SQL command to create the table in the database.
➜  bin/rails db:migrate
== 20220212031029 CreateTasks: migrating ======================================
-- create_table(:tasks)
   -> 0.0021s
== 20220212031029 CreateTasks: migrated (0.0022s) =============================
If you open your SQLite database using a database viewer such as DB Browser, you should see a tasks table in the database.
Step 4: Set up Home page
Let's change the routes.rb file to change the home page to the tasks page instead of the Rails welcome page. For this, open the routes.rb file and add the following directive at the top.
Rails.application.routes.draw do
  root "tasks#index"

  resources :tasks
end
Rails recommends putting the root route at the top of config/routes.rb, as it will be matched first, since a home page is the most popular route of most Rails applications.
Now restart your Rails app, and reload the browser. You should see an error.
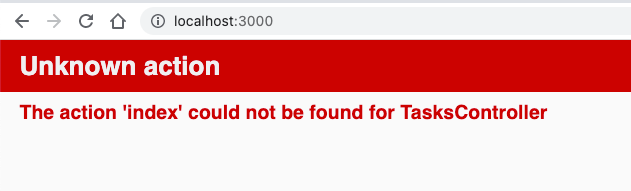
Rails throws this error because we haven’t created our index action yet. Let's create that now.
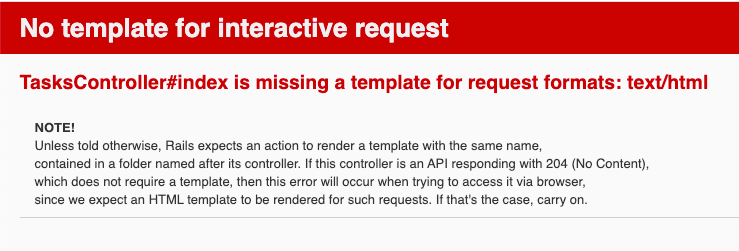
In addition to the migration, the generate resource command should have also created an empty TasksController for you.
class TasksController < ApplicationController
end
Let’s create our first action called index to display all the tasks. In this action, we will fetch all the tasks from the database.
class TasksController < ApplicationController
  def index
    @tasks = Task.all
  end
end
Creating action is not enough. If you reload the page, you should see a different error because we didn’t create the template (view) corresponding to this action.
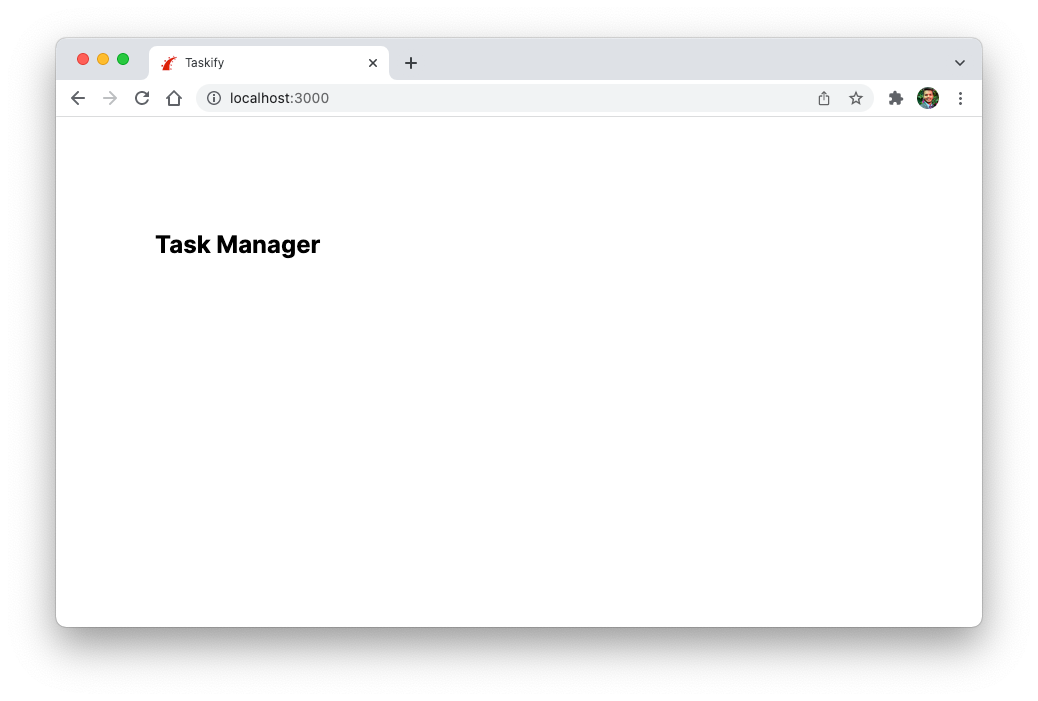
Let’s fix that. In the app/views/tasks directory, add a file named index.html.erb.
<h1 class="font-bold text-2xl">Task Manager</h1>
If you reload the browser now, the words “Task Manager” should greet you. If you see the following view, that means Tailwind is working correctly, too.
Step 5: Create New Tasks
A task manager without any tasks is boring. So let’s add a form using which the users can add new tasks.
Start by creating a new task in the index action on our TasksController. Our form will use this as the default task.
class TasksController < ApplicationController
  def index
    @tasks = Task.all
    @task = Task.new
  end
end
Next, we will create the form partial by adding a _form.html.erb file in the app/views/tasks directory. This form has an input field and a button to submit the task.
<%= form_with(model: task, class: "mb-7") do |form| %>
  <div class="mb-5">
    <%= form.text_field :description, placeholder: "Add new task", class: "inline-block w-96 px-3 py-2 mt-2 shadow rounded-md border border-gray-200 outline-none" %>
    <%= form.submit "Save", class: "btn py-2 ml-2 bg-blue-600 text-white" %>
  </div>
<% end %>
Add the following code to the index.html.erb file to display this form partial on the home page.
<h1 class="font-bold text-2xl">Task Manager</h1>

<div class="mt-4">
  <%= render "form", task: @task %>
</div>
Notice that we are rendering the form as a partial, so we can reuse it later, possibly in a separate page that lets users add more details to a task.
Partials allow you to break the rendering process into more manageable chunks. With a partial, you can move the code for rendering a particular piece of a response to its own file.
Finally, add some style in the application.tailwind.css file, so our buttons look good. I’ve also removed the flex class on my main element in the application.html.erb file to keep things simple.
@tailwind base;
@tailwind components;
@tailwind utilities;

@layer components {
    .btn {
        @apply mt-3 rounded-lg py-1 px-5 inline-block font-medium cursor-pointer;
    }
}
Now reload the page. You should see the following form:

If you add some text and click “Save”, the page reloads. However, opening the Devtools shows an error in the networks tab because we are not handling form submissions on the back-end.

Let’s fix it by adding a create action on the TasksController.
class TasksController < ApplicationController
  def create
    @task = Task.new(task_params)

    respond_to do |format|
      if @task.save
        format.html { redirect_to tasks_url, notice: "Task was successfully created" }
      else
        format.html { render :new, status: :unprocessable_entity }
      end
    end
  end

  private

  def task_params
    params.require(:task).permit(:description)
  end
end
Strong Parameters in Rails
You might wonder why we are using task_params method instead of fetching them directly from params hash.
This technique called strong parameters, and it allows you to choose which attributes should be permitted for mass updating and thus prevent accidentally exposing that which shouldn’t be exposed.
The require method is used to mark parameters as required, and permit is used to set the parameter as permitted and limit which attributes should be allowed for mass updating. source
To learn more, check out the following post:
Akshay Khot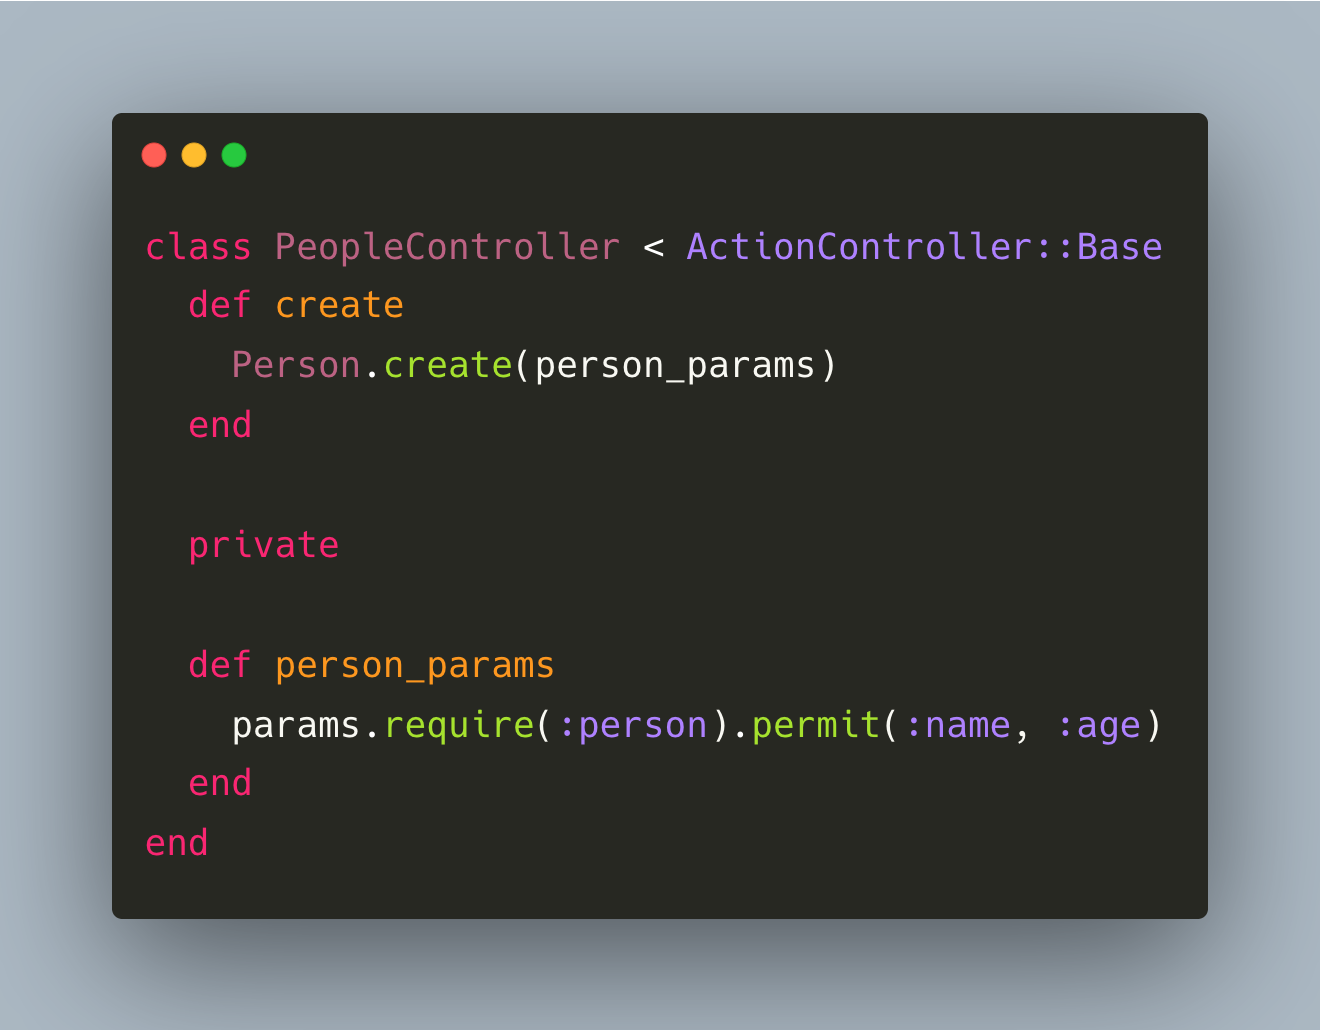
Finally, update the index.html.erb template to show the notice message at the top.
<% if notice.present? %>
  <p class="py-2 px-3 bg-green-50 mb-5 text-green-500 font-medium rounded-lg inline-block" id="notice">
    <%= notice %>
  </p>
<% end %>

<h1 class="font-bold text-2xl">Task Manager</h1>

<div class="mt-4">
  <%= render "form", task: @task %>
</div>
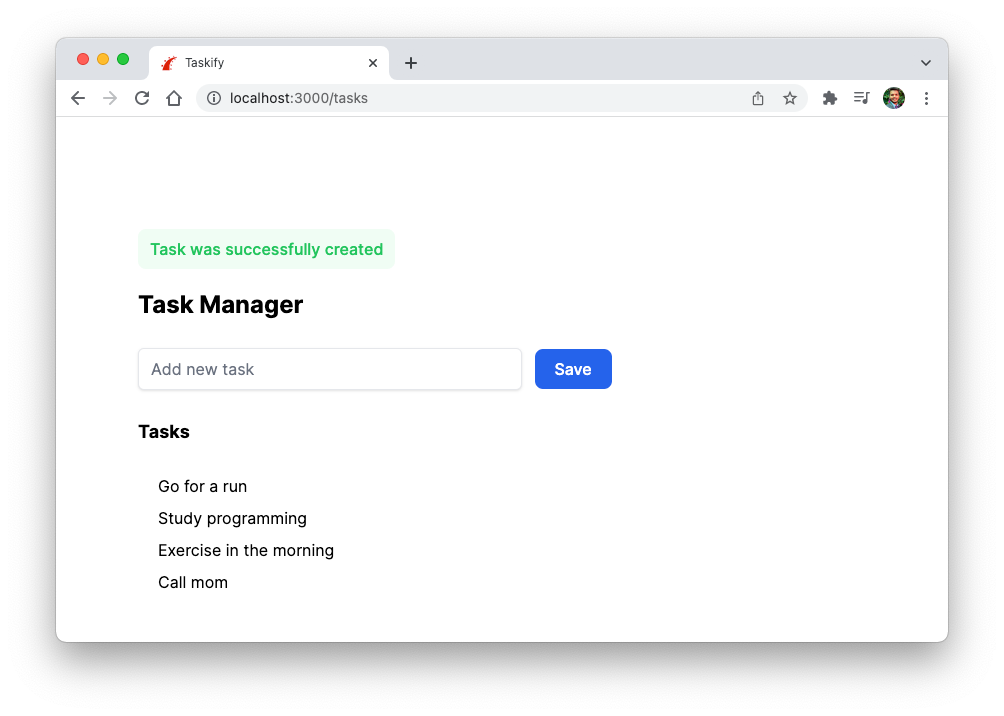
Let’s add a new task and hit the Save button. You should see the success message, saying that the task was successfully saved in the database.
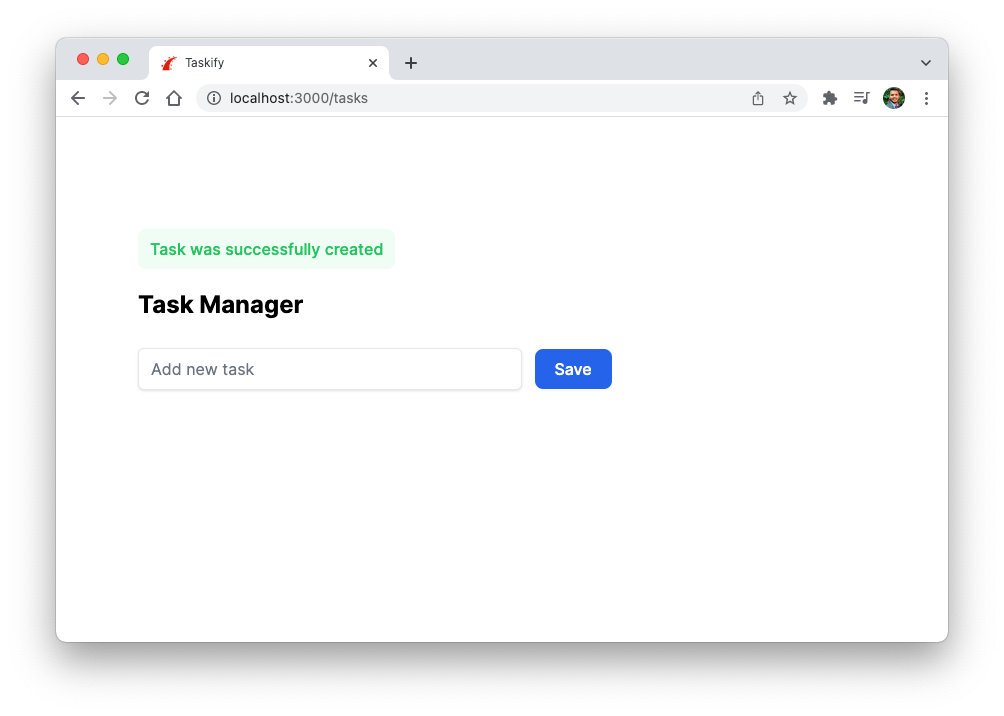
But, wait? Where is my task? It’s not showing up because we haven’t added any code on our view template to display the tasks. Let’s fix that by adding the following code (the last div below) in the index.html.erb file.
<% if notice.present? %>
  <p class="py-2 px-3 bg-green-50 mb-5 text-green-500 font-medium rounded-lg inline-block" id="notice">
    <%= notice %>
  </p>
<% end %>

<h1 class="font-bold text-2xl">Task Manager</h1>

<div class="mt-4">
  <%= render "form", task: @task %>
</div>

<div id="tasks">
  <h1 class="font-bold text-lg mb-7">Tasks</h1>

  <div class="px-5">
    <%= render @tasks %>
  </div>
</div>
We are again using the task partial in the <%= render @tasks %> statement, which is a shortcut for looping over each task and rendering the _task partial for that task. Also, remember that we had set the @tasks variable in our index action on the TasksController class.
So let’s create the _task partial by creating a _task.html.erb file in the app/views/tasks directory.
<div class="block mb-2">
  <%= task.description %>
</div>
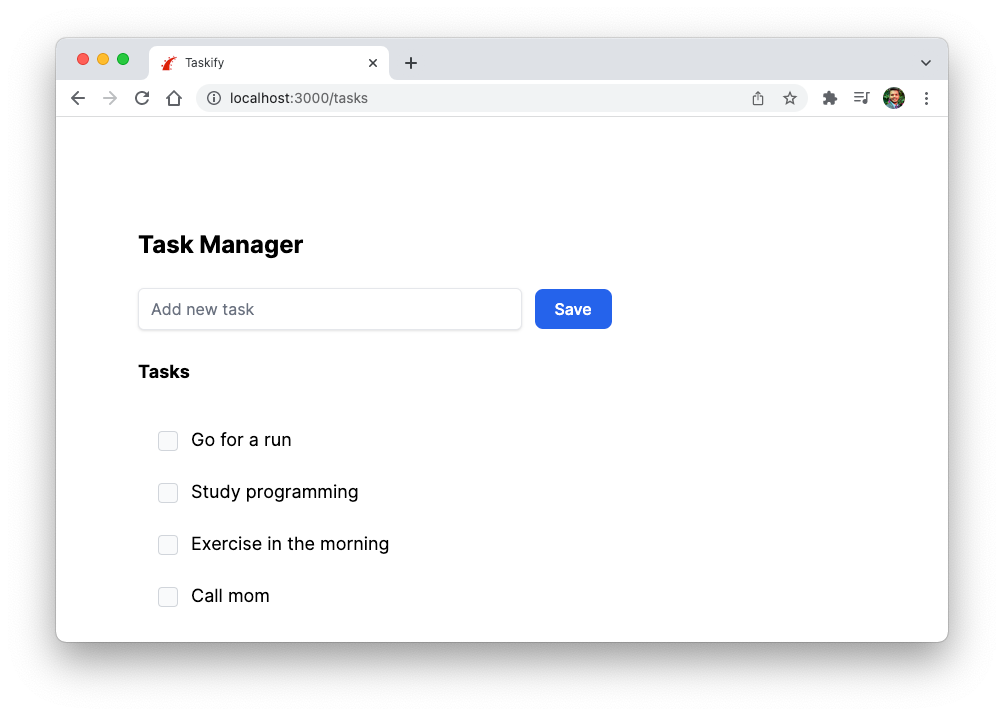
If you reload the page, you will see our first task. Hey, we did it!
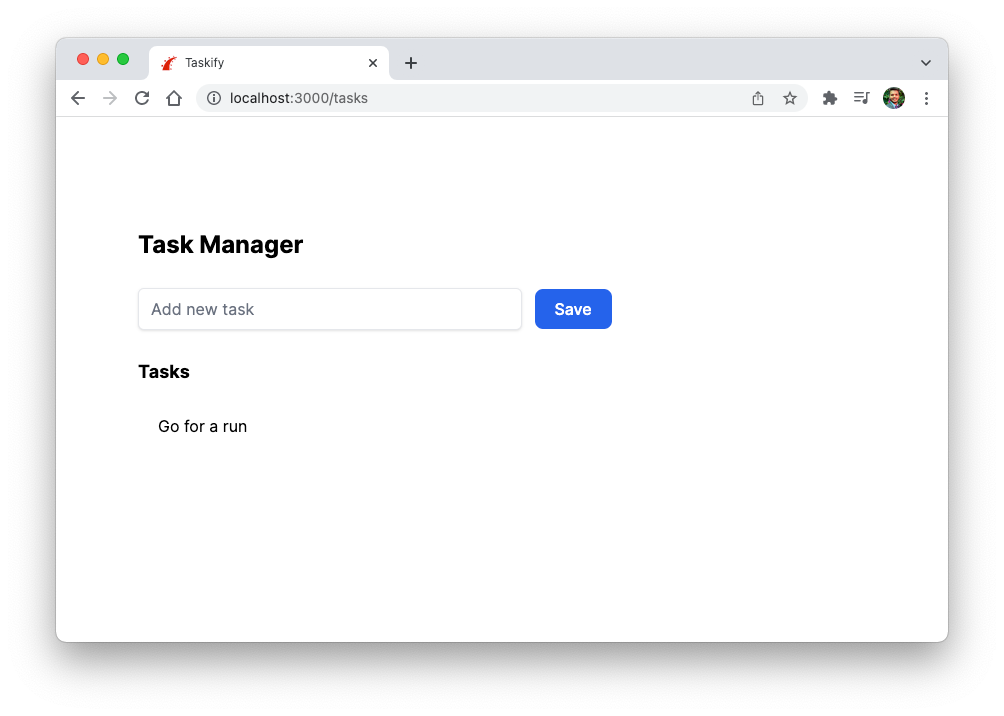
Go ahead and add a few more tasks.
Wait, Where's Hotwire?
At this point, you might be wondering, “Hey, you said we were going to use Hotwire in this tutorial. When are we going to get to that part?” If so, I have a surprise for you. We are already using Hotwire. At least, a sub-framework of Hotwire called Turbo Drive, which is activated by default in a Rails 7 app.
Notice that the browser is not doing a full page reload when we add a new task. It also feels very responsive. The server redirects you to the index page whenever you click the button. However, you can see that the browser is not reloading the page, and your task shows up automatically. What gives?
The answer is the Turbo Drive framework that’s part of the Hotwire stack. It’s working behind the scenes to make your application faster.
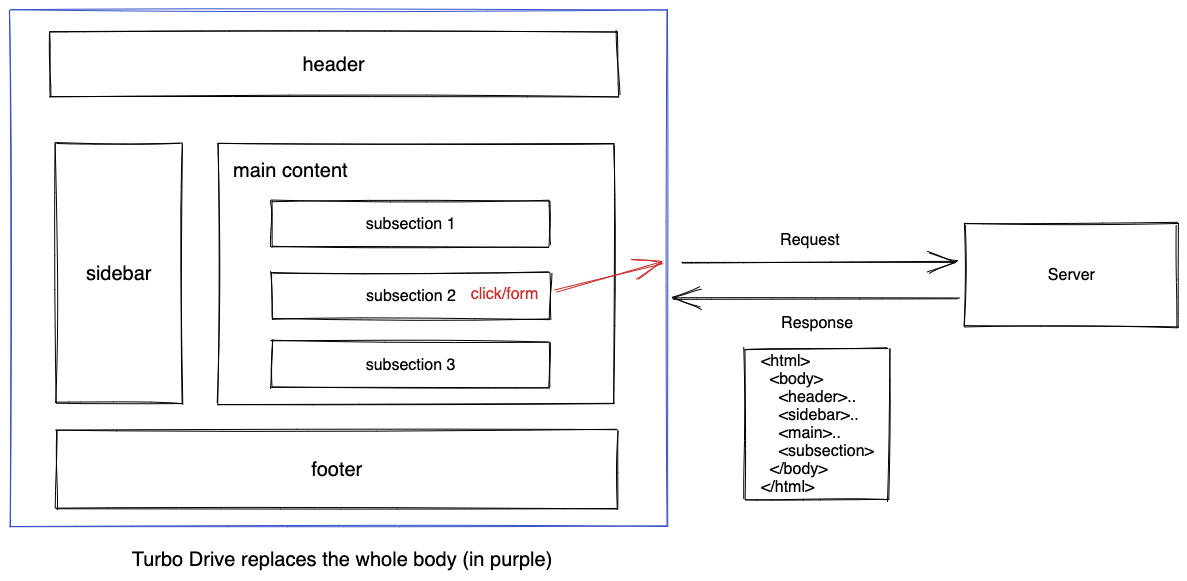
How Turbo Drive Works
Turbo Drive intercepts all clicks on anchor links to the same domain. When you click a link or submit a form, Turbo Drive does the following:
- Prevent the browser from following the link,
- Change the browser URL using the History API,
- Request the new page using a
fetchrequest - Render the response HTML by replacing the current
<body>element with the response and merging the<head>element’s content.
The JavaScript window and document objects as well as the <html> element persist from one rendering to the next.
The same goes for an HTML form. Turbo Drive converts Form submissions into fetch requests. Then it follows the redirect and renders the HTML response. As a result, your browser doesn’t have to reload, and the app feels much faster.
To see how the app will behave without Hotwire, disable the Turbo Drive framework by adding the following line in the app/javascript/application.js file.
Turbo.session.drive = false
Now if you try to add a task, you can verify that the browser did a full reload like traditional web applications. Re-enable it, and reload the page. Try adding a new task, and notice that it didn't reload the page.
Some of you must have noticed that there’s no way to complete our tasks. What fun is there to keep piling more and more tasks, without having a way to complete them? We need a checkbox that will mark a task as complete or incomplete.
We will use another Hotwire framework called Stimulus to achieve this. As advertised, it is a modest JavaScript framework for the HTML you already have.
I love the way it describes itself on its website.
Stimulus is a JavaScript framework with modest ambitions. It doesn’t seek to take over your entire front-end—in fact, it’s not concerned with rendering HTML at all. Instead, it’s designed to augment your HTML with just enough behavior to make it shine.
Let's dig deeper.
Step 6: Using Stimulus for Completing Tasks
First, let’s wrap our task in a form to add a checkbox. Add the following code in the _task.html.erb file.
<div class="block">
  <%= form_with(model: task, class:"text-lg inline-block my-3 w-72") do |form| %>
    <%= form.check_box :completed,
                       class: "mr-2 align-middle bg-gray-50 border-gray-300 focus:ring-3 focus:ring-blue-300 h-5 w-5 rounded checked:bg-green-500" %>
    <%= task.description %>
  <% end %>
</div>
Reloading the page shows the beautiful checkbox next to our task.
Next, we will add a data-controller attribute in our index.html.erb template.
In Stimulus, we mark our elements of interest by annotating their data attributes, such as data-controller and data-action.
Stimulus continuously monitors the page waiting for HTML data-controller attributes to appear. For each attribute, Stimulus looks at the attribute’s value to find a corresponding controller class, creates a new instance of that class, and connects it to the element.
I have skipped the rest of the code for brevity. You are only adding the data-controller="tasks" attribute on the div element rendering the tasks.
...
<div class="px-5" data-controller="tasks">
  <%= render @tasks %>
</div>
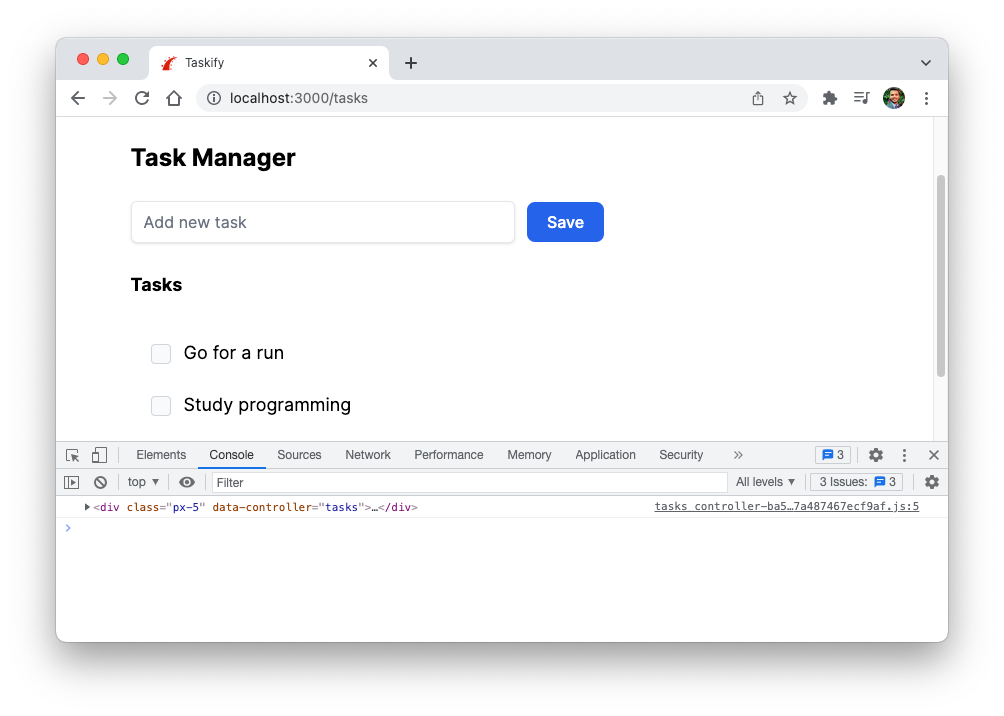
For this data-controller to work, we need to add a tasks_controller.js file in the app/javascript/controllers directory. Or, you can also run the Rails generator to create Stimulus controllers for you.
➜  bin/rails generate stimulus tasks
      create  app/javascript/controllers/tasks_controller.js
Add the following code to this file.
import { Controller } from "@hotwired/stimulus"

export default class extends Controller {
    connect() {
        console.log(this.element)
    }
}
Stimulus calls the connect method each time it connects a controller to the document. Simply reload the page and open the dev tools window to test it’s working. You should see the following output in the console. That means Stimulus has connected the element to our controller.
Next, we will make a back-end request whenever the user clicks the checkbox. For this, update the task partial (in the _task.html.erb file) by adding the data attribute.
<div class="block">
  <%= form_with(model: task, class:"text-lg inline-block my-3 w-72") do |form| %>
    <%= form.check_box :completed,
                       data: {
                         id: task.id,
                         action: "tasks#toggle"
                       },
                       class: "mr-2 align-middle bg-gray-50 border-gray-300 focus:ring-3 focus:ring-blue-300 h-5 w-5 rounded checked:bg-green-500" %>
    <%= task.description %>
  <% end %>
</div>
When Rails renders this template, it spits out the following HTML.
<input data-id="1" data-action="tasks#toggle" class="mr-2 .." type="checkbox" value="1" name="task[completed]" id="task_completed">
- The
data-idattribute is not specific to Stimulus, but we are using it to pass the task id to the controller so that we can pass it to the server. - The
data-actionattribute tells Stimulus that whenever a user clicks on this checkbox, call thetogglemethod defined on the controller in thetasks_controller.jsfile.
Note: The data-action attribute must be nested inside an element that’s getting connected to the Stimulus controller. In our case, the task partial is rendered inside our div element in the index template. That’s how Stimulus knows which controller action to call.
Now add the toggle method in our tasks_controller file, which makes a JavaScript fetch call to the server. Again, Stimulus will call this method whenever the user clicks the checkbox.
import { Controller } from "@hotwired/stimulus"

export default class extends Controller {
    connect() {
        console.log(this.element)
    }

    toggle(e) {
        const id = e.target.dataset.id
        const csrfToken = document.querySelector("[name='csrf-token']").content

        fetch(`/tasks/${id}/toggle`, {
            method: 'POST', // *GET, POST, PUT, DELETE, etc.
            mode: 'cors', // no-cors, *cors, same-origin
            cache: 'no-cache', // *default, no-cache, reload, force-cache, only-if-cached
            credentials: 'same-origin', // include, *same-origin, omit
            headers: {
                'Content-Type': 'application/json',
                'X-CSRF-Token': csrfToken
            },
            body: JSON.stringify({ completed: e.target.checked }) // body data type must match "Content-Type" header
        })
          .then(response => response.json())
          .then(data => {
             alert(data.message)
           })
    }
}
There are a few points to note in the above method.
- The
togglemethod takes the event as a parameter. We can access the checkbox element from thetargetproperty of the event. - We retrieve the task
idfrom the data attribute on the element, which we set earlier. Then we pass theidin the URL. - We are passing the
csrfTokenin the header. I wrote about the Cross-Site Request Forgery vulnerability and CSRF tokens in my post Understanding Authenticity Tokens in Rails. Check it out if you're interested in learning more. - The body contains whether the checkbox was selected or not, letting the server know if the task is completed or marked incomplete.
With the front-end ready, let’s add the back-end code to handle this POST request from the browser. There are two steps to it.
Step 1: Add a route in the routes.rb file that tells the router to call the toggle action on the TasksController, whenever a POST request is made with a specific URL pattern.
Rails.application.routes.draw do
  # ...
  post "tasks/:id/toggle", to: "tasks#toggle"
end
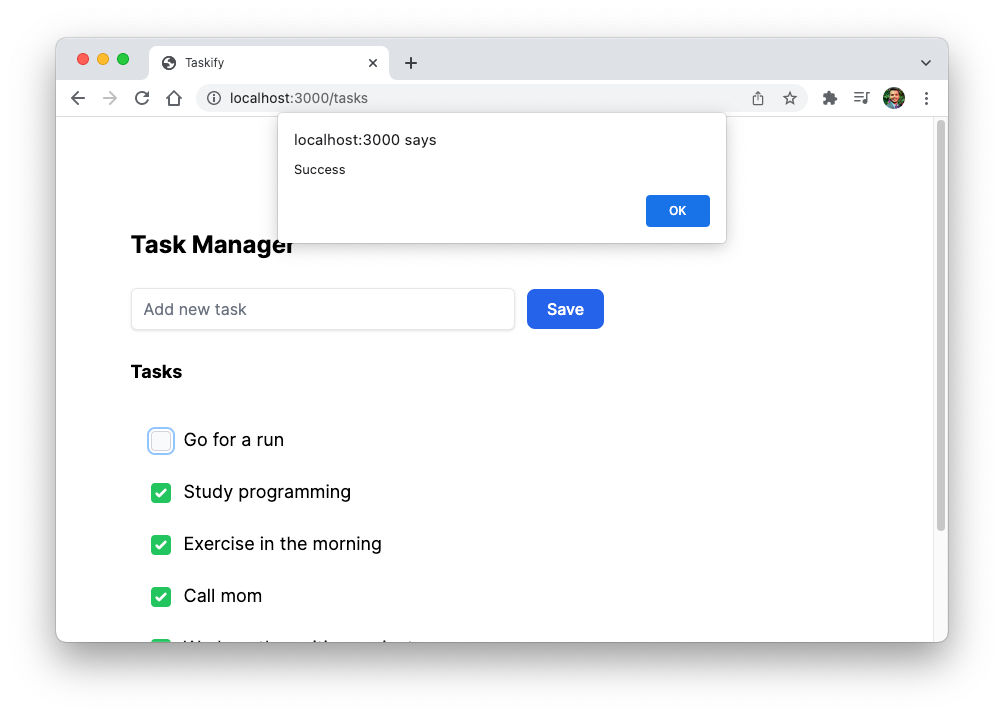
Step 2: Add the toggle method on the TasksController which finds the task using the id and updates the completed attribute. Once toggling the task, it returns the message "Success" in the JSON response.
def toggle
  @task = Task.find(params[:id])
  @task.update(completed: params[:completed])

  render json: { message: "Success" }
end
You’re all set! Go ahead and mark a few tasks complete (of course, after you’ve finished them in the real world). To make sure the changes were persisted in the database, reload the page, and you should see the completed tasks checked off.
Step 7: Edit and Delete Tasks
As the last step, we will allow the users of our task manager to edit and delete their tasks. Let’s start by adding the corresponding actions in the tasks_controller.rb file. This is standard Rails, so I won't go too deep here.
class TasksController < ApplicationController
  def edit
    @task = Task.find(params[:id])
  end

  def update
    @task = Task.find(params[:id])
    respond_to do |format|
      if @task.update(task_params)
        format.html { redirect_to tasks_url, notice: "Task was successfully updated" }
      else
        format.html { render :edit, status: :unprocessable_entity }
      end
    end
  end

  def destroy
    @task = Task.find(params[:id])
    @task.destroy
    redirect_to tasks_url, notice: "Post was successfully deleted."
  end

end
The edit action finds the task that we want to edit, and the corresponding view displays the edit form. Add the edit.html.erb file in the app/views/tasks directory with the following code.
<div>
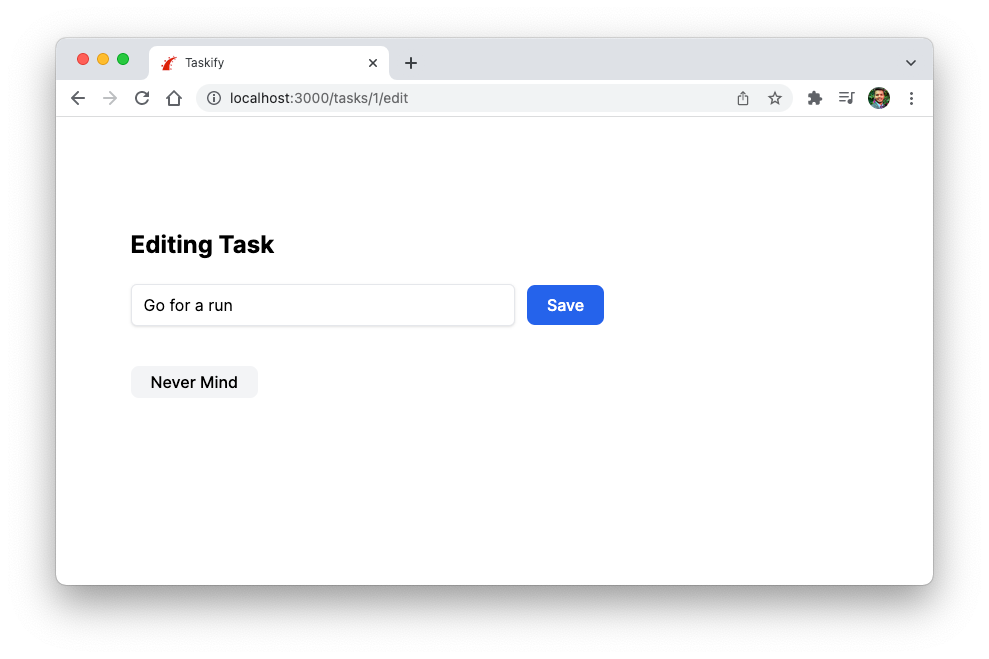
<h1 class="font-bold text-2xl mb-3">Editing Task</h1>
<div id="<%= dom_id @task %>">
<%= render "form", task: @task %>
<%= link_to "Never Mind", tasks_path, class: "btn mb-3 bg-gray-100" %>
</div>
</div>
Finally, add the edit and delete buttons next to the task, in the _task.html.erb file.
<div class="block">
  <%= form_with(model: task, class:"text-lg inline-block my-3 w-72") do |form| %>
    ...
  <% end %>

  <%= link_to "Edit", edit_task_path(task),
              class: "btn bg-gray-100"
  %>
  <div class="inline-block ml-2">
    <%= button_to "Delete", task_path(task),
                  method: :delete,
                  class: "btn bg-red-100" %>
  </div>
</div>
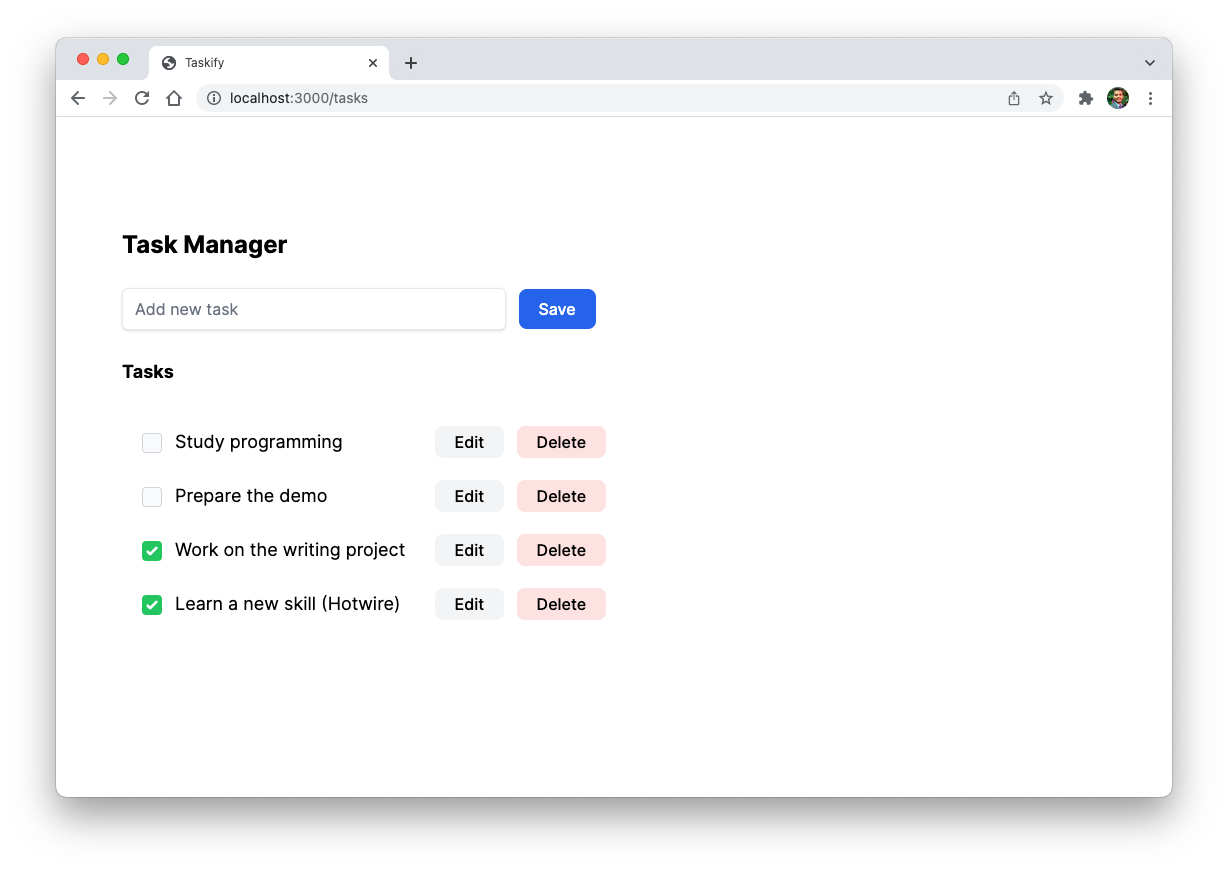
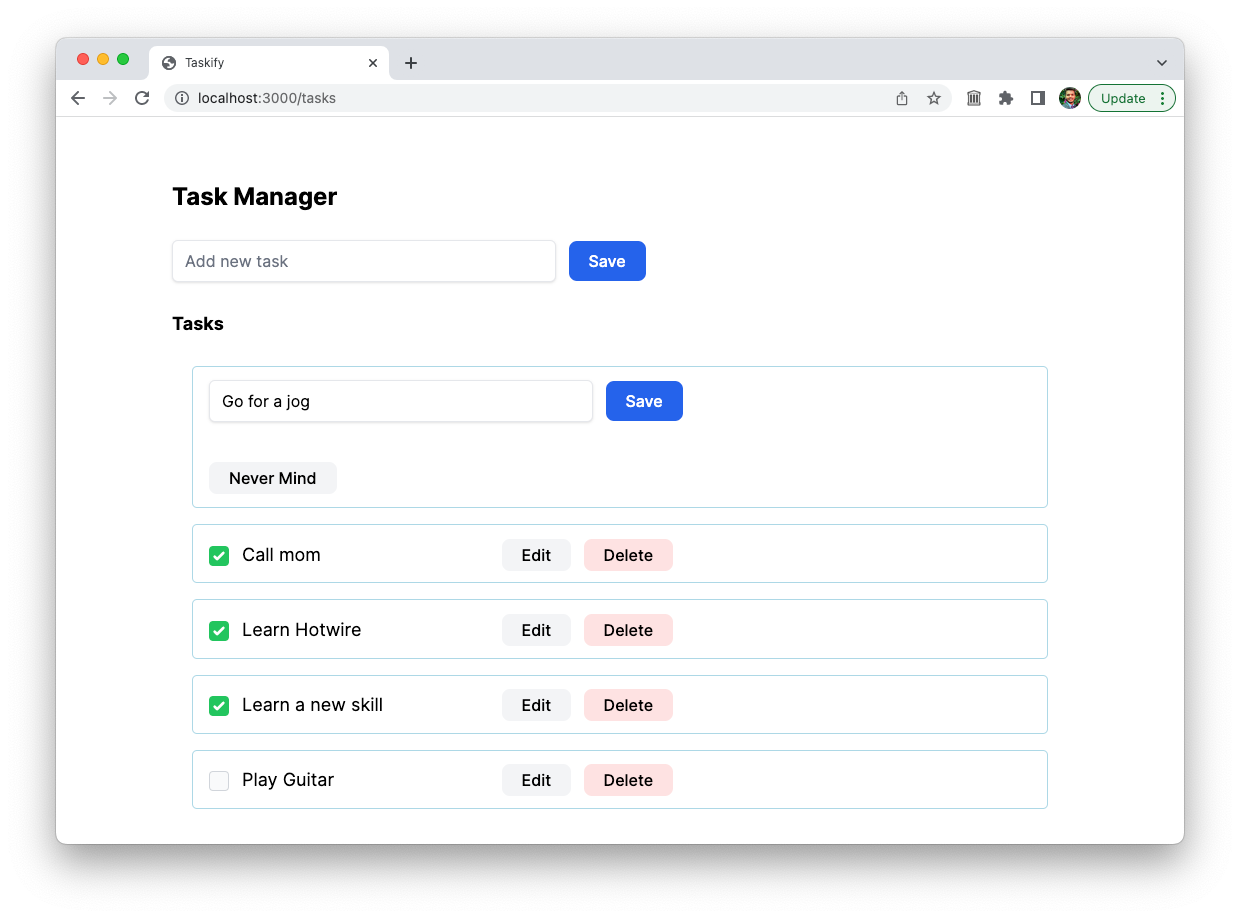
That’s it. Reload the page, and you should see our buttons to edit and delete the tasks. Clicking the Delete button should delete that task, without a full page reload.
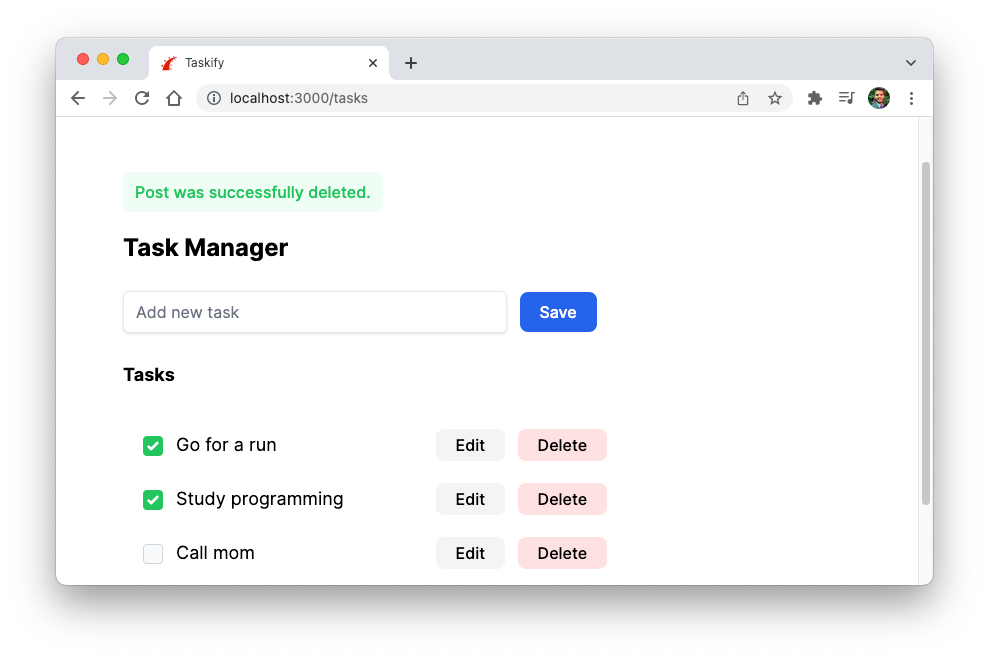
Clicking the Edit button should show you the form with the task in it. After making changes, it should redirect you to the home page. Again, without a full page reload. Turbo Drive makes the fetch request, gets the response, and replaces the DOM content.
That’s it. Congratulations, you have just implemented a fully-featured to-do list using Ruby on Rails and Hotwire frameworks.
Step 8: Introducing Turbo-Frames
So far, we've used Turbo Drive to replace the entire body of the page with the response from the server.
However, this feels very inefficient if the only thing that's changing is a small section on the web page. This was the appeal behind single-page applications, where most of the page remained as it was, only updating small sections independently.
What if you could just send the specific HTML that changed, without touching the rest of the page? The response would be much smaller, and the rest of the HTML could be easily cached, making the application even more responsive.
Turbo Frames allows us to do the exactly same thing. The only difference is, the part of the page that's updated is retrieved from the response HTML, instead of making an API call to retrieve the JSON response.
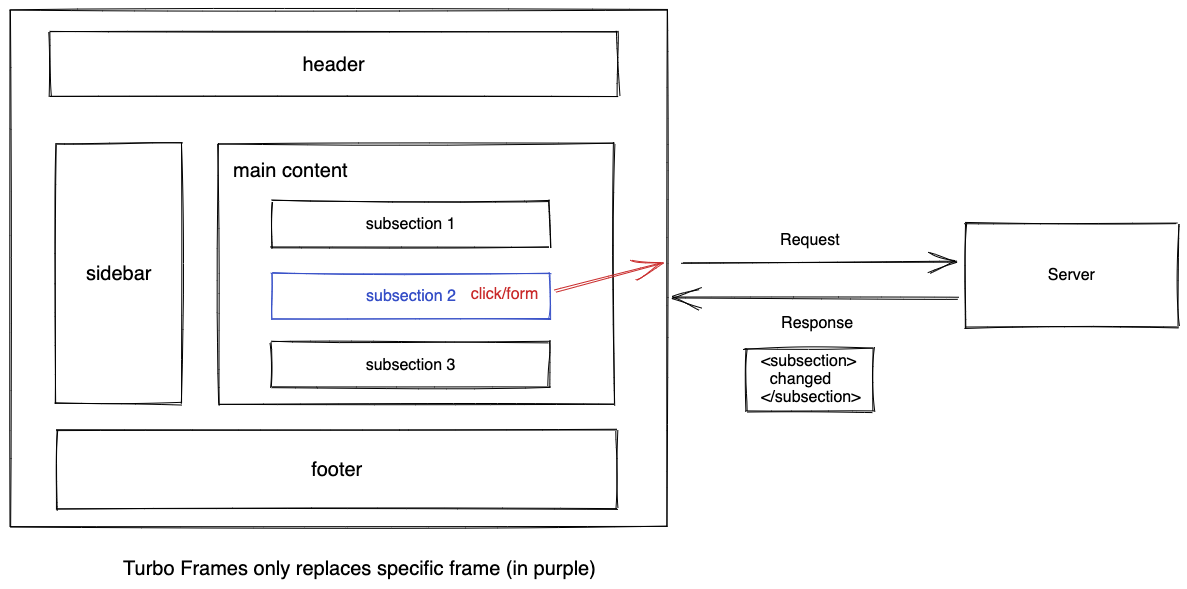
Turbo Frames allow you to dynamically update sections on the page in response to some action, such as clicking a link or submitting a form. In contrast to Turbo Drive, Turbo Frames let you contain the scope of the change, reducing the size of the HTML your server has to send.
Usually, to build the final response HTML, you compose various views or partials together. With Turbo Frames, you can place those independent segments inside <turbo-frame> elements. Turbo replaces the existing frame that matches the response and updates it dynamically. This also allows you to lazily load frames in parallel, improving the perceived performance of your web application.
A key concept to understand with Turbo Frames is that any user interaction inside a specific <turbo-frame> element is scoped within that frame. The rest of the page doesn't change or reload, unless you specifically target it.
You can make any section on your page a Turbo Frame by wrapping it inside a <turbo-frame> tag. For example:
<turbo-frame id="turbo-messages">
  <div>..
  </div>
</turbo-frame>
The server can provide a full document or just a part of it. The only condition is that the response contains the updated <turbo frame id="turbo-messages"> element. Upon receiving the response, Turbo extracts the specific frame from it and replaces the existing frame with the matching ID.
Points to note:
- Each
<turbo-frame>element must have a unique ID. Turbo uses this ID to match the content it will replace when a response arrives from the server. - A single page can contain multiple turbo frames, allowing different contexts. They can be lazy-loaded or replaced independently.
That's enough theory. Let's use a concrete example that demonstrates how useful Turbo Frames can be when used properly.
Step 9: Using Turbo-Frames for In-Place Editing
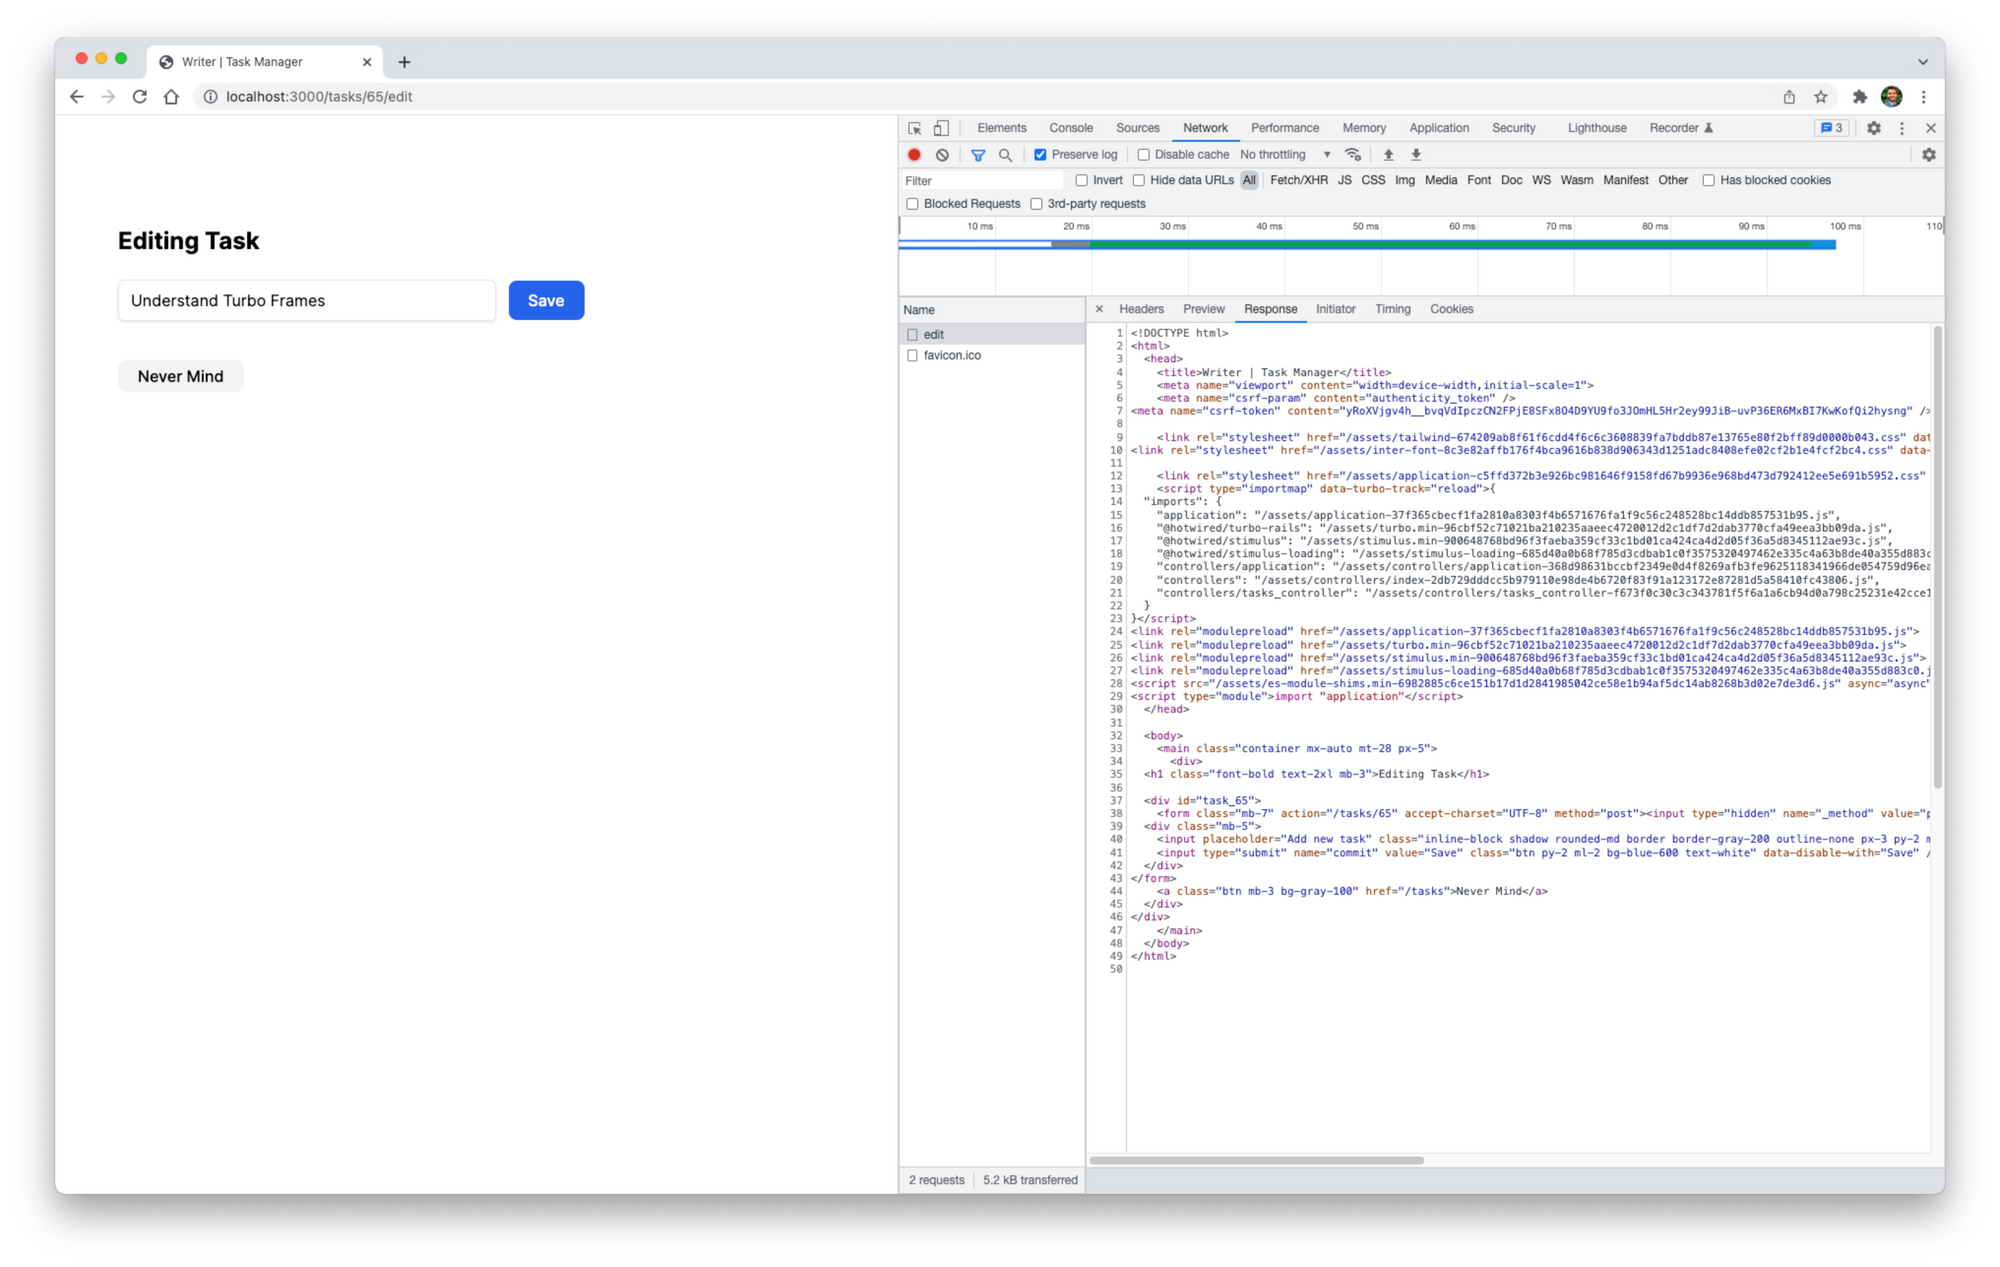
Let's try to edit a task with the DevTools' Network tab open. Notice that the server builds and sends the whole response HTML, which is about 5.2 kB. Upon receiving the response HTML, Turbo Drive extracts and replaces the body.
Let's improve this functionality by rendering the edit form in-place on the index page, instead of taking the user to a separate page. We will achieve this in three simple steps using Turbo Frames.
A) Highlight the Turbo Frames
Well, this is an optional step, but it will make understanding Turbo Frames easy. Turbo Frames are just custom HTML elements and are invisible by default. During development, it's useful to highlight them to understand what's going on.
Let's add some CSS to make them visible. Add this code in the app/assets/stylesheets/application.css file.
turbo-frame {
  border: 1px solid lightblue;
  border-radius: 5px;
  padding: 0.1em 1em;
  margin: 1em 0;
}
B) Wrap the Task in a Turbo Frame
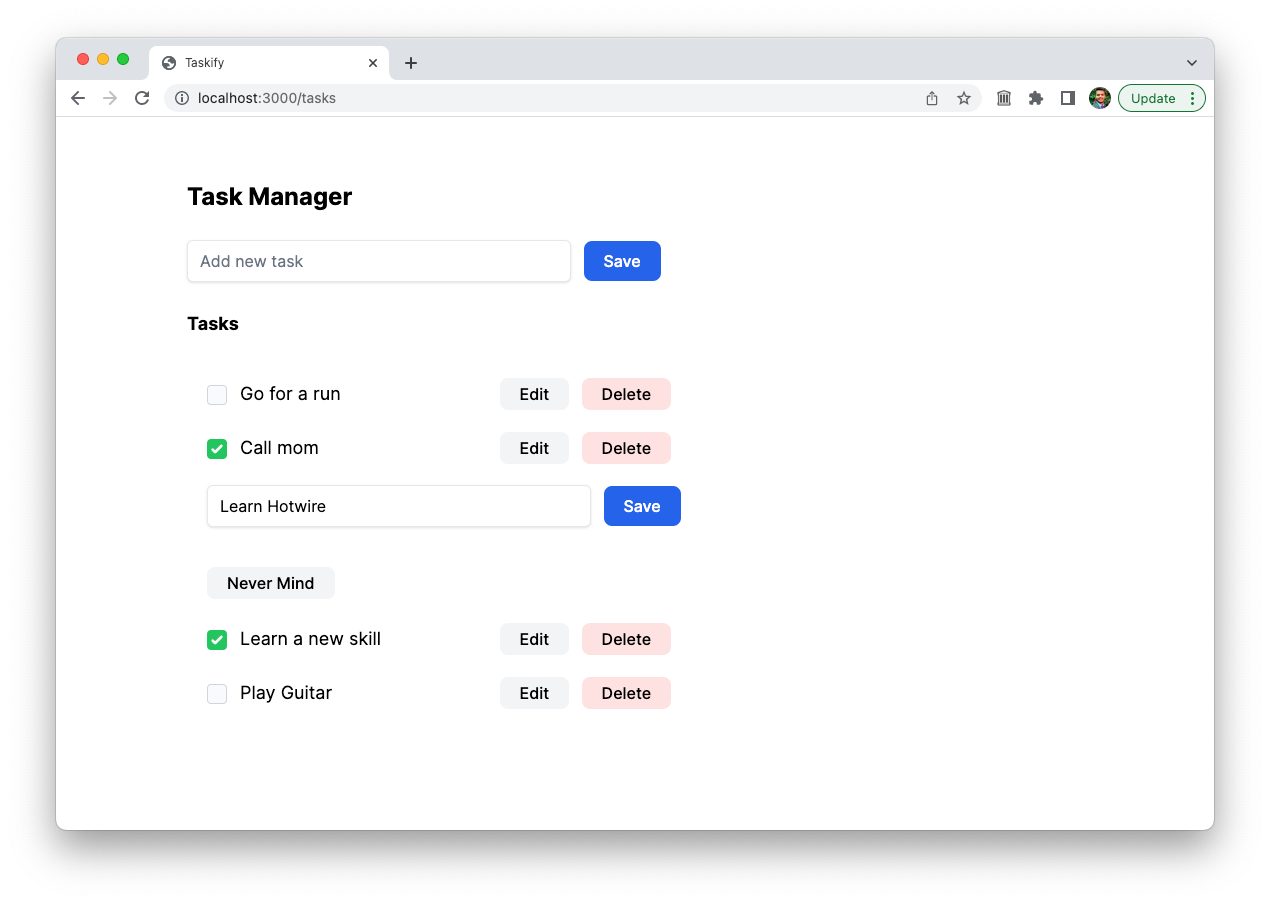
Frames are created by wrapping a segment of the page in a <turbo-frame> element. Since we want to update the task we want to edit with the form to insert the new task, let's wrap the task in a Turbo Frame element.
<turbo-frame id="<%= dom_id task %>" class="block">
  ...

  <%= link_to "Edit", edit_task_path(task), class: "btn bg-gray-100" %>

  ...
</turbo-frame>
Notice that we're also using the Rails' dom_id helper to generate a unique ID for each <turbo-frame> element. Each frame element must have a unique ID, which is used to match the content being replaced when requesting new pages from the server.
Also, note that we added class block to the frame. Since <turbo-frame> elements are custom elements, and all custom elements are displayed inline by default, we need to make sure they're displayed as block elements.
After reloading the browser, this is how it should look.

C) Wrap the Response in a Turbo Frame
This is how Turbo Frames work: any links and forms inside a frame are captured, and the frame contents are automatically updated after receiving a response.
When the link to edit the task is clicked, the response provided by /tasks/1/edit has its <turbo-frame id="task_1"> segment extracted, and the content replaces the frame from where the click originated.
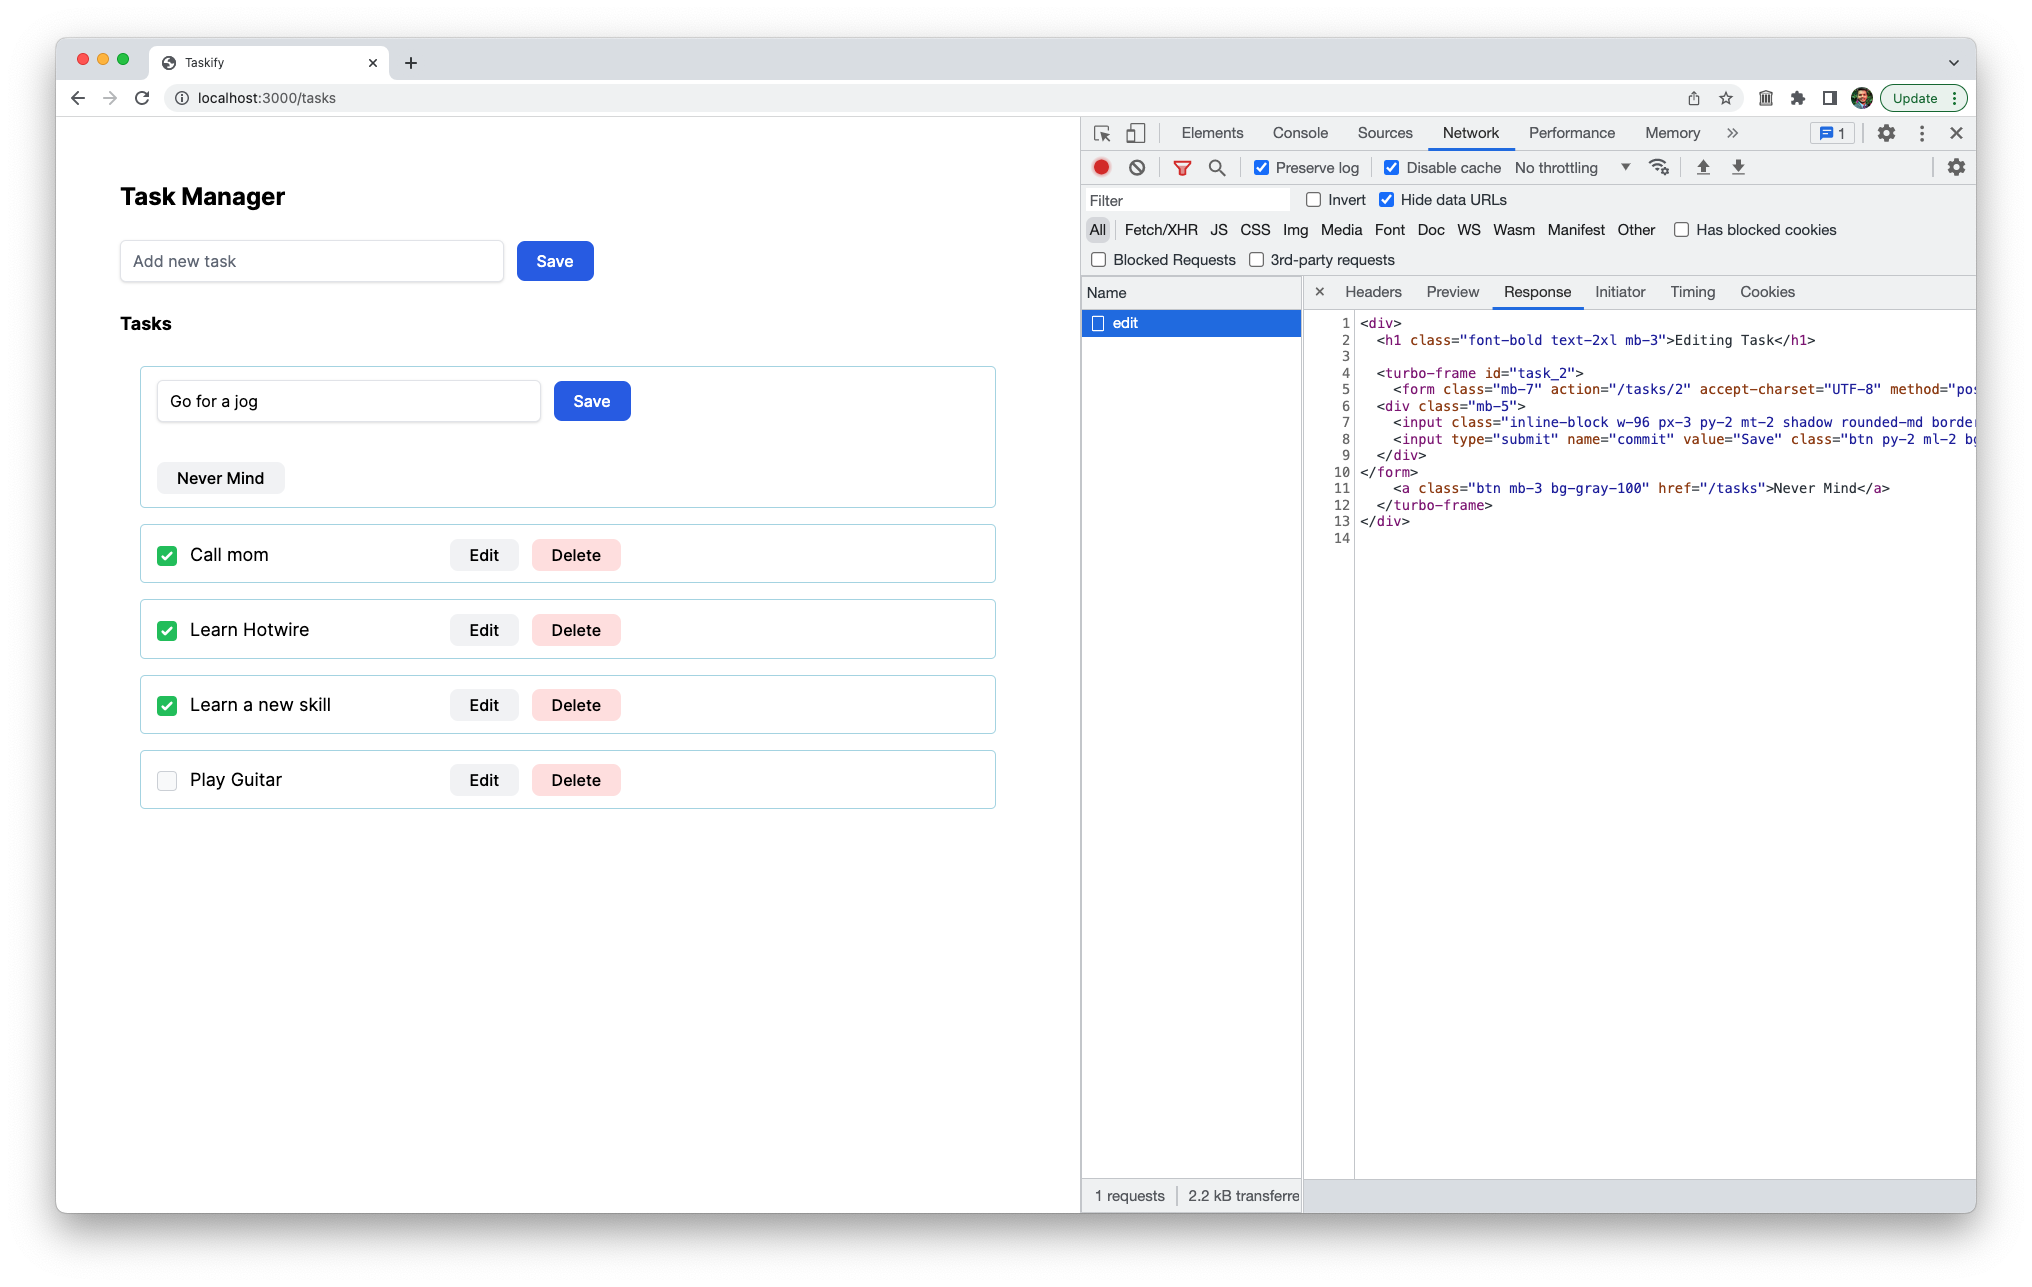
Update the edit.html.erb response by wrapping the form inside a <turbo-frame> tag.
<div>
  <h1 class="font-bold text-2xl mb-3">Editing Task</h1>

  <turbo-frame id="<%= dom_id @task %>">
    <%= render "form", task: @task %>
    <%= link_to "Never Mind", tasks_path, class: "btn mb-3 bg-gray-100" %>
  </turbo-frame>
</div>
Notice that we haven't wrapped the <h1> element inside the <turbo-frame> tag. This is because whether the server provides a full document, or just a fragment containing an updated version of the requested frame, only that particular frame will be extracted from the response to replace the existing content.
That's it. We are done. Reload the page and be prepared to be amazed.
Upon clicking the Edit button, the edit form is rendered inline, without having to redirect to a separate page.
Notice that the <h1> tag containing the text Editing Task is not showing up. This is because Turbo replaces the existing <turbo-frame> tag with the matching <turbo-frame> tag with the same ID. Everything else is ignored.
What's more, if you open the Network tab and click Edit, you will see the response is only 2.1 kB, and only contains the template, without any layout. This is because Rails being smart, sets the layout to false if it's a <turbo-frame> request. For more details, checkout the frame_request.rb file in the turbo-rails repository.
Upon editing and hitting Save or Never Mind buttons, Turbo conveniently gets the response from the server and replaces the edit form with the now updated task.
Now comment out the CSS that makes the <turbo-frame> tags visible, and our application feels even more impressive.
Note: You'll have to update the delete button as follows for it to work. See the comments for more details.
<%= button_to "Delete", task_path(task), method: :delete, data: { "turbo-frame": "_top" }, class: "btn bg-red-100" %>Conclusion: Why Hotwire?
So that concludes our project. Hopefully, you read through the article and have built a nice to-do list for yourself.
Now you might be wondering if Hotwire is just yet another shiny, new tool and if it's worth it for you to learn yet another JavaScript library. I get it. I was skeptical at first, too, but changed my mind after playing with it just for a few days.
Using Hotwire gives you fast first-load pages, and allows you to render templates on the server, where you have access to your whole domain model. It is a simple and more productive development experience in Ruby on Rails, without sacrificing any of the speed or responsiveness associated with traditional single-page applications.
After using it professionally for almost a year, I am a big fan of the Hotwire way of building web apps, and don't want to go back to the complexity of front-end JavaScript frameworks like React.
I hope you give it a try.
Wow, that was a really long article. I hope it was helpful and you learned something new. If you're stuck at any step or have any questions, feel free to reach out to me by email. I'd be happy to help.
Please subscribe to my blog below if you'd like to receive future articles directly in your email. If you're already a subscriber, thank you.
If you enjoyed this article, you might like these, too.
Akshay Khot Akshay Khot
 Akshay Khot
 Akshay Khot